Before I send my Passion For Fashion garment off to the model, I thought I would show you what went into constructing it. I'm sure you remember that the band Kiss was my inspiration. When I sew for a contest like this, I call it down and dirty sewing, seams aren't finished. It's about getting maximum impact in a short amount of time.
The pants were a snap. I had started to drape the pants when our mentor came over and told me that we had a McCalls tights pattern that we were welcome to use. Score!! These took me all of about 30 minutes to make. Here's a link to the pattern,
http://mccallpattern.mccall.com/m6173-products-11288.php?page_id=114 If you want to make a pair of tights, get this pattern. It's a good one. Just a little heads up though, my model's hip measurement is 37" and I cut the small pattern.
The waist is elastic. I serged the elastic to the edge and then zigzagged it down.
The bra top took a little bit of time. I was able to tear the fabric and get this great edge that I placed along the top edge. The seam that you see over the bust was draped, so it has a bit of a curve to it.
To achieve a snug fit under the bust,
I added a piece of elastic to the opposite side, between the two layers of fabric and zigzagged it in place. So there is no stitching line on the front side.
You can see the raw edge a little better in the picture below. For the straps, I attached grommets and then thread a tube of the pleather through them and stitched the tube together.
The jacket.
The bodice of the jacket is just a draped bodice which follows the lines of the dress form.
It's exactly like the first draping project you do in design school. Nothing at all complicated.
I added the stud tape at the waist to give it a little definition. You can find this tape at
Soutache here in Chicago. I'm sure she would send it to you as well, if you are interested in having some.
The fur collar is 1/4 yard of fur. When you only have $100.00 to spend, you have to be very careful with your money. The fur piece is nothing but a tube. You can see my hand in the opening at the bottom of the piece.
From the back you cannot see a seam and that is because of how I sewed the fur.
The fur should not have a seam allowance. Place the two pieces together, push the fur to the inside and then zigzag along the edge. On the right side, the fur will fall into place and the seam will not show.
The skirt of the jacket is a full circle skirt. You can find the tutorial I did on circular skirts
here.
You may have noticed that the back of the skirt is quite full. To add this fullness, once the circular skirt was drafted, I added about 6" by extending the skirt as you see below. This will be a total of 12" because this is on the fold. This area will then be gathered before the skirt is sewn to the top of the jacket.
The skirt is also shorter in the front and longer in the back. I waited until I had the skirt on the jacket to cut down the skirt.
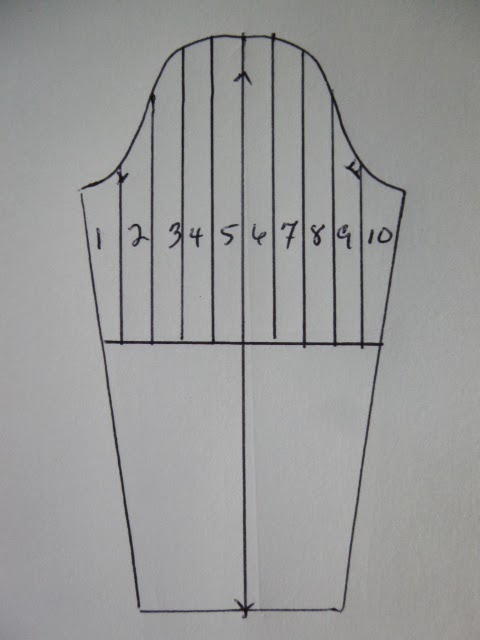
The sleeves were just a quick method of drafting a leg-o-mutton sleeve. I will show you how to draft this sleeve this coming Saturday for Sleeves On Saturday. It's really quite easy.
Wow, I wish I could have put this together as quickly as I've done this post ;) If you have any questions, be sure to let me know and I'll do my best to answer them.