f
Showing posts with label Leg-O-Mutton Sleeve. Show all posts

Saturday, November 16, 2013

Sleeves On Saturdays

The Leg-O-Mutton Sleeve Revisited
I received a question from Chris in Indiana yesterday about the leg-o-mutton sleeve. She attended the 
American Sewing Expo in Novi back in September and got to have an in person look at the outfit I did for the contest. Here's a picture of the two of us together. Such a beautiful smile :) Chris is a fireball when it comes to drafting a number of the sleeves I've posted. She just loves taking on the challenge and has had great success with her endeavors.
Chris loved the outfit I did for the contest and especially the sleeve.
Her question was about doing the sleeve in a knit fabric. I thought that many of you might like to see some real life examples of the sleeve made up in knits.
The sleeve above and the sleeve below are the exact same sleeve with one difference, the amount that was added to the cap. In the post I did here,  http://www.rhondabuss.blogspot.com/2013/10/sleeves-on-saturdays.html, I told you that the rule of thumb is that for every 3" that the cap is spread, add 1" to the cap. The sleeve in the above picture is made from a knit that holds its shape and doesn't have a lot of drape. If I had added the rule of thumb amount to the cap, it would really stand up rather high. This sleeve only has 1 1/2" added to the cap. I wear this top as a base layer under my ski sweater. I like that at the end of the day, when I take my sweater off, I have something on that is rather feminine and a little unexpected.
You can see that the top below has LOTS of drape. It is also a knit, but since it is so drapey, it will not hold a stand at the top of the sleeve. The top below has the rule of thumb amount added to the top of the sleeve.
You can get a little better idea of just how full the top of the sleeve is in the picture below. This sleeve has 3" added to the cap.
So, the rule of thumb is just a guideline. How much you add to the cap of the sleeve depends on the look you are going for and the drape of the fabric. If I had wanted an even drapier sleeve, I could have added even more to the cap of the second top.
This is a great sleeve to add to many outfits and one that you can have lots of fun with.
Happy Saturday Everyone!
Rhonda


Share this PostPin ThisShare on TumblrShare on Google PlusEmail This

Saturday, October 26, 2013

Sleeves On Saturdays

It has been far too long since I've done a sleeve post. I still have my Dream Weaver sleeve to post. You may remember that it's the one that actually came to me in a dream. Pretty bad when you're dreaming of sleeves :) I wanted to finish the top before  post it, and it should be easily finished by next Saturday.
Today's sleeve is really just a continuation of the post I did on Thursday,  http://www.rhondabuss.blogspot.com/2013/10/the-passion-for-fashion-outfit-my-dirty.html. In the event that you would like to draft a Leg-O-Mutton Sleeve, this is a simple and very fast version of the drafting process. One thing to note, the fabric that I used for this jacket is a stretch pleather. Gives the look of leather at a much reduced cost. Remember, I only had $100.00 to spend, so leather was not in my budget. Typically, this sleeve would be drafted from a fitted sleeve with an elbow dart, but, because I was using a stretch fabric, I could get around this by just tapering the sleeve to give it the fit I wanted.
Don't think that this sleeve is just for wedding gowns or out of date prom dresses. Here are a couple of examples that I found that I thought were especially pretty.
 So pretty paired with a cowl neckline. Notice that the sleeve is pleated rather than gathered.
To draft this sleeve, begin with the basic sleeve pattern.
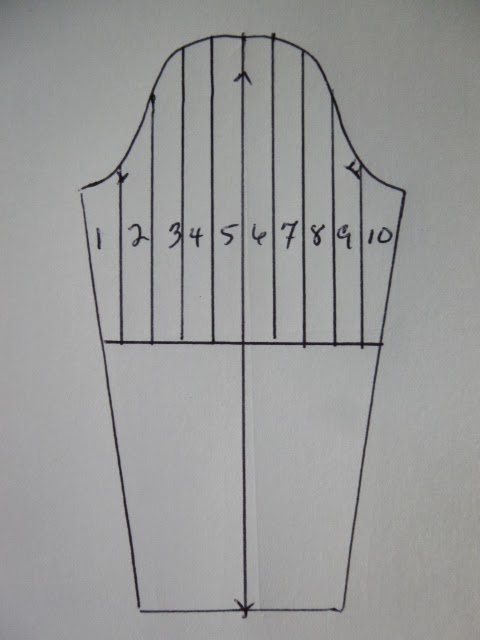
 Determine where you would like the fullness to end, usually at the approximate elbow area.
Divide the cap as you see below. Be sure to number the the sections.
Begin by cutting down the middle and then across to the sides.
 Cut between each section and spread. Of course the more you spread, the fuller the cap will be.
The rule of thumb for adding height to the sleeve is for every 3" that were spread, raise the cap 1" The sleeve I did for this jacket was spread 9" and I raised the cap 3".
 The final pattern.
I lengthened my sleeve as I wanted it to be longer at the wrist. I also tapered the sleeve so that it would fit snugly around the wrist. The last thing that I did was to add the point. It is not exactly in the middle of the sleeve.
 You can see the point in the picture below.
This is not the best picture, just one that I took before the fashion show, but you can see the sleeve fairly well.
Hope this helps if you ever want to give this sleeve a try.
Rhonda


Share this PostPin ThisShare on TumblrShare on Google PlusEmail This