f

Monday, December 31, 2018

Christmas Traditions, Christmas Creatures

We all have traditions, especially when it comes to celebrations. When my husband and I married, a BIG bunch of years ago, I began giving him a ski related ornament (he LOVES to ski) for Christmas. Each year I would try and find something truly special. And, each year as I would lay out all of his ornaments, I would ask which was his favorite. Without thinking, he would always choose a crazy little skier that had been made with clothespins. I will admit that it is very cute. But...it had been given to him by an old girlfriend, and I felt the need to trump her gift. I finally realized that what he loved was the quirky, handmade aspect of the ornament. So began a new tradition.

I love seeds of any kind, and have quite the collection. Whenever I am out in the woods, my eyes are always on the lookout for something I don't have, or have never seen before. I like to take the seeds and make balls that I then decorate with them during the fall.  

The first ornament I made was the crazy guy with the red hat in the picture below. Since I already have quite the collection of seeds and seed pods, he came together very easily. When my husband opened the package, he was elated! I had finally trumped the clothespin ornament :) And so began a new tradition. 


Below is the gang. What's interesting to me is that although they are all made from basically the same thing, they all are so very different. What I also find interesting is how they come together, it's as if they tell me what they want to be. 


This year, I ended up doing 2. 

This guy holds a lot of memories for me. He's quite large. Before my aunt died, she and I were out for a drive. I saw all of these huge pinecones laying in a yard. I jumped out of the car and raced over to pick up a bunch. My aunt was yelling at me to "get-back-in-the-car!!!" Obviously, I didn't listen ;) The big "horns" on his head, and his skis were found at a roadside park where my husband and I had stopped to walk the dogs while on a road trip. I don't know if he is a moose, or a cow, or what. I guess he's just a creature :) 


When my husband opened up his package and saw this guy, he was so very happy. He could not believe how it all came together. 


This is the second little guy. I had found the pinecone that I used for his head while on a hike in Colorado. What struck me was how the cone had opened. The back had stayed together and the top portion had formed kind of a nose. The branch was also still attached and I saw it to be a neck. 
  

Here are the 2 together. You can see how large the moose/cow guy is. They will now happily join the rest of the gang :)


Each year as I pull out my seeds and seed pods, I always feel that there is nothing new that I will be able to create. And then, as if by magic, a new little creature comes to life. 

I was asked by the owner of an art shop in Colorado to create a line of these creatures. What an honor it was to have someone see the art of the creatures, but I declined. They are one of a kind little creatures, all made with love :)


Share this PostPin ThisShare on TumblrShare on Google PlusEmail This

Sunday, December 30, 2018

Sunday Night Reflections


Share this PostPin ThisShare on TumblrShare on Google PlusEmail This

Sunday Brunch/Biscuits Part 2

Treasures. What really constitutes a treasure? For some, it's money. Others value jewels. And then, there are things. All of these can be gone in the blink of an eye, but what can never be taken from us are our memories. Now, true enough, some suffer from debilitating diseases that can destroy the mind, and wipe away memories. But, even then, I think the mind can have moments of remembering. When my uncle was suffering with Alzheimer's, I found it interesting that he could have beautiful moments when he remembered something. Maybe it was just the touch of my aunt's hand. The far away look in his eyes would change, and for a moment, I could see that there was recognition. It was like a small gift to my aunt especially, but I think to him as well.

I thought I would share a few "treasures." In my last biscuit post, I talked about a tiny iron skillet that was mine. When I would visit with my grandmother, this little skillet was for my biscuits, and mine only. In the picture below, you see that tiny little skillet, my grandmother's biscuit cutter, and my great-great grandmother's wooden biscuit bowl. I used it this morning :) My great-great grandmother died at the age of 96 in 1960, so the bowl is quite old. 
  

My grandmother made biscuits each and every morning for breakfast. Her recipe is simple, nothing as elaborate as the Joanna Gaines biscuits. They can be made in a flash. After making the Joanna Gaines biscuits, which were good, but quite a bit of work, I decided to make up my grandmother's recipe and compare. Maybe it's because this is what I grew up eating, but I like my grandmother's the best :)

As I said, the recipe is simple, 
Begin by pouring oil into a cast iron skillet and heating until piping hot. At the same time, preheat the oven to 450 degrees. Mix 1 cup of self-rising flour, 1/2 teaspoon of baking soda, and 1 tablespoon of oil.


Mix in just shy of 1 cup of buttermilk(between 3/4 and 1 cup). Mix the batter together and place on a floured surface. 

Pat out the dough and cut into 2" or so sized biscuits. Do not over work the dough.


Place the biscuits in the hot oil. Quickly turn the biscuit over, coating both sides with the oil.

Place in oven and bake until golden brown. Approximately 15 minutes.


What I love about placing the biscuits in the hot oil is that you get a crunchy bottom. Yum!


Elvera's Biscuits

ingredients;
1 cup self-rising flour
1/2 teaspoon baking soda
1 tablespoon oil
1 scant cup buttermilk
Extra oil for cast iron skillet

directions;
Preheat oven to 450 degrees.
Heat at least 2 tablespoons of oil in cast iron skillet until skillet is piping hot. 
Combine flour, baking soda, oil and buttermilk. Place on a floured surface. Sprinkle flour over the top of the dough and pat dough out to about 1/2" thick. Do not over work the dough. 
Cut into 2" biscuits.
Place in hot oil and turn over, coating both sides of the biscuit. Place the skillet in preheated oven. Bake for approximately 15 minutes, or until biscuits have browned.
Serve piping hot!
_____________________________

I have the sweetest memories of my grandmother. I loved how she would sing as she worked. Even under the worst circumstances, she always had a song in her heart.  

As this year draws to  a close, I hope that you will find some lovely memories to reflect upon, and maybe even a sweet song in your heart.
Rhonda


Share this PostPin ThisShare on TumblrShare on Google PlusEmail This

Tuesday, December 18, 2018

New Pattern Release With So Many Options

 As I was getting the pictures together to share the new Sumekko dress pattern from Pattern Union, it occurred to me that this would be a fabulous group project. Sewing can be such an isolating craft. I know that when I have the opportunity to get together with a group of friends and have a creativity day, it's just the best!

I had the opportunity to test out the Sumekko dress pattern, and I loved it. In case you missed it, you can see it HERE.

What's unique about this pattern is the stenciling option. There are 4 stencils that you can choose from, all included in the stencil pattern.


The first 3 options are shown on Sarah. 


I love the thistle version pictured below on Sue from Fadanista


Sarah has made the pattern available with options. If you would like the Sumekko dress without the option of the stencils, you can find it HERE. The pattern offers the option of darts or no darts.


If you have a pattern that you love and would just like the stencil pattern, you can find that HERE

If you would like the Sumekko dress pattern as well as the stencils, you can find that HERE

Sarah just released a new pattern, and what a great pattern for those of us who need a last minute gift! It's the Sobi Belt. A fun little belt that is reversible...and quite forgiving. So if you don't have the waist measurement of your gift recipient, no problem!!!


As soon as I get mine made, I will post it. I can't wait to makeup a few. It's also a wonderful way to use up some scraps that are just too lovely to throw out. 

The dress and belt are available as PDF patterns. I so LOVE PDF patterns. No driving to the store, no waiting for a package to arrive, just print and go! I call it instant gratification :) Now, if only the sewing part could be as fast!

Hope you have fun with the pattern!
  Rhonda


Share this PostPin ThisShare on TumblrShare on Google PlusEmail This

Monday, December 17, 2018

Celebrating with Creativity

My birthday was last Wednesday. Rather than a party, I opted for a quiet celebration. 

Two years ago, I took a nuno felting class at Esther's Place. Rather than make a specific project, we created yardage that we could then make into anything we would like. I created the piece below. My intention had been to make a skirt. Once I got the piece together, I just couldn't bear to cut into it.


So, I wear it as a shawl, or a wrap skirt as you see above. 


Once I completed the first piece, I then understood the process a bit more, and thought that I would like to create another. I bought all of my supplies, brought them home where they proceeded to sit in the bag for the last two years :/

Back in November, I said, "enough!" I called Natasha who owns Esther's Place and asked if I could come in for a private lesson. The day that worked best for both of us was the day before my birthday. Fabulous! It was the best way to celebrate, creating, doing something that I love :)

The piece that I made is below. My intention had been to create a piece that I would then make into a sheath dress with a sheer yoke. I think it will still be a dress with a sheer yoke, but not so sure about the sheath aspect. I love the wispy, lighter than air aspect, so I think I want something that has some movement.   


The day was so much fun. I am now addicted to nuno felting. Now that I have done two pieces, I feel that I can tackle a project on my own. So, I am planning my next piece!

I just have to share this with you!!! The American Sewing Guild Chicago Chapter had their annual holiday party on Saturday. It was so much fun. They are celebrating 10 years. Amazing! There was a gift for everyone. Little needle cases had been made with the ASG logo fabric.


Inside is a small pocket that hold a needle threader and stick on thimbles.


Within the pages are various sizes of Japanese needles and some lovely pins. 

  
A special cake was made for the celebration. Made by one of the members. The entire cake is/was edible. We devoured it!!! The top half was chocolate, and the bottom half was vanilla. Such a treat. 


This neighborhood group began as a dream. The founding members felt that there had to be others who are sewing away in high rise apartments. They were right! I'm not sure of the membership number, but it's a great group of ladies, and the membership continues to grow. I would encourage you to possibly start a group if one is not in your area. The payoff of friendship and comradery is worth the effort! 

Have a wonderful day!
Rhonda


Share this PostPin ThisShare on TumblrShare on Google PlusEmail This

Sunday, December 16, 2018

Sunday Night Reflections


Share this PostPin ThisShare on TumblrShare on Google PlusEmail This

Sunday Brunch/Biscuits

One of my most precious memories is making biscuits in the morning with my grandmother. She would make up the dough, roll it out on waxed paper, and then I would get to cut the biscuits with her biscuit cutter. All the little leftover pieces went into my very own tiny little cast iron skillet. Of course, those little bits and pieces of biscuits were the best! In her simple way, my grandmother taught me to love to cook.


Earlier this year, Joanna Gaines of Fixer Upper fame, published a cookbook, Magnolia Table. I was curious, and happy when I found out that our library had a copy.  


There are lots of lovely recipes, but not enough of what I like to eat for me to purchase the book. I was curious about her biscuit recipe, so I decided to give it a try. You can find the recipe HERE.

It begins with 4 cups of self-rising flour, 2 tablespoons of baking powder, 1 teaspoon baking soda and 1 1/2 cups of butter. The butter is cut into the flour as if you were making pie dough.    


2 eggs and 1 1/2 cups of buttermilk are than poured into the flour mixture. 


The eggs and buttermilk are then mixed until a sticky dough is formed. At this point, the dough is to be covered and placed in the refrigerator for at least 30 minutes, and can be left overnight. It is important that you don't skip the refrigerator time as it does make a difference in the dough.
 

Once the dough has sat, it is then turned out onto a floured surface. No rolling, just mashed down with your hands, and then cut into biscuits. You can see my grandmother's biscuit cutter below :)


Rather than greasing a pan, parchment paper should be used. The biscuits are to touch each other in the pan. They are then brushed with 1 beaten egg, and 1 tablespoon of buttermilk.


Place the biscuits in a 400 degree oven for 15 minutes, or until golden brown. They really are quite lovely when they come out of the oven.


The recipe makes up a LOT of biscuits. But, the nice thing is that they can be frozen and used later. I frozen mine and will be baking them for Christmas. One job completed!!! I placed the biscuits on waxed paper, and then wrapped them in foil for freezing.  


The result is a very flaky biscuit. I poured honey over mine :)


My husband thought the biscuits were great. Maybe I'm just nostalgic, but I think I like my grandmother's biscuits a bit more. I haven't made them in quite a while, but I will this week. If I'm right, look for the recipe next week. 

Enjoy!
Rhonda


Share this PostPin ThisShare on TumblrShare on Google PlusEmail This

Tuesday, December 11, 2018

Books That Inspire

I have always loved to read. As a child, it was a means of escape, and a place to dream. My taste in what I read has changed. Maybe the correct term would be matured. I especially love books that teach me something, or enlighten me.

Today I am sharing 2 books that I especially enjoyed. The first, Lincoln the Unknown by Dale Carnegie is one that I have read a number  of times. The second is the Autobiography of Benjamin Franklin. Both I found to be very inspirational. 

If you decide to give either, or both a try, I hope that you will enjoy them as much as I did. As for Lincoln the Unknown, I read it about every 2 to 3 years, and enjoy it each and every time. I have such a profound respect for President Lincoln. A perfect man, no. But a man who can still inspire us to reach for all that we were destined to be.


Share this PostPin ThisShare on TumblrShare on Google PlusEmail This

Monday, December 10, 2018

A New Gown for a Gala/A New Pattern From Pattern Union

The highlight of the holiday season, for me, is the American Opera Society of Chicago's Holiday Gala. It's held at The Fortnightly, and it is simply an enchanting evening. Pictured below is Whitney Morrison, an incredibly lovely, and talented woman. So...you know what that means :), I needed a new dress. Yeah right...I "needed" a new dress ;)   


About a month ago, I shared with you 2 free patterns from Pattern Union, the Maisie Dress, and the Phoebe Jumpsuit. That prompted me to begin following Sarah on Instagram. She posted a request for pattern testers for a new pattern, and I thought, "oh, why not?" She promptly sent me a note with all the particulars, and the time frame worked for me, so I agreed to test the pattern.

The pattern is the Sumekko Dress. I was surprised to see that it only has 1 seam. How great is that?!! It has the option of no darts, 2 darts, or a more fitted version with 4 darts, so you can easily customize the fit.  


Another special aspect of the dress is that it comes with 4 fabulous stencils. I haven't had a chance to try them out yet, but I can't wait to get my hands dirty :) My only difficulty is choosing which one to try first. 

Since I "needed" a new dress for the gala, and I also needed to get my test pattern made up, I decided to combine the 2.


I loved how the dress has a slight racer back.


The pattern is intended for a jersey knit. I used a knit, but a much heavier knit. I wanted something with sparkle, and this piece has lots of sparkle, and I already had it in my "collection." To give it just a bit more pizzazz, I added the beaded motifs to the neckline, and then added the rhinestones as well. I had both, so nothing was purchased. But, I really wished that I had some larger rhinestones to mix in with the smaller. This is something I am planning to add.   


If I had worn flat shoes, the hem length would have been fine, but I wanted to wear heels, so I added the lace to the bottom of the dress. I loved how it just seemed to finish it off.   


The pattern has not been released yet, but Sarah is planning to release it later this week. You can find Pattern Union HERE

The pattern has so many possibilities. You can make it a casual garment, or dress it up for a gala event. Then, there's the opportunity to really make it special with the 4 stencils. You could cut it off and make a tank as well as a knee length dress. So, a pattern that is well worth adding to your collection.

Have a wonderful day!
Hope you have time to do something fun. I'm on my way to see the dentist :/ 
 Rhonda


Share this PostPin ThisShare on TumblrShare on Google PlusEmail This

Sunday, December 9, 2018

Sunday Night Reflections

What If...

World War I began in July of 1914. Many thought the war would be over in a very short period of time, but it raged on and thousands lost their lives. Some asked for a truce on Christmas day in 1914. Those in charge declined. But nonetheless, a miracle happened, guns were laid aside and opposing sides came together, offering gifts of food, cigarettes and cigars. It is believed that even a game of soccer was played. As the day drew to a close, the soldiers returned to their foxholes and once again picked up their guns and the war raged on.


What if they had refused to fight? What if the soldiers who came together had laid down their guns and refused to go on?

What about our present day wars, the wars that we fight in our daily lives? What are our weapons? They are jealousy, prejudices, anger, unforgiveness, spite, hate. What if we were to lay these guns aside? 
What if?


Share this PostPin ThisShare on TumblrShare on Google PlusEmail This

The Perfect Accompaniment to Soup/Cheese Crackers

If you had known me as a child, you would NEVER have guessed that I would ultimately become a vegetable lovin' gal. After my mother had helped my plate, I would carefully scrape the vegetables to the side so that they would not contaminate the other items that I loved. And yes, I felt that strongly about some of the vegetables that I was forced to eat, especially something called succotash as well as asparagus. 

It would rarely happen, but on occasion, bread and butter would be on the table, mostly when we had guests. I so loved having guests as I could help my own plate, bypass the vegetables that I hated, and load up on bread and butter. And that's exactly why we didn't get bread and butter on a regular basis. 
  
Just before Thanksgiving, I had a dinner party and decided to make up some cheese crackers as an appetizer. When dinner began, a friend of mine was helping her plate, and I noticed her take a very small portion of a dish that I knew she loved. I asked, "are you sure that's all you want?" She sheepishly replied, "I ate too many of the cheese crackers!!!" As everyone left, they all went home with a package of cheese crackers. I wonder if they even made it home ;)

I actually posted this recipe 4 years ago! Wow, where does time go?!! Since things get lost in the pages of a blog, and since my friends were so very pleased with the cheese crackers, and since this is the season of parties and special meals, I thought I would post it again. What I especially love about this recipe is that the crackers are made up ahead of time. They can actually sit in the refrigerator for a week, or more. When you are ready for a few, pull them out of the refrigerator, slice a few, pop them in the oven and you'll have fresh, warm crackers for yourself and or guests.


Aunt Clara's Cheese Crackers

ingredients;
2 sticks of butter at room temperature
8 oz.of sharp cheddar cheese grated
3 cups of flour
1 teaspoon of cayenne pepper(optional)
1 teaspoon of salt


directions;
Mix all ingredients together with hands. Once combined, divide mixture into 2 equal portions. Roll into long logs about 1" in diameter.
Roll into plastic wrap and place in refrigerator for at least 2 hours.
When ready to serve, preheat oven to 325 degrees. Cut into 1/8" rounds. Place on ungreased cookie sheet. Bake for 15 minutes, or until golden brown. Serve warm.

Makes 8 dozen.
The dough can also be frozen. 

A dear friend gave me this recipe. It was one that her Aunt Clara would make for special occasions. Although Aunt Clara is no longer with us, I think it is fitting that Aunt Clara continues to receive credit :)

Enjoy!
Rhonda


Share this PostPin ThisShare on TumblrShare on Google PlusEmail This

Tuesday, December 4, 2018

Write It Down, Get It Done

December is turning out to be the month of getting things done. I love it!

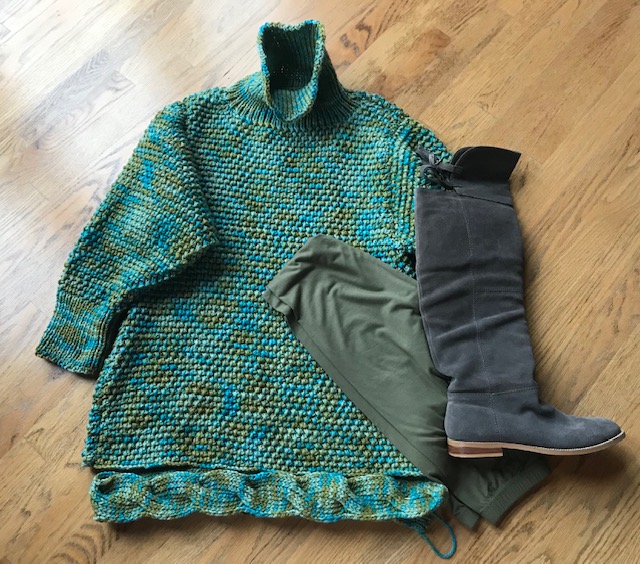
Quite a while ago, I began the sweater below. It's from a Rowan magazine, and it's a Martin Storey pattern. It appealed to me because I love anything with a cable, I loved the oversized aspect of the sweater, and too, I had yarn that would work. 


In progress. 


I finally finished the knitting!!! For those of you who knit, you know that the knitting is one thing, the putting it all together is another :/


The sweater is basically together, all I have to do is a bit of steaming, and then sew the cable to the hem. I have a pair of wool tights that I made using my own pattern, and a fabulous pair of over the knee boots. The boots look more gray in the picture. They are gray, but with a green undertone. I plan to get the piece finished up today, so pictures of me in the sweater will follow soon. 

The yarn I used as you can see in one of the above pictures is from Lorna's Laces. The warehouse is opened maybe 2 or 3 times a year, and small batches of mill end yarns are sold. I was fortunate enough to be able to purchase an entire bag of this yarn, so I had plenty for the sweater. While the ply and stitch count is the same as the Rowan yarn, this yarn is a little less drapey, so my collar doesn't come down as far on my shoulders, which I really like as it turns out, so all's well that ends well :)   
  

Quite a few years ago, I came across THIS pattern for knitted and felted clogs from Fiber Trends. They are so easy to knit, so I ended up knitting a boat load of them as gifts for friends and family. They LOVED them!!! In fact, all have been worn completely out, and all have been asking for more. 


My husband is one that has been asking for a new pair. I finally got a new pair done for his birthday. You should have seen the look on his face when he opened the gift :)

Even if you are a novice knitter, these are quite easy to make.
They are huge once the knitting is completed. 


You will need access to a regular agitating washing machine. The slippers are put in and allowed to agitate in hot water. It takes about 45 minutes. When they come out of the machine, they are fuzzy as you see below, but beautifully shaped. 


 A bit of a hair cut, and the slippers look fabulous. 


Now to get them off my husband's feet so I can sew on the leather soles. The leather soles are a must if you have tile, or hardwood floors. The slippers can be, well, quite slippery! You can find the leather soles HERE

When I finally get a project completed that I have allowed to languish, I always wonder why I didn't get to it sooner. A question I have yet to figure out. 
But, I will say this...
Back in January of this year, I made a list of things I wanted to accomplish in 2018. While there are things I have not accomplished, I have been amazed with all that I have. The trick was to make attainable goals. I listed things as small tasks that would end up as big projects being accomplished. 
Last year, I read the book, Write It Down, Make it Happen. It has had a profound affect on me. I highly recommend it to anyone who has dreams and goals that they would like to achieve, and yet has a difficult time making it all happen.

This year, I am adding a little something to my daily routine,


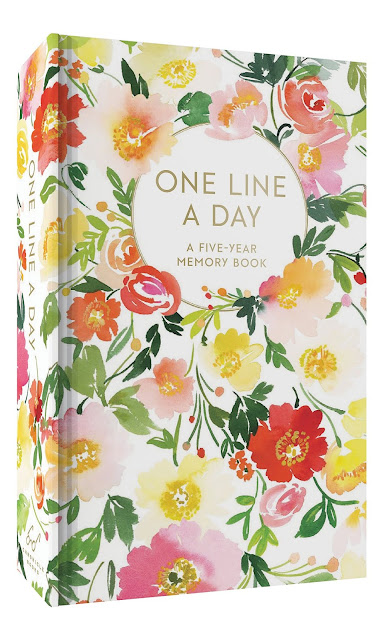
It's a simple daily task of recording what was important about your day. I love it! So often we have accomplishments that just become part of the fog of our past. Once I receive my book, I'll share a little more. Look for it on one of my book review videos :)

Have a wonderful day, and I hope it includes getting something done that will make you feel fabulous!
Rhonda  


Share this PostPin ThisShare on TumblrShare on Google PlusEmail This