f
Showing posts with label Master Sewing and Design Professional Certificate Program. Show all posts

Wednesday, August 2, 2017

As If By Magic

We've all heard of the so called 'overnight sensation.' Those with that title would be the first to say that if years of hard work are considered overnight, then okay, but it didn't seem like overnight to them! 

And then we've also heard that it all came together, "as if by magic." Again, there's a tremendous amount of work that must take place in order for the outcome to seem "magical."

What brings about magic? Determination, dedication, and a continuing pursuit of knowledge are key components that work together to bring about a magical outcome. The Association of Sewing and Design Professionals is an organization that is devoted to offering a wealth of knowledge, and resources for anyone who desires to enhance their skills as a sewist. Each year they make all of this possible by offering exceptional classes at their conference. This year, the conference is entitled...


2017 ANNUAL EDUCATIONAL CONFERENCE

ORLANDO, FLORIDA  

OCTOBER 19-22, 2017

WYNDHAM LAKE BUENA VISTA RESORT  


The registration opened July 1 to members, but as of yesterday, August 1, 2017, registration has been opened the public. Here's your opportunity to discover what the organization has to offer without making a commitment to join.  

For those who have thought about the possibility of going through the process of becoming certified as a Master Sewing and Design Professional, there are a number of classes that are designed to help you along. 
Below are the classes that are being offered at this year's conference.


Susan Widawski 
Apparel Design By Flat Pattern Method


Robin Mazzola
Social Media
Branding, Planning and Reaching Your Customers


Mary McCarthy
Be a Great Sewing Teacher


Louise Cutting
Know Your Half Measurements and How To Use Them


Carla Mathis
The Triumph of Individual Style


Dianne Frewer
No Fear of Numbers with Excel


Helen Haughey
Standards of Quality
**Chic Sheath For All Body Types 


Sarah Veblen
Being Profitable with Custom and Alteration Work
**Nuance of Bodice Fitting

The classes above marked with the double ** which are being offered by Helen Haughey and Sarah Veblen are post conference classes and each class is a day and a half long. 

You can find more information on the conference on the ASDP website HERE. On the right hand side of the page, you will see a link to the conference where you can discover more and download a registration form.

There's 1 more class that is being offered, a 2 day intensive workshop on Adobe Illustrator and Photoshop which I will be taking. Can't wait!!! 

It would be fun to see you there :)



Share this PostPin ThisShare on TumblrShare on Google PlusEmail This

Thursday, March 10, 2016

Master Sewing and Design Certification/Piped Pockets

If by chance you are thinking about taking the plunge and working toward Master Sewing And Design Certification, I wanted to let you know that most of the techniques that I'm sharing with you at this point are not a part of the requirements. For instance, you will need to demonstrate a welt pocket, but it does not need to be a piped welt pocket. I think that the tutorials offer great information, and hopefully help you in projects that you take on. Something that you might want to think about doing is getting a notebook, doing the samples for yourself and building your own sample notebook. A notebook like this can be a wonderful resource. I made one when I was in school...lots of years ago :)...and I loved my notebook. Sadly, we had a flood and I lost the book, but I am now building a new one. For those of you who teach, this is a great resource to have and to share.  
Today I wanted to do a welt pocket with purchased piping. This is a fun technique to have in your sewing arsenal as you can customize your garments with a purchased piece of piping, or even create your own. Since the piping that I'm using is quite small, it could also be used to make bound buttonholes, and the process would be basically the same. 

Piped Welt Pockets

The fabric that I'm using is a piece of raw silk.  
Depending upon where you want to place your pocket, and the type of fabric that you are using, you may want to back the pocket opening with a piece of interfacing. I used a piece of cotton fusible interfacing. Just be sure that the interfacing corresponds to the fabric.
As we did with the triangle buttonhole, marking is very important. Notice here that I have marked the center of my pocket and the ends. Hand basting is best for this step.  
The size of the piping may not be as wide as the tape that is holding the piping, so be sure to measure the width of the piping before you begin. My piping is approximately 1/8" wide. 
Once I determine the width of my piping, I then marked the outside edge of the pocket. 
Align the piping with the basted edge of the pocket.
Stitch down the piping, starting and stopping at the marked ends of the pocket. I stitched the piping to the fabric on the right side, but it's easier to see the stitching from the back side.
Once the piping has been stitched to the garment, clip the pocket open, using the center basted line as a guideline.  
Stop clipping about a half inch away from the ends, and clip a small v shape as you see below.
Turn the edges of the piping to the inside of the pocket opening and press.
Now that the piping is in place, we will add the pocket bag to the inside. Begin by stitching the pocket facing to the lower piped edge. Once the pocket facing has been stitched to the lower edge of the piping, simply fold it down and press.
Now stitch the top pocket to the top edge of the piping.
Once the top pocket and the pocket facing have been stitched in place, it's time to sew the pocket together.
Turn the pocket over and make sure that the piping is aligned and you are happy with how it all looks. Maybe give it a little light steam, depending upon your fabric. 
Fold back the sides and reveal the small triangle that was cut at the ends of the pocket.  
Beginning on one side, stitch across the triangle, right at the edge of the pocket and continue stitching around the pocket to the other side and stitch across the opposite triangle.  
All I need to do now is take the basting stitches out of my fabric and my pocket is complete. 
If by chance you are using a piece of piping that is encased in fabric, you will probably want to pull a little of the piping out from the edge so that you don't have to sew over the piping. A larger piece of piping could also leave a bump on the right side of the garment which you would not want. The piping that I used is quite small and basically pressed flat, so it is not an issue. 

The Pattern Review Weekend will be May 13th and 14th, here in Chicago. If by chance you are coming, be sure to check out Chicago Fabric Yarn and Button located at 208 South Wabash. The shop is not a large shop, but if you don't mind digging, you can find some wonderful treasures. The piping that I used for this demonstration was purchased there. This is our only downtown fabric store. All the other stores are either in the suburbs, or will require a ride on the elevated train. 

I hope this tutorial will inspire you to be creative with your pockets and buttonholes. Think about building a sample notebook. I have lots of tutorials coming up and I think you will enjoy having the notebook as a reference.
Happy Sewing,
Rhonda


Share this PostPin ThisShare on TumblrShare on Google PlusEmail This

Tuesday, March 1, 2016

Master Sewing and Design Certification/Drafting and Pockets

Whether you are sewing for yourself, or for clients, having the ability to make changes, even simple changes to a pattern is a skill that will come in quite handy.
When I initially made the Clover Pant from Colette Patterns for Sew News, I was pleasantly surprised by how much I liked the pattern. The pants are a slim fit, with a side seam zipper. 
I decided that I would like to use the pattern again, but I wanted side pockets and a fly zipper. 
To do this, we will only need the front of the pant. 
Measure over from the side seam 2 1/2" at the waistline. 
At the side seam notch, fold an angled line from the notch to the mark we made at 2 1/2" from the side seam.
From the folded edge, at the waistline, measure in 3 1/2" and place a mark. 
From the side seam notch, measure down 4", and place a mark. 
Now draw in the shape of the pocket as you see below. 
When I do drafting exercises, I like to use white paper. You can purchase a roll at your local office supply store. The cost is minimal. My roll is a fairly good size roll and I paid about $5.00 for it.
Take a piece of paper and slide it under your pattern. copy off the shape of the pocket. Be sure to transfer the grainline.
Add 1/4" to the angled line of your pocket for seam allowance. I incorporated seam allowance into the measurements that I gave for the rest of the pocket. This will be the pocket facing.
Now, fold the angled edge of the side seam back and trace off the pocket once again. Be sure to transfer the grainline. This will be the pocket insert.
To cut out the pants, fold the angled line back in and pin in place. When cutting the pants, BE SURE TO REMEMBER TO ADD 1/4" SEAM ALLOWANCE  TO THE ANGLED LINE.
Cut 2 pocket facings and 2 pocket inserts.  

Now that we have the pockets drafted and cut, it's time to put them together. 
Begin by matching the pocket facing to the front pant, right sides together. Stitch along the 1/4" seam line.   
Open out the pocket facing and edge stitch along the side of the pocket facing.
As you can see below, the seam allowance should be laying towards the pocket facing. 
Fold the pocket facing back inside the pant and stitch along the edge. We have now stitched the pocket opening edge 3 times. All of the stitching will help to keep the pocket opening edge from stretching when putting your hands in the pockets.  
You can see the stitched edge a little better in the picture below. 
Now lay the pocket insert over the pocket facing and stitch the 2 together. Finish the seam however you choose.
Now we have the pocket assembled. 
Before we begin to insert the zipper, we need to baste the pocket  to the pant leg along the side seam and the waist line.   
We now have a pocket where there was never one before!!!
Adding a pocket to a pencil skirt or a pair of pants is so easy to do. This is a basic pocket, but once you've mastered a simple pocket, you can do anything.
Hope you enjoy adding to pockets to all of your pants and skirts!
Rhonda


Share this PostPin ThisShare on TumblrShare on Google PlusEmail This

Tuesday, February 23, 2016

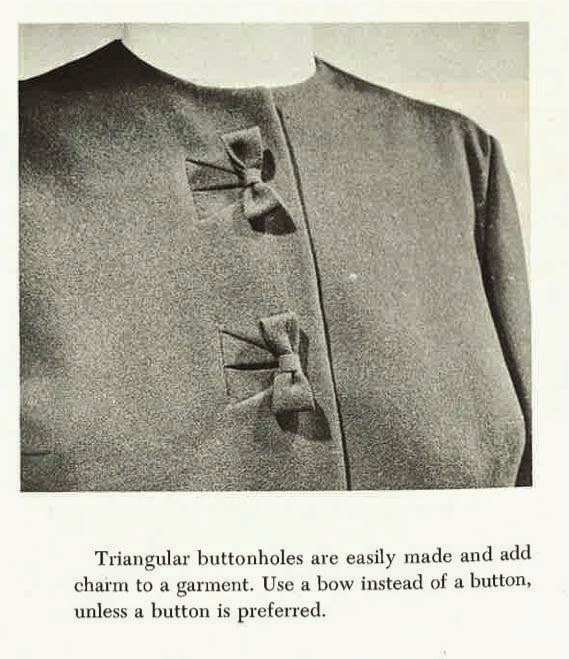
Master Sewing and Design Certification/Making a Triangle Shaped Bound Buttonhole

For the Master Sewing and Design Certification Program, you must demonstrate that you know how to make a bound buttonhole. Rather than walk you through making a typical bound buttonhole, I decided to make it a little more fun and show you how to make a triangular shaped bound buttonhole. They are fun to make, and surprisingly easy. Once you master making the buttonhole, there are lots of design possibilities.

I did a video tutorial for you on how to make a triangle shaped bound buttonhole. I hope that it explains the process and that you have great success in making your own. If you would like for me to demonstrate a typical bound buttonhole, I'll be happy to do so. Just let me know in the comment section. They really aren't as scary as we've been lead to believe.
Enjoy the video!


For those of you who may be wondering about the Master Sewing and Design Certification Program, you can read about it HERE.


Share this PostPin ThisShare on TumblrShare on Google PlusEmail This

Tuesday, February 9, 2016

Master Sewing And Design Certification/Building A Better Waistband

When I have the opportunity to visit Houston, I love to hit the The Guild Shop. What a fabulous place to shop. I always find a treasure...well, to be honest, quite a few treasures. In fact, the last time I was in Houston, I ended up with an extra bag to carry home. Next week I'll share a glorious bias number that I can't wait to remake. But today, I wanted to share a beautifully finished waistband on a Louis Feraud pencil skirt. 
What initially grabbed my interest was the fabric of this skirt. It's a lovely silk, woven into a basket weave pattern. The skirt is a little too big, but a quick alteration will fix that. 

 The darts were not stitched down, but just pressed in place.
Rather than a hook closure, this skirt is fastened with a button. It's obviously cheaper and quicker to do. I prefer the stitched hook method that I shared with you a few weeks ago. 
The lining is not stitched to the zipper, just turned back and stitched. Again, not my preferred method.
So here's how the waistband, lining and skirt were stitched together. The waistband was made and laid against the skirt, then the lining was laid on top. All were stitched at the same time and then the seam was serged. Not couture, but clean and easy. 
Once the waistband and lining have been attached to the body of the skirt, the waistband is held in place by stitching in the ditch, which is the seam between the waistband and the skirt.
On the opposite side, the lining was extended to match the waistband extension. The lining was actually extended further, look closely and you'll see that the extended area is folded back and stitched. All in all, it was extended approximately 1 1/2" past the waistband extension.   
The lining is not stitched to the zipper, with this application, it would be impossible. The center back seam is shaped, similar to the shaping that would be done for a back pleat. 
This waistband was not cut in 1 continuous piece, but in 3 pieces. This makes alterations a quite a bit easier, but takes a little more time in construction.
I like how the waistband and lining were attached to the skirt. I'm not a big fan of how the lining was treated, but it's an option that you might want to experiment with. 

For the Master Sewing and Design Certification Program, you will need to demonstrate 3  types of waistbands,
1. On-grain waistband
2. Elastic casing waistband
3. Contoured/Faced waistband
The above waistband would be considered an on-grain waistband. The positive side of this waistband is that it holds it's shape. The down side is that since it is cut on the straight of grain, it is not the most comfortable waistband to wear. The most comfortable waistband would be probably be the elastic waistband, but typically not the most attractive. The contoured waistband sits beautifully on the waist and is quite comfortable. 
I'll talk more about waistbands in the coming weeks. 

In the meantime, if you live in Houston, or take a trip to Houston, by all means, stop by The Guild Shop. I know you'll find a few treasures :) 


Share this PostPin ThisShare on TumblrShare on Google PlusEmail This