It has been far too long since I've done a sleeve post. I still have my Dream Weaver sleeve to post. You may remember that it's the one that actually came to me in a dream. Pretty bad when you're dreaming of sleeves :) I wanted to finish the top before post it, and it should be easily finished by next Saturday.
Today's sleeve is really just a continuation of the post I did on Thursday,
http://www.rhondabuss.blogspot.com/2013/10/the-passion-for-fashion-outfit-my-dirty.html. In the event that you would like to draft a Leg-O-Mutton Sleeve, this is a simple and very fast version of the drafting process. One thing to note, the fabric that I used for this jacket is a stretch pleather. Gives the look of leather at a much reduced cost. Remember, I only had $100.00 to spend, so leather was not in my budget. Typically, this sleeve would be drafted from a fitted sleeve with an elbow dart, but, because I was using a stretch fabric, I could get around this by just tapering the sleeve to give it the fit I wanted.
Don't think that this sleeve is just for wedding gowns or out of date prom dresses. Here are a couple of examples that I found that I thought were especially pretty.
So pretty paired with a cowl neckline. Notice that the sleeve is pleated rather than gathered.
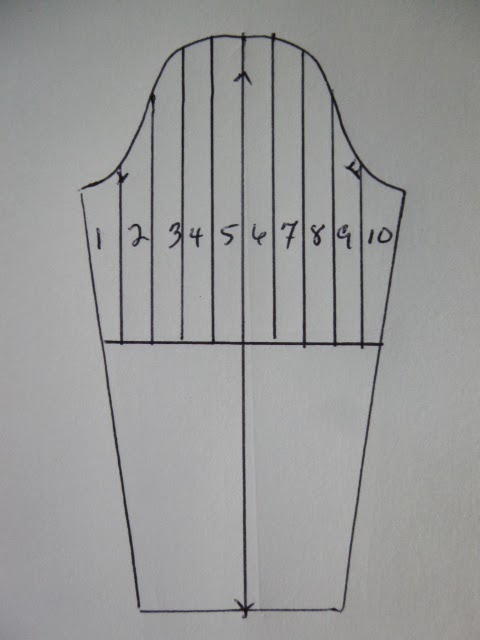
To draft this sleeve, begin with the basic sleeve pattern.
Determine where you would like the fullness to end, usually at the approximate elbow area.
Divide the cap as you see below. Be sure to number the the sections.
Begin by cutting down the middle and then across to the sides.
Cut between each section and spread. Of course the more you spread, the fuller the cap will be.
The rule of thumb for adding height to the sleeve is for every 3" that were spread, raise the cap 1" The sleeve I did for this jacket was spread 9" and I raised the cap 3".
The final pattern.
I lengthened my sleeve as I wanted it to be longer at the wrist. I also tapered the sleeve so that it would fit snugly around the wrist. The last thing that I did was to add the point. It is not exactly in the middle of the sleeve.
You can see the point in the picture below.
This is not the best picture, just one that I took before the fashion show, but you can see the sleeve fairly well.
Hope this helps if you ever want to give this sleeve a try.
Rhonda


VERY interesting! Love the sleeve. Where can we find all your other "Saturday" sleeves. I would like to make printouts and keep them all in a file. I had no idea you had only $100 to spend. You are a very brave lady!
ReplyDeleteHugs, Joy
Hi Joy, You can find all of my sleeve posts on my Pinterest Sleeve board here, http://www.pinterest.com/sewbussted/sleeves-on-saturdays/
DeleteA fabulous sleeve, Rhonda! Though I certainly remember it from wedding dresses in the 80s. :) Your pleather outfit is wonderful!!
ReplyDeleteI love the Leg-O-Mutton, one of my favorites.
ReplyDeleteYou make everything look so easy. How many inches beyond the sleeves pattern did you go? I see the sleeve cap extending above the pattern, how much extra length do you add to get the nice, full sleeve cap?
Thanks Becki. I added 3" to the cap of the sleeve.
DeleteWe sure missed you last week in the Threads ASDP Sleeves challenge! My dress (which was a finalist) has a sort-of leg-of-mutton sleeve - with a cowl top. Now that the winners have been chosen, I'll be posting photos and a blog post about that dress. Inspiration from you was a big part of my decision to follow through on submitting an entry, so thank you, Rhonda!
ReplyDeleteWhat a lovely compliment! I'm so happy that I encouraged you to submit a design. That's just wonderful. Can't wait to see what you did.There was just a little too much on my plate this year, but I plan to be there next year!
DeleteVery cool sleeve! Thank you for the drafting information!
ReplyDelete