
If you aren't on Instagram, I strongly encourage you to open an account!!! The inspiration is incredible!!!
For the month of March, Sam of Fruglisama, and Ruan of The Yorkshire Sew Girl hosted a challenge, make up a dress with a free pattern, and use something from your stash. Okay, easy enough. As I thought about the free pattern that I would like to use, there are millions!!!!, I decided to use 1 of my own free patterns. Why not?!! After all, I've invested a lot of time and energy into my Fabulous Free Pattern Friday series.
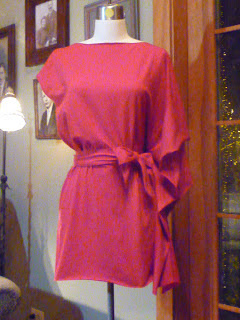
The tunic/top below was actually done 10 years ago :/ Amazing! But, it's still great all these years later. I called it The Flutter Top as the draped side flutters when you walk :) You can find the free instructions HERE.


A while back, Cennetta Burwell of The Mahogany Stylist and I teamed up to make cargo pants. We had so much fun!!! And then the added benefit...we got new pants!!!
We have both enjoyed our cargo pants so much that we decided to team up again and do not only a new pair of cargo pants, but a cargo jacket as well. We chose the Kelly Anorak from Closet Core Patterns.


Over on Instagram, Sewover 50 has a little challenge going for the month of March entitled, #SO50PATTERNMIXING
When I read about the challenge, I thought that it would be a lot of fun to participate. A while back, I found this fun little dress at the resale shop. I absolutely loved the mix of patterns, and the overall design.


Rhonda
One of the best things about being able to sew is being able to create a truly unique garment. A few years ago, I went to the Lincoln Park Zoo Ball in Chicago. It is an absolutely spectacular event, and they raise huge amounts of money for the zoo. I think it's 1 of only 3 zoos in the United States that's still free. Anyway, I was shocked that evening as 4, yes 4!!! women had on the exact same gown. Talk about horror of horrors!!! Well, in the overall scope of things, if this is your worst horror, it really isn't all that bad ;), but I'm sure those ladies were not happy :/
I purchased the fun faces in the dark fabric that I used for the skirt below some time ago from Mood Fabrics. Once I had the fabric, I thought it would make a fun skirt. I can't remember how much I purchased, but it wasn't a lot, so I ended up piecing it a tiny bit on the side seam at the waist. Who's going to ever see that, right?!! The piecing ended up disappearing into the folds of the gathers, so no one will ever be the wiser...except you!!!


When I sat down to do my writing this morning, I tore the page off my daily calendar and saw that it's International Women's Day. For some, the day will mean nothing. For others, it's a day to participate in a march. For me, it's a day to reflect, and to think about the women who came before me. None of them wrote a great piece of literature, found a cure for a disease, or held a political office. But, they were heroes in their own right. I wrote the piece below in 2012, the morning before I went to vote. I hope that you will enjoy it.


