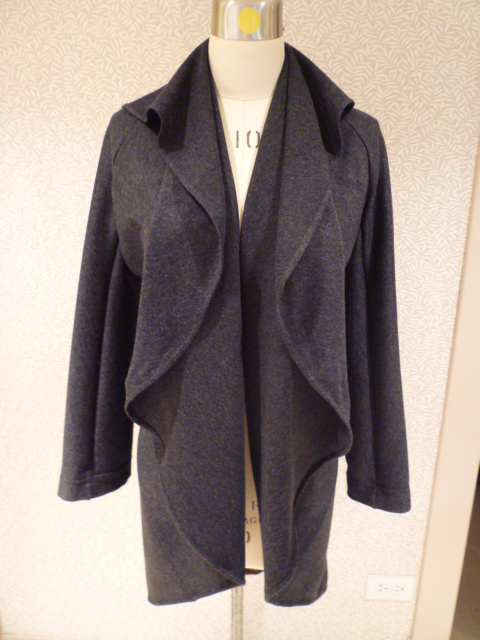
I feel like it has been such a long time since I've done a FFPF post. But it was only two weeks ago as I missed last Friday due to the fact that I was trying to get my garment finished for the Passion For Fashion contest. I have been wiped out all week, but I'm back with a fun little jacket. Believe it or not, it's just one rectangle, one half circle and one triangle. I'm calling it the
Geometric Dreams Jacket
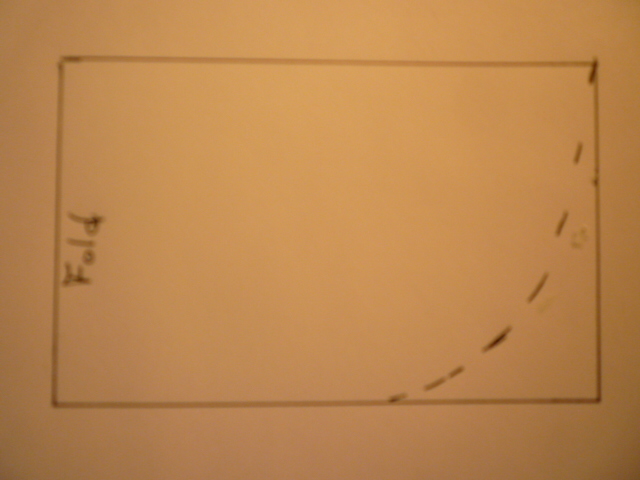
This piece needs to be made with a knit. It does not need to be a two-way stretch knit, but it should have a nice stretch in the crosswise grain. The first measurement that you will need is the measurement around your arm.


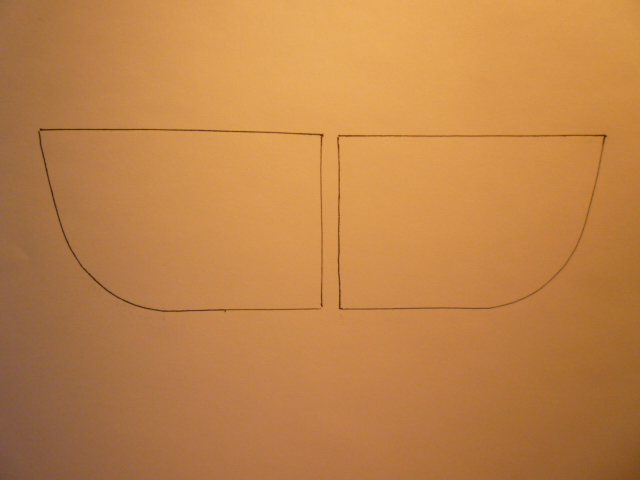
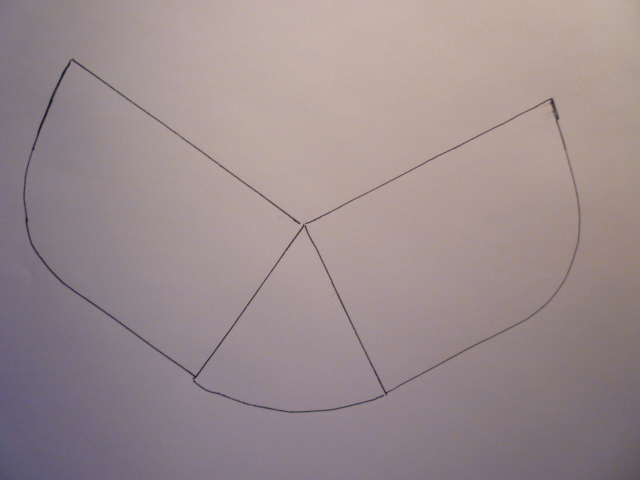
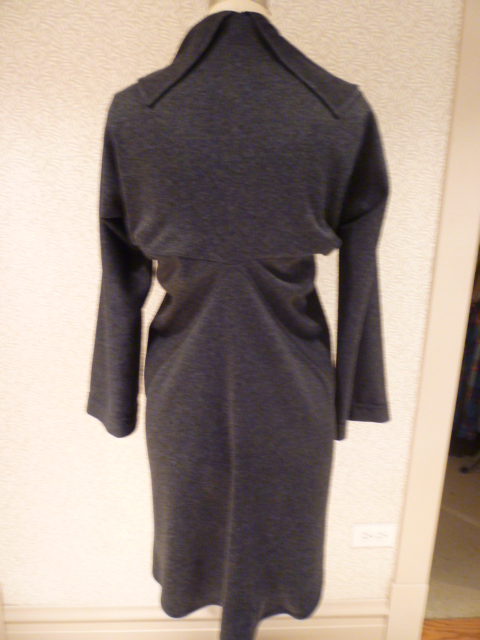
In order for the jacket to hang well at center back, you will need to add a triangle. The width of the triangle at the widest point should be 3/4 of your hip measurement. So if your hips are 40", your triangle at the widest point will be 30". The length will be the same as the center cut edge of your half circles. Sew together as you see above.
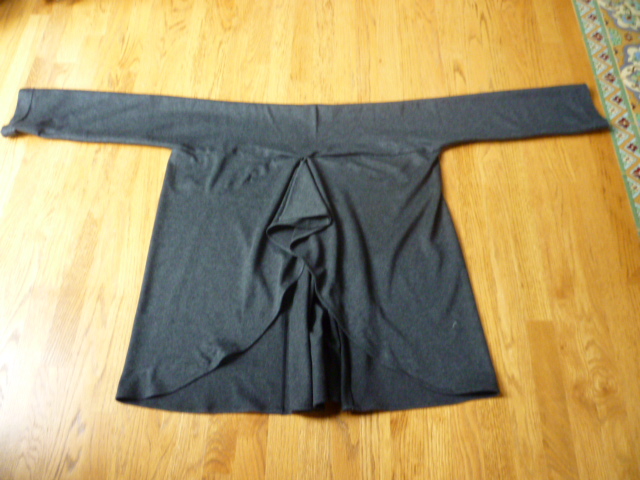
Now take the half circles and the triangle that you have sewn together and sew to the center opening of your tube as you see above. leave the excess length of the half circle free. This will form the portion of the collar that drapes to the front of the jacket or over the back, your choice.
As I said, the triangle is necessary as the lower portion of the jacket will not hang free without the extra fabric. You can see below the center of the triangle at center back.
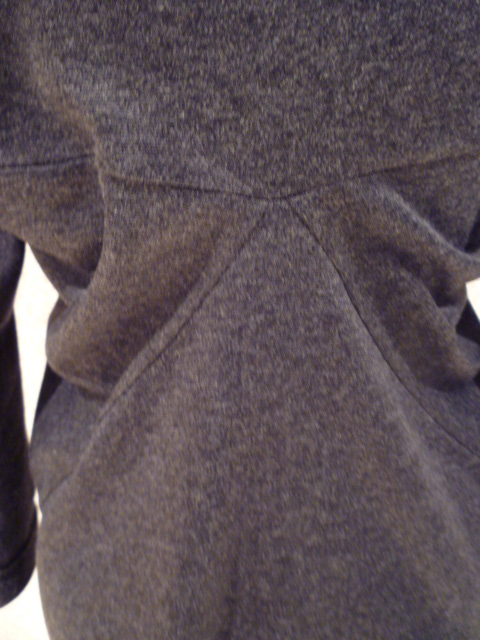
The triangle will wrap to the front and give your hips the room that they need.

Finish the edges, hem the sleeves and you are good to go. If you would like, you can taper the sleeves. I chose not to as I would like to wear other pieces under the jacket and I don't want the sleeves to end up being too tight. A super easy jacket and there are only 3 easy pieces!
Happy Friday Everyone!!!!


Very creative design Rhonda! Thanks for posting!
ReplyDeleteThanks Mary :)
DeleteLove the flow of the lines on the front of this - just brilliant!
ReplyDeleteWow! What a wonderful compliment. Thanks do much Jilly.
DeleteWow, that is so cool!
ReplyDeleteThanks Shams. I'll have some time to "talk" next week. I'll be in touch!
DeleteLove this one!
ReplyDeleteSo clever! I love this!
ReplyDeleteThat is very very cool and I want to try it out!
ReplyDeleteCan't wait to try it. Too Cute. Thanks
ReplyDeleteLovely! I adore the drape of the collar. *smiles*
ReplyDeleteThis is amazing Rhonda! Brilliant design...adore it!
ReplyDeleteThanks Pam. I just saw that you joined the blog. Thanks so much and a big welcome!! So happy to have you.
DeleteAnother fabulous design - ever thought about putting all these in a book? I'd buy it.
ReplyDeleteDo you think it'll work in leather?
Thank you 4 sharing this brilliant design!!
ReplyDeleteThank you for sharing this brilliant design!
ReplyDeleteOutstanding! I love this design. And you make it look so easy. What types of fabric do you recommend? Fleece, wool coats?
ReplyDeleteYou are just amazing--and also very generous!
ReplyDeletereally interesting. Thank's for this!
ReplyDeleteHi Rhonda!
ReplyDeleteI found your site/Blog on Pinterest. I love this jacket! Can you please give me an estimate in how much fabric to buy? I want to make this Awesome jacket soon... Thank you again! Great and Creative work! Blessings to you and yours!
Helena
Hi Helena, depending on how long you would like the jacket to be, 3 yards should be plenty. Good luck! Let me see your creation when you finish.
DeleteP e r f e c t. F a n t a s t i c.
ReplyDeleteI love this pattern. As I'm 100% allergic to wool, can you recommend some other fabrics that would work well with this?
ReplyDelete