f

Friday, February 27, 2015

Fabulous Free Pattern Friday

While looking for some webbing at my local chain fabric store today, I just happened to notice this free pattern tutorial. This was meant as a promotional to sell the faux fur strip that was used to make the collar. I thought it was rather cute and something that I could use, so I tore off a sheet.
I made this coat quite a while ago. It's perfect with skirts, pants and even an evening gown, but the problem is that my neck gets very cold. I could wear a scarf with the jacket and I have, but a scarf is just not quite right.
 The back has a lovely swing.
When I arrived home, I immediately began working on the collar and I am so pleased with the outcome. It's just perfect for the jacket.  As I said, the tutorial was created to sell a 4" wide strip of faux fur. I made a few changes to the tutorial,  quite a few actually, so I will walk you through what I did.
Supplies;
54" long strip of 4" wide piece of faux fur
1 yard of 1" wide ribbon
A small amount of fiber fill for the pom poms

Most people will cut their fur with a pair of scissors. You should not cut fur with scissors. It cuts the hair and makes a mess. Use a razor blade to cut the fur. The blade will cut the backing fabric, but not the hair..
Begin by cutting 2, 4"squares from the end of the fur strip. Set the 2 squares aside for now. Cut the remainder of the strip down to 3"wide. Fold in half and cut into 2 pieces. Take 1 piece and hold it up to your neck to check the circumference. If the strip is too long, cut it down at this point.
Lay the 2 pieces together. Push the fur inside and sew along the edge with a zigzag stitch. Fur should not have a seam allowance.

By sewing the seam with a zigzag stitch, and pushing the fur fibers inside the seam, the fur will cover the seam and look lovely from the outside.
On the other side, leave an opening for turning.
Cut the ribbon in half. I used a velvet ribbon for my ties. Thread the ribbon into the collar and pull it out the end. Zigzag the edge. Be sure to go back and sew a straight stitch across the ribbon to help secure it in the seam. Turn the collar to the right side.
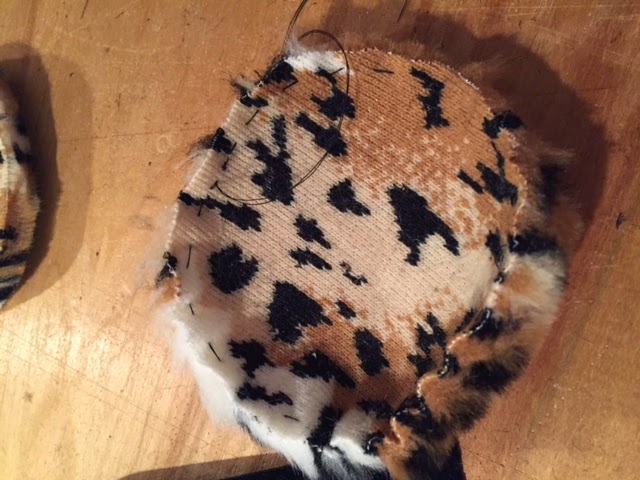
For the pompoms, round off the edges of the 4" squares, and create circles.
 With needle and thread, do a running stitch around the edge of the circle.
Pull the stitches up. Prior to closing the circle, stuff the pompom with a little fiber fill.
Insert the end of the ribbon into the pompom and securely stitch the ribbon into the pompom.
Stitch the side opening closed by hand.
Tie a nice bow and wear the collar with pride.
The collar goes together quickly, in less than an hour. It's just 2 rectangles and 2 circles. Girls of all ages would love this collar, so they would make great gifts. I know this girl is going to enjoy wearing hers ;)


Share this PostPin ThisShare on TumblrShare on Google PlusEmail This

Thursday, February 26, 2015

Thrifty Thursday/Free Raglan Sleeved T-Shirt Pattern

Well, at least it's still Thursday in America :)
I came across this cute raglan sleeve t-shirt pattern from On The Cutting Room Floor and decided to give it a try.


The pattern is quite simple, just 3 main pattern pieces. A band for the neckline is included as well as a bottom band of the top. The pattern is boxy with no real shape at the waist, but I knew that could be easily changed.
  

My finished t-shirt. I'm very happy with it. I used a sweater knit for the main body and a stretch velvet for the contrast. As you can see, I gave the top some shape along the sides. Just a matter of pinching it in at the waist. The band was left off of the bottom. I felt it gave the top a more casual look and took away from the overall look of the top.


I rarely use the neckband if it is provided in a pattern, as I would rather make my own. I cut a 2" wide strip for my neckband.


The fabric pattern matches fairly well. I could have been a little more precise, but all in all, it looks rather nice.


If you decide to give the pattern a try, pay attention to the scaling and make sure that the guide box measures out correctly after printing. I didn't pay attention when I printed out the pattern the first time and the pattern was a mess. My fault, not the pattern's.
The style is great for just about anyone. It's quite easy to put together. There is an instruction sheet, but I didn't use it.
You can find the pattern HERE. On The Pattern Room Floor has a number of free patterns that you might want to take a look at. There's a couple that I think I will be giving a try. Just click on Sewing at the top of the web page and you will see a link to the patterns.


Share this PostPin ThisShare on TumblrShare on Google PlusEmail This

Tuesday, February 24, 2015

A Pencil Case and So Much More!

Last week I showed you this adorable little pencil case from Ithinksew Patterns
Well, I made one up and I am in love!
I wanted a bag for my watercolor brushes and this one is perfect. My brushes are longer than the original pattern, so I simply added 4" to the length.  
The bag is fully lined and when open, lays nicely on the table.
I included this picture just to give you an idea of the new length of the bag. Reminds me of a giant tube of toothpaste!!!
The bag is billed as a perfect project for a teenager. Hey, I'm no teenager, but I loved it too. The bag is so fast and easy to put together. If you are teaching someone how to sew, this is a great project. The  zipper is very easy to install and the bag offers just the right amount of sewing time for the beginner. The bag would make great gifts that are quick and easy to make. They would also be great party favors for children. Just lots of possibilities.
Ithinksew did not provide me with the pattern, it's just one that I thought might be fun and since it was on sale, I decided to give it a try. And as it turns out, it was a lot of fun to make and I will be making more. The pattern is on sale until February 27th and you can find it HERE.


Share this PostPin ThisShare on TumblrShare on Google PlusEmail This

Monday, February 23, 2015

Monday Morning Inspiration

It's very easy to get caught up n the idea that what is being created today is truly unique to this generation. If you just take a short look back, you'll see that as we go forward, we build on the past. I came across this Pinterest page that has incredible historic fashions and inspiration. As I scrolled through, what really caught my eye were pieces from the 1960's. I think it's interesting to take a look back, see where we were, where we are, how we have changed, and how we have stayed the same.
Below, the sun and moon from Yves St. Laurent.
 There was a lot of whimsy in the 1960's. The pocket is a purse!
Lots of space age influences. Norma Kamali did a collection a few years ago that was very reminiscent of the piece below.

Janis Joplin's bell bottom pants. Interesting use of a tablecloth.
Everything was about geometric patterns and 
 flowers!
Pucci was everywhere, mixing patterns and colors in such vibrant ways.
Picasso's abstracts fit perfectly on to a shift dress.


 Embellishments even had a space age feel.
 The basic forms were simple,
but beautifully designed.


 Above and below, Balenciaga. Take note that the piece below is a shift with an ethereal train.
I hope you have enjoyed this stroll through the 1960's as much as I enjoyed putting it together! 
Have a wonderful week!
Rhonda


Share this PostPin ThisShare on TumblrShare on Google PlusEmail This

Sunday, February 22, 2015

Sunday Night Reflections


Just as a rudder steers the boat,
 the tongue steers your life.


Share this PostPin ThisShare on TumblrShare on Google PlusEmail This

Eating For Your Future/Sunday's Soup

After I posted this recipe for Lentil Soup a few weeks ago, I received a message from Debbie of http://lilysageandco.blogspot.com/ As it turns out, Debbie is not only a gifted sewist, she's also a nutritionist. She told me about a soup recipe that she had made with lentils and she shared it with me...and now you :) You can see the original recipe HERE  I made a few changes to the recipe, so I'll post my version below.
Sweet Potato, Carrot and Red Lentil Soup

1 tablespoon of olive oil
1 large onion diced
1 large clove of garlic, chopped
1 teaspoon ground cumin
1/2 teaspoon turmeric
1 teaspoon garam masala
4 cups vegetable broth
1 cup red lentils
3 cups diced sweet potatoes and carrots
2 tablespoons peanut butter
1/2 teaspoon cayenne pepper
salt and black pepper to taste

1. Heat oil and then saute onions garlic and spices until onions are transparent.
2. Add broth.
3. Add sweet potatoes, carrots, lentils and peanut butter. Cook until vegetables are tender.
4. Once vegetables are tender, puree the soup with a hand held blender.
Debbie recommends serving the soup with a dollop of yogurt and fresh coriander.

I thought the combination of the vegetables and the lentils was absolutely beautiful!
I was not able to get a fresh pumpkin and so I settled for the sweet potatoes and the carrots. And since I am not feeding children, and I love spice, I added the garam masala and the cayenne pepper. I posted a recipe for garma masal HERE.
The soup is quite flavorful and very satisfying. I actually made up a double batch as we are back in sub zero temperatures this week. I am going to want lots of soup!!!
If you enjoy lentil soup, give this one a try as it's a nice change especially with the addition of the peanut butter.
Thanks Debbie!!!


Share this PostPin ThisShare on TumblrShare on Google PlusEmail This

Saturday, February 21, 2015

The Winners of The Giveaway Extravaganza

Good Morning All and Happy Saturday!
So, the day has finally arrived, the announcement of the giveaway winners. It breaks my heart that I can't make all of you winners, but, please keep trying as there will be a giveaway with each sew along this year, not as great as this one, but winning is always nice :)
Just to let you see how I conducted the name drawing. I do my utmost best to make it as fair as I can. Each name is written down and then put into a bag. It's a little old fashioned, but it works. I did a lot of writing this morning!!!
So we'll begin with the Sew News subscription.
The first place winner of the Sew News subscription is Bunny of http://lasewist.blogspot.com/!!!
Congratulations Bunny :)
The second place  and winner of the Sew Chic Valentine Slip pattern is Paula Lemos.
Congratulations Paula :)
And finally, our third place winner of the 35th Anninversary issue of Sew News is Sew Diane of http://sew4sewgood.blogspot.com/!!!
Congratulations Sew Diane :)

Please email me at sewbussted@yahoo.com ASAP with your addresses so we can get your prizes in the mail. If I don't hear from you by Saturday, February 28th, I will draw another name.
Thanks again for helping me celebrate another year of sew alongs. I hope that they will be informative and fun!
Have a wonderful weekend.
Rhonda


Share this PostPin ThisShare on TumblrShare on Google PlusEmail This