f

Friday, October 30, 2015

Fabulous Free Pattern Friday/A Winter Hat

The last few days have been really chilly here in Chicago. While I was out for my morning walk yesterday, I kept overhearing people talk about how cold it was. I had to laugh a little, not at them, but our perception of cold. On this side of winter, we all think that 40 is cold. Once we've actually been through the winter months, and we finally get a day that is in the 40's, everyone thinks it's warm!

With the cooler temperatures, I've needed a hat, and as it goes, I can't find my hat, so time to make a new one. 
When I scrolled through the blog to find the hat that I made, I couldn't believe that it was actually 4 years ago. Wow, where does the time go?  
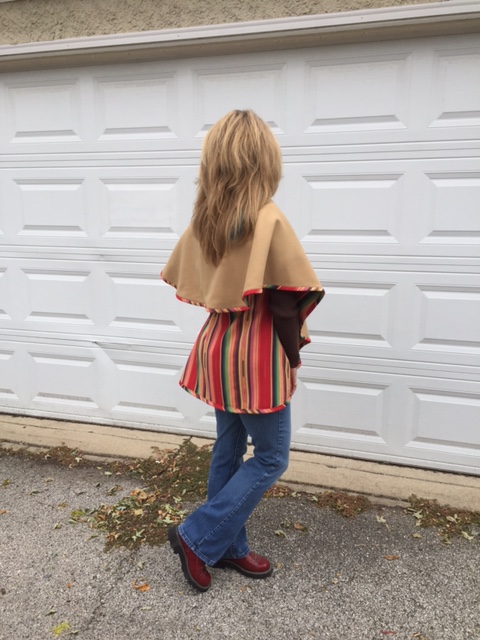
This hat is nothing more than a rectangle. It's a little quirky I guess, but I really like it.You can find the original post and instructions HERE. See the feather in my hair? 

Well, I'm still wearing feathers from time to time and if you look closely at the picture below, you'll see a little blue in my hair. I look at it this way, life is just too short not to have a little fun!
So, this is the exact same hat I made originally. Just a rectangle. In the original post, I instructed you to measure around your head and to not add ease. The hat should have a snug fit. I suggest measuring around your head and then sewing the center back seam and trying on the hat before you progress. I ended up cutting mine down a couple of inches to give a truly snug fit. Some of you may want a looser fitting hat, so just be sure to try it on before you sew the top of the hat together. 
I decided to make one that is a little less quirky, just a rectangle with a circle on the crown.  This is truly a very easy project, perfect for the beginning sewist.
For a medium size head, cut a rectangle that is 
20 1/2" long x 8 1/2" wide 
The measurements include a 1/4" seam allowance for the crown and a 2" turned up hem along the bottom of the hat.
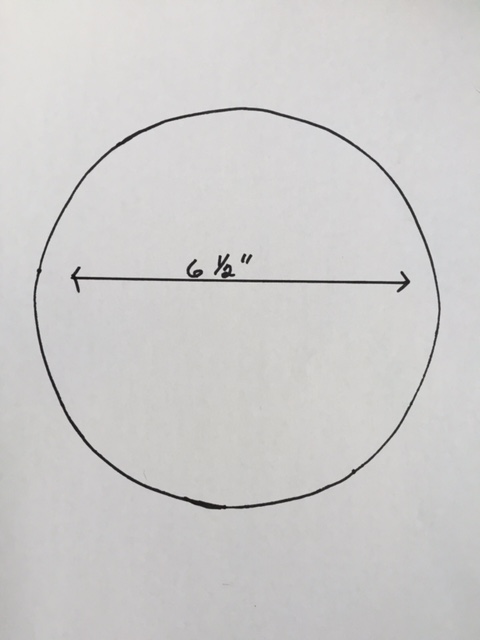
For the crown, cut a circle that is 6 1/2" in diameter. This measurement also includes a 1/4" seam allowance.
The best way to make your crown pattern is to fold a piece of paper into 4ths. From the corner, measure out 3 1/4" as you see below. Cut along the dotted line and you'll have your circle pattern! 
To make the hat, simply sew the center back seam of the rectangle. Then sew the circle to the one of the open ends. finish the hat by turning up the lower edge and stitching it in place. The hat takes no more than 30 minutes to make.
One aspect of the first hat that I really like is that it folds flat. The hat with the round crown will fold flat, but it isn't as nice and neat as the simple rectangle hat.
Whichever hat you choose to make will keep your head nice and warm, so a winner either way.
With Christmas not so far away, the hats make great stocking stuffers! 


Share this PostPin ThisShare on TumblrShare on Google PlusEmail This

Tuesday, October 27, 2015

The Upline Jacket Sew Along Begins

The new sew along for the Sewn Square One Upline Jacket has begun and the first post is up on the Sew News blog. You can find it HERE.

I am super excited about this sew along. It offers a number of techniques that may seem a little challenging, but I think you'll find are really quite easy to execute. The jacket has princess line seams that are curved, so pretty. The pockets are inseam pockets, but I was amazed by how easily they came together. The second post in the series will be all about sewing the basic shape of the jacket and doing the pockets.
Probably the most daunting aspect of the jacket is the zipper, but it's really just a matter of taking your time. We will, step by step work through the process of inserting the zipper in the third post.
In this week's post, I talked a lot about fabric choices. I chose to make the jacket out of a beautiful piece of wool. I think it will look lovely when finished, but it will also give you a better chance to see the lines of the jacket as we sew along.
The more I've thought about the jacket, the more ideas I've had. A faux fur collar would be spectacular. I would just do the faux fur on the inside collar. It would feel nice and warm against the neck when zipped up, and look so pretty when the collar is open.
Another idea I had was to do the jacket in a special occasion fabric. 
Maybe do the mid-length or the longer version. Actually, the shorter version would be fun too. Especially with the addition of a faux fur collar, the jacket would become the jacket you grab for any evening occasion. 
Hmmm, I may have just talked myself into another project!
I'm looking forward to sewing along with you!
Rhonda 


Share this PostPin ThisShare on TumblrShare on Google PlusEmail This

Monday, October 26, 2015

Monday Morning Inspiration

I hope your Monday is off to a great start!
Well, I have to say that you all surprised me. Last week's inspiration post was all about skirts, and I gave you the chance to vote on the skirt that you would most like to see drafted out. I initially had only 4 up for the vote, but it quickly became obvious that I needed to include number 5, the red skirt. Not only did I need to include it, it was the hands down winner! I think it will be a fun skirt to draft out and make. 
But so many of you really liked the other 4 skirts, so I have decided to draft them out for you as well. 

The skirt pictured below has already been drafted out by Studio Farro and you can find it HERE.
So starting next Monday, in loo of our normal Monday Morning Inspiration post, I will begin drafting out the skirts, starting with the red skirt. but,who knows, I may still try and sneak in a little inspiration  too:)
So often with the Monday Morning Inspiration posts, the pictures are great, but the question is....how do I make what I see?
I posted this coat a while back and it has been repinned so many times. Great coat!
Here's a pattern that is similar in feel. It's McCall's 7025. The inspiration coat has a notched collar and the skirt is tiered, but the McCall's pattern makes for a great jumping off pattern. Combine it with Vogue 8346 and you'll have the exact same coat.
This sleek trench would be easy to copy using....
 Simplicity 2311. Just eliminate the buttons and add a zipper.
How about making a much prettier version of the Prada coat pictured in the middle below
 with Vogue 9040

Sometimes, it takes a little more drafting knowledge to get the design that you would like, and sometimes, it just takes a little bit of looking at the patterns we have available. 
Be sure to stop by tomorrow, I had a bit of a hectic weekend and I didn't get my sleeve draft posted on Saturday, but I will tomorrow. 
Have a wonderful week!!! 
Rhonda


Share this PostPin ThisShare on TumblrShare on Google PlusEmail This

Sunday, October 25, 2015

Sunday Night Reflections


There is a destiny that makes us brothers,
None goes his way alone.
All that we send into the lives of others,
comes back into our own.
                                                                                                        Edwin Markham


Share this PostPin ThisShare on TumblrShare on Google PlusEmail This

Friday, October 23, 2015

Fabulous Free Pattern Friday Rewind

In the upcoming weeks, I will be doing a little repeat work on a number of Fabulous Free Pattern Friday pieces. You may remember the Wrapped In Circles jacket I did a little over a year ago. The fabric that I used was double faced, so it made the project really easy. But what if you don't have a double faced fabric and you would still like to do the jacket? 
Use 2 fabrics!
I really liked how the piece turned out. 
If you are going to use 2 fabrics, there is a little catch. Remember that a portion of the circle hangs on the bias, and bias stretches and grows. It can be very tempting to just cut, sew and go, but in the end, you'll be sorry that you did. Cut the 2 circles and then allow them to hang for at least 24 hours. You can see below how much the crepe grew. 
You can find the instructions for the Wrapped In Circles Jacket HERE. It's a great piece to have in your wardrobe as a between seasons jacket. Just enough to keep your shoulders warm and adds a nice little spark to an outfit too.


Share this PostPin ThisShare on TumblrShare on Google PlusEmail This

Wednesday, October 21, 2015

Fashion Illustration/Master Sewing and Design Certification

This past weekend, I attended the Association of Sewing and Design Professional's yearly conference. One of the classes that was offered was Fashion Illustrating and it was just the confidence builder that I needed. The class was taught by Judith Baer, a wonderful instructor. Even those who had never drawn were amazed with their progress. She is an instructor who truly wants her students to succeed, and she gives you the tools to do so.
Judith provided us with various croquis, and a wealth of information. One of the books that she recommended was Creative Fashion Drawing. While in the class, I found it on Amazon and purchased it. Really a great book. Can't wait for it to arrive.
Another wonderful book that Judith recommended was Fashion Details. I have not purchased the book, but I may do so soon. A lot of inspiration in the book, whether you want to draw or not.
Just a few of the tasks that must be completed for the Master Sewing and Design Certification Program Illustration Module are;

1. Five types of necklines, including two collars, and one jacket with lapels.
2. Three types of skirts, including a straight skirt with darts, an a-line skirt with panels, and a full gathered skirt.
3. Three types of patterned fabrics.
4. Three examples of textured fabrics.

Before the class, I felt completely overwhelmed. As I sat through the class, I found myself so immersed in what I was doing, and just having a blast. Once the class was over, I could not wait to get home and start drawing. I finally feel like I have gotten over the hump and can progress with the program. Below are a few of the pieces I am working on for the module. The jeans will get paired with a shirt of some sort and the blouse will probably be submitted on its own. 
I've just started working on the coat pictured below, but I think it's obvious what the coat is, an over-sized down parka with a fur hood, paired with stirrup pants. This is rough at the moment, I was just trying to get my bearings and see where I want to go. I'll show more as I continue to progress.
  
If you have ever thought about joining The Association of Sewing and Design Professionals, I encourage you to do so. The conference offers so many classes to help you refine or even develop new skills. It was the first conference that I've attended and it won't be my last. Next year, the conference will be held in Vancouver, British Columbia, one of my favorite cities!
One of the best tips that Judith gave us in the class was to just hang up a garment and really look at the lines. Take it apart piece by piece rather than looking at the whole picture. A good lesson for life in general.


Share this PostPin ThisShare on TumblrShare on Google PlusEmail This

The Wednesday Showcase

Isn't it wonderful when we have the chance to reconnect with something we love to do, or have forgotten how much we love the task? Last Friday, I had the opportunity to take a Fashion Illustration class with Judith Baer. She is my kind of teacher, the type of teacher who breaks the lesson down in such a way that you have instant success and makes you feel that what seemed overwhelming, really isn't at all. A little later today, I'll show you a few sketches that I'm working on for the MSDP Fashion Illustration module. I'm having so much fun!
But the first order of the day is The Wednesday Showcase and once again, this is a post that is packed with inspiration.

First up is a lovely blogger, Meg McCarthy of www.cookinandcraftin.blogspot.com She's a talented sewist with a heart of gold. Not only does she sew for herself, but all of her family and friends too!
I wore jumpsuits in high school and have not embraced the return, until I saw this super cute make of Meg's, McCall's 6083. Not only stylish, it looks so comfortable.

What a fun take on a beach cover up, the Mojave from Seamwork. They call it the caftan that goes beyond the beach. 

I just couldn't believe my eyes when I saw this lovely make. It's the Union St. Tee from Hey June. Check out not only the couldn't be more perfect job on the neckline binding, but the super cute sergered finish. Meg's made a number of these tops. I can see why.
As I said, she's quite generous with her sewing time. A friend was getting married, so she decided to make this super cute nightie set for her bachelorette party. It's the Fifi pattern from Tilly and the Buttons.  
Be sure to pop on over to Meg's blog, your head will be spinning with inspiration! 

Next up is the beautiful Caroline of www.4-sisters.blogspot.com. She is one lady who is not afraid to take on a challenge. 
Inspired by the show Mad Men, she made this incredible striped coat. I especially enjoyed the unexpected pop of color in the lining.

I don't know about you, but when I put a lot of work into a garment, especially work that isn't going to show once the piece is completed, I always think that it would be fun to just walk around with the insides on the outside. See world, I did a lot of work!!! Well, Caroline finished her coat, but I just couldn't resist showing off her work.   
Caroline commented that she had too many special pieces of clothing and not enough casual pieces, so she made this fun Burda top. I really like the style lines of this top. Hmmm, this is nothing more than a number of rectangles. I see a Fabulous Free Pattern Friday piece brewing ;)
As I said, she's not afraid of a challenge, so she took on the task of making a great pair of jeans. Success!!!! Even the dreaded back view is just spot on. I want those jeans!
On a very sad note, Caroline recently lost her mother and she has not been blogging for a couple of months. When we've experienced a loss in our lives, it can really sap our creativity, but as I'm sure many of you know, getting ourselves back into doing something creative can also help with healing. I hope that you'll take a moment to go to Caroline's blog, leave a note and encourage her to return. I'm sure she would appreciate knowing that we care. 

Have a wonderful day!
Rhonda 


Share this PostPin ThisShare on TumblrShare on Google PlusEmail This

Monday, October 19, 2015

Monday Morning Inspiration/Skirts and a Chance To Vote

Welcome to Monday!!!
Last week I shared a story about my favorite childhood outfit, a pair of orange corduroy pants and a little cashmere sweater that I wore until it was fit for nothing more than the garbage. I was a true tomboy. In fact, my mother says that she never knew that a little girl could smell so bad after a day of playing. I played hard! 
As much of a tomboy as I was as a child, I have turned into such a girl ;) During the summer, I live in dresses and come fall and winter, I love nothing more than a nice warm pair of tights and a skirt. 
Over the weekend, I was on the Pinterest website trying to find some innovative quilting ideas, when I just happened upon THIS website. The two aren't related, but that's how the internet goes! The clothes are high end designer pieces, and lots of fun to look at. The skirts really caught my attention. I was able to pull out a few that I liked, so I thought I would share them with you this morning.

1.A color blocked a-line skirt with an asymmetrical hem.   

2.A pencil skirt with a lovely over drape.
3.I especially like this skirt. The pleats radiate out of the darts. For most of us, the drape would need to be a bit wider as this skirt is a little difficult to sit in without most of your leg, or other things ;), showing.
4.This skirt has the large drape in the front and back. Talk about great movement when you walk!
I have been asked a number of times what to do with a very large print. I thought that this skirt was a great use of a very large print.
5. This is a 6-gore skirt with side panel pockets. Notice how the pockets stand away from the skirt. Believe it or not, this is a very slimming look.
Such a pretty drape.
I included this skirt as I loved how the print was used. It's from Isabel Marant and is a cool, $1,360.00! The waistband is elasticized.
This skirt is a bit of a throw back to the 70's, but I found it rather fun. Maybe it's the lacing that I liked so much. 
An interesting way to break up a pattern. Grosgrain ribbon would work well for this.
A lovely take on Mondarin art.
What a fun skirt this would be to wear! A simple way to duplicate this would be to buy your fabric and then buy yarn to match. My creative juices are flowing!!! Stay tuned as this might get done sooner than later. The skirt is nothing more than a 1/4 circular skirt with a hip yoke. You can see how to draft a 1/4 circular skirt HERE.

Did you notice that the first 4 skirts are numbered? (A fifth skirt has been added to the mix, the red skirt with the side pockets, so place your vote for 1, 2, 3, 4, or 5) Well, here's your chance to vote. Which one would you like to see me draft? The one that gets the most votes will win. To vote, just leave a message! 
You may remember that I drafted out this skirt last year.

A number of you actually made up the skirt and did a fabulous job. You can find the tutorial and all the lovely makes HERE.
Happy Monday Everyone!!!


Share this PostPin ThisShare on TumblrShare on Google PlusEmail This

Sunday, October 18, 2015

Sunday Night Reflections

                                                                                               photo by Justin DeRosa

The unmistakable truth about forgiveness is 
that it is not a reward that must be earned; 
forgiveness is a gift to be given. 
                                                                                               From The Traveler's Gift
                                                                                               By Andy Andrews


Share this PostPin ThisShare on TumblrShare on Google PlusEmail This

Sunday's Soup/Cream of Mushroom Without the Cream

Do you love Cream Of Mushroom soup, but would like the forgo the cream? I decided to take a look around and see if I could find a vegan cream of mushroom soup that actually sounded good. As luck would have it, I found THIS recipe that got my creative cooking thoughts going. Rather than milk and flour to thicken the soup and make it creamy, she used cauliflower. Turns out, cauliflower is one of those vegetables that you can substitute in so many recipes. 

Here's my version of the recipe;
Creamy Mushroom and Cauliflower Soup

4 cups cauliflower broken into small florets (appox. 1 medium head) 
4 cups portobello mushrooms diced
3 cups unsweetened almond milk
3 cloves garlic minced
1 medium onion finely chopped
1 large carrot finely diced
1 tablespoon olive oil
1/4 teaspoon crushed red pepper(optional)
1 tablespoon chopped fresh sage
salt and black pepper to taste

1. Place cauliflower and almond milk in heavy saucepan and bring to a boil. Reduce heat and simmer until cauliflower is tender, approximately 10 minutes.
2. Pour olive oil into a large bottomed pot. Add mushrooms, carrots, onions and garlic and red pepper. Cook over medium heat until mushrooms and carrots are tender.
3. Once cauliflower is tender, cream with a hand held blending stick or blend in a blender.
4. Combine creamed cauliflower with mushrooms. Add chopped sage, salt and pepper to taste. Simmer for another 10 minutes and serve.   

I broke my cauliflower into smaller florets to reduce cooking time. 
As you can see, once blended, the cauliflower has a lovely creamy consistency. 
So, is it the same as a traditional cream of mushroom soup? No. Is it good? No, it's great! 
This is a soup that would pack well for weekday lunches, so be sure to make up the entire recipe. 
Just think, cream of mushroom soup without all the fat and calories and the lowly little cauliflower is the magic ingredient. 
Be sure to check out all the wonderful recipes at Healthful Pursuit.
Enjoy!


Share this PostPin ThisShare on TumblrShare on Google PlusEmail This