The blog post as well as the video covers French seams. I just love the way French seams look inside a garment. If you would like to take a look at the video, I've linked it below. It's short, less than 3 minutes.
A little side note about the video. This was the 3rd set of videos I did that day and I can see that I was getting rather tired. It was a looong day!!
If you are making the Summer Breeze Top, pop over to the Flickr page and post your progress. A little hint, there is going to be a giveaway at the end of the sew along, so you might want to join in!! You can find the Flickr page here, https://www.flickr.com/groups/sn_sewalong_3
Happy Sewing!
Good Morning Everyone and Happy Monday!
Things are getting crazy here in America as everyone seems to have World Cup Fever. Even I who rarely watches any sports, unless I'm forced to, must admit to at least listening to the game. The city of Chicago will be opening Soldier Field tomorrow and hosting a huge party with giant screens so that all can watch and hopefully cheer America on to a win. We will also celebrate Independence Day on July 4th, so this is truly a red, white and blue week! In the spirit of this week, I did a little looking around for some interesting and fun red, white, and blue inspiration.
This is the dress that got me started. It's a vintage dress, but I love the idea of making a halter dress with a detachable collar. Fun!
And I thought that this was a cute idea. Grab some bangles from the thrift store and wrap yarn around them.
I rather like this space age vintage dress :)
Such a pretty and sophisticated combination.
I like the use of the paler blue rather than the typical dark blue and the clear sandals.
Are you a baseball fan? How about painting a stitching line on the pockets?!! I like the red piping that runs down the side seam too.
A vintage trench from the 1970's.
Not a traditional red, white and blue, but I thought it was rather fun regardless.I keep posting potential painting projects, I think I need to get out my paints!
I loved this feminine long, flared jacket over the pleated skirt.
,
This past week,Maria Jose did a post on tie dye. You must see what she did! There are links to how-to videos in her post. I really like what she did. Then I saw this skirt and decided, that's it, I really have to do this. Maybe this will finally take care of my painting bug!!
Some fun with stripes. The sleeve is just a long rectangle that has been gathered and sewn around the armhole. Doesn't get any easier than that!
Another vintage dress. I would not add the stripe to the tie, but I really like it around the bottom of the skirt.
And finally, a cute dress posted by Maria Jose. Check out those shoes!!!! You can see the entire post here.
Whether you're patriotic or not,a little red, white and blue can be lots of fun to wear!
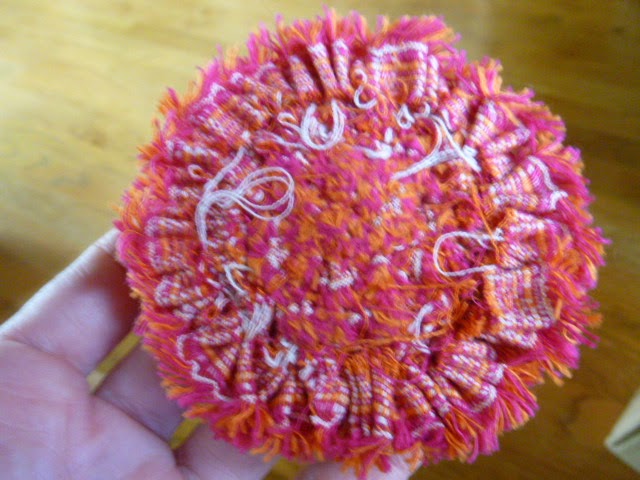
What do you do when you have a pretty selvage left over? Well, there are a number of creative things that can be done,
but I decided to make a sunflower!
The fabric I used for the Hot Patterns Crepe Suzette Clutch and the Patrick Kelly Cocoon Coat had such a lovely selvage, so I cut it off, laid it aside and waited for a little inspiration. A few nights ago, I sat down with a needle and thread and started gathering up the selvage. I initially had no intention of making a sunflower, but the more I gathered, the more it just seemed to evolve into a sunflower.
Here's the unfinished backside. In the center you can see the furry edge of the selvedge.
So I made the center and then attached 2 more rows of the gathered selvage. The center section of the flower has the backside facing up which gave a flat surface to sew the beads to.
To finish the backside, I save all my old leather gloves that have become to worn to wear any longer.
Simply cut a circle out of the leather.
Before I glue the circle to the flower, I attach a pin. Simply cut 2 slits for the ends to go through.
The back of the pin will remain on the backside.
Put a small amount of hot glue between the backside of the pin and the leather. This will help to hold the pin in place.
Apply hot glue to the back of the leather,
and then place on the back of the flower. You may need to go around and add a little more glue to secure the edges.
Now I have a sweet little sunflower to adorn my clutch, the cocoon jacket or any other outfit that it may go with.
My eye infection has really given me a run for my money. I finally just gave up and went to bed. Sometimes bed is a very good thing :) I'm feeling better, a bit of a headache and my eye is still swollen, but I'm definitely on the mend. Yea!!! Thanks for all the well wishes.
A friend sent me a link(hey Miss P!!) that she thought I would enjoy, especially since I've been doing the Thrifty Thursday posts. It's the One Seam Coat that was designed by Patrick Kelly.
As for downloading the pattern, I was not able to download it as it is larger than what my copy shop could do. Okay....there's always more than one way to do anything, so I came home and just figured it out.
Here is the pattern graph. The picture on the left is the front of the coat and the picture on the right is of course the back. Take a closer look at the photograph of the coat and you can see that it has a very large back pleat.
Okay, with that information, we can move forward. You will need about 4 yards of fabric to make this coat. The first thing that you will want to do is establish the back pleat. Take a look at the picture and you can see that the pleat ends at the shoulder. I am 16" from one edge of my shoulder to the other. Whether your shoulder measurement is 16"or not, I think this will be a good measurement for just about anyone. Divide the shoulder measurement in half. Along the selvedge of the fabric, find the center. Measure over 24" (3 x 8). Bring this point to the marked center and fold in half of the pleat. Do the same to the other side. You will now have a box pleat.
In the drawing, you can see that the back neck has been shaped. At center back, measure down 1 1/2" and mark. From center back, measure over 3 1/2" on either side. Draw in the back neckline and cut it out.
I finished my neckline with a bias strip.
To determine the length that you will need for the sleeves, measure from the center of your back to your wrist. On your jacket fabric, measure from center back, along the selvedge the measurement of center back to your wrist. Do this on both sides. Cut the fabric at this point.
Now for the 1 seam. This video shows you how to make a doll size version of the jacket, but it also shows in detail how to form the 1 seam.
Now for my coat. My fabric was 60" wide, but I did not want a long version, so I cut off 15" in order to make it more of a knee length coat. Remember, the coat is cut along the length of the selvedge. The fabric that I used is a linen and silk blend, and as you can see, it is double sided. Great for this project as my coat is reversible. Please forgive my pressing, I could have, should have done a better job :( At least you get the idea.
As you can see, the coat is a roomy cocoon shape.
The reverse side.
To be honest, I like the reserve a little better as I really like the look of the inverted pleat rather than the sleek box pleat.
Above, the inverted pleat side and below the box pleat side.
As soon as I'm feeling better, I'll take a few pictures of me in the coat. I'm excited about adding it to my wardrobe as it will work great with everything from jeans to, slacks, to a dress. Very versatile.The coat would be lovely made out of fleece or a boiled wool for cooler temperatures.
In order to make my coat reversible, I sewed the seam as a flat felled seam. It basically melts right into the fabric.
As I said, it's a nice roomy coat that will go over just about anything in your wardrobe. Give it a try, I think you'll enjoy having one in your wardrobe too!
Did you have a chance to make up the free Crepe Suzette Circular Clutch pattern from Hot Patterns? Well, if you haven't had a chance, there's still time, the link party will be up until midnight, July 1st. Here's a link to the pattern just in case you have yet to download it, http://www.pages01.net/fabriccom/Crepe_Suzette_Clutch/ You can find the post I did on the bag here.
I had intended to show you the coat that I made to go with my clutch, but my eye issue is really bothering me and I am moving a lot slower than I would like, so the coat reveal will happen tomorrow. But here's a sneak peak to the pattern I used.
It's the One Seam Coat designed by Patrick Kelly. It really does have only one seam!
In the meantime, link up your clutch creations below and I will showcase all of them next Wednesday on The Wednesday Showcase. There's no excuse to not get one made. You have all weekend!!!!
As with everything, I'm a little behind. I had hoped to get back to the drafting posts for the Master Sewing and Design Certification Program last week. They are coming, so please bear with me.
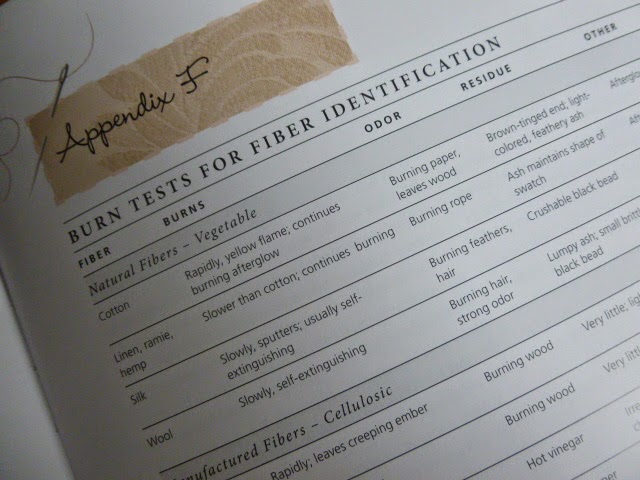
I'm very excited though as I am ready to take my first test. It will be on the Textiles Module. I had a textbook that I had used when I was in school and thought that it would be a great resource until I found such a blatant error. Since then, I've looked for a book that I thought would put me on the right track and I am very happy to say that I found a wonderful book, Claire Shaeffer's Fabric Sewing Guide.
I had purchased another book that looked wonderful online only to be very disappointed when it arrived. That book was returned and I decided to give Claire Shaeffer's book a try. I was so happy when it arrived. It contains everything I wanted and so much more.
In the back of the book are a number of Appendixes that cover burn tests, an extensive guide on interfacings, needles as well thread.
There are 6 chapters that cover everything from Fiber Content to Sewing Techniques. I have found the information to be extensive and thorough.
Within the chapters, you'll find many photographs like these found in the first chapter, The Basic Guide for Sewing Any Fabric. I especially like how she showed the same garment made in 2 very different fabrics.
Throughout the book, you'll also find lots of little helpful hints like this one,
At the moment, I'm just waiting to hear back on when and how to take the test. Of course I will let you know how I did!!! Wish me luck :)
*Now, a little note on the day at hand, Thrifty Thursday. I should have the post up in just a few hours. I'm sewing the binding on the coat that I made to go with the clutch I made last week. If you've made a clutch, you will be able to link yours to the post and next week I will showcase all of the cluthes on The Wednesday Showcase post. There's still time to get your clutch made as you will be able to link up until Tuesday of next week, so get busy!!!!
For some reason, I'm having a problem with embedding the video to this post, so be sure to drop by the Sew News post to check it out.
If you have not purchased the pattern, and you would like to sew along, this week is the week to get your supplies together. There are links to the Hot Patterns website where you can purchase the pattern in the blog post.
If you would like to join the Flickr group, you can find it here, https://www.flickr.com/groups/sn_sewalong_3/. We all like to see other's creativity, so share away!!!
In the blog post, you'll see that I'm adding a few extras, like a sleeve and lengthening the top into a dress, so even if you decide not to make the top, I think you'll enjoy the posts.
The top is really quite easy to make, but the gathered detail can be a bit tricky. Although, I think I'll be able to walk you through the process with ease.
Looking forward to sewing along with you!
Rhonda


 ,
,