f

Thursday, September 27, 2012

Faux Hem Band Tutorial

I recently discovered how I could make a band to finish off the edges of my knit garments. Now, I may be a little late to the party, and all of you already know how to do this, as it is quite simple. But, just in case you don't, I thought I would share this with you.
This is a top that I made with a dolman sleeve. The sleeve has a very shallow curve, not deep like the one I showed you last Saturday. The hem of the top as well as the sleeves is a faux band.
 Here's a little closer detail of the hem of the top above and the finished edge on the sleeve.
To do this, you will need to add a little extra to the hem of your garment when cutting. An extra inch should be plenty.
 Rather than turning the hem to the inside of the garment, turn it to the outside as you see above.
Now fold the top edge down to meet the fold at the bottom of your garment. 
Zigzag or use a double needle to stitch the edge in place.
 Fold the new band down, press, and you have a finished edge! 
On the inside, you will have a small finished edge as you see above.
This works great for knits. Because you have zigzagged or stitched with a double needle, there is stretch in the seam. This is my new favorite way to finish my hems on my knit garments. If you have never done this before, give it a try, I think you'll like it!


Share this PostPin ThisShare on TumblrShare on Google PlusEmail This

Monday, September 24, 2012

Monday Morning Inspiration

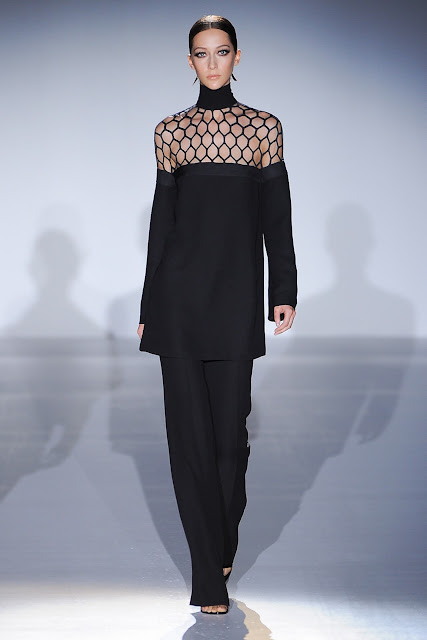
Welcome to a brand new week! I'm not much in the mood for spring or summer clothes. The temperatures have finally begun to dip here in Chicago and I'm loving it. But, the spring/summer 2013 collection from Gucci is so lovely, very reminiscent of Yves St. Laurent. If you have followed my blog for a while, you know that he was one of my all time favorite designers. For those of you who follow the Sleeves On Saturday posts, look closely as there are some fabulous sleeves in this collection. I've put at least one in the lineup. 
The model below looks a bit devilish, but I love the way the ruffle wraps from the sleeve and around the back. 

 Simple, yet so pretty.

 I love the clear colors.
 The dress below is one of my favorites.
Look at the sleeve below. Beautiful.


The pantsuit below is my absolute favorite.


I think it is always nice to be able to see the clothes move, so I've included the video. Clothes take on a whole new dimension when they move.


As always, wishing you all a lovely week!


Share this PostPin ThisShare on TumblrShare on Google PlusEmail This

Sunday, September 23, 2012

Sunday Night Reflections


Character comes from within.
It is not what others think of you,
but what you think of yourself.
It is not not what others expect of you,
but what you expect from yourself.
It is not what others judge you to be,
but how you judge yourself.
For there are no standards greater
than what people of character place upon themselves.

By Bob Scarlatta
Written in remembrance of his father
The home in the photograph is on Monhegan Island, Maine and is the home of artist Jamie Wyeth.
I took the picture early one morning while I was visiting the island. As the fog rolled in, the island seemed to take on a feeling of mystery.


Share this PostPin ThisShare on TumblrShare on Google PlusEmail This

Sunday Brunch

This is not my usual Sunday Brunch recipe share, but for all of you with dogs, I think you will enjoy it.
First of all, this is not my dog. I saw this picture on Pinterest and I have been laughing ever since. The caption read, "Draw eyebrows on your dog and laugh until you give them a bath." Poor dog. I know I can have a rather twisted sense of humor, so yes, I find it awfully funny. Oh, the things we do to our animals! Today I'm sharing a recipe for all of the dog people in the world. With all the worry about tainted treats coming from China, I have started making treats for my dogs. They are very simple to make and my dogs love them. Take a look at the ingredients. Who wouldn't love these?!!
Peanut Butter Dog Biscuits 
1 cup flour
1/4 cup oats
1/4 cup unsweetened shredded coconut
1/2 tablespoon baking powder
1/2 cup creamy organic peanut butter
1/2 cup milk
1 tablespoon olive oil
1 tablespoon applesauce

Preheat oven to 350 degrees.
Combine all dry ingredients in a medium bow. Add wet ingredients and mix until well combined.
 Knead into a well incorporated ball. Roll out on a piece of wax paper to 1/2" thick.
Use desired cookie cutter or just cut into small pieces, whatever is appropriate for your dog. Place on unlined baking sheet and bake for 20 minutes or until golden brown. Store in an airtight container. Get prepared for lots of kisses!!
My pieces are rather large. They will be broken apart for my dogs. But you can see that even rather large, the recipe makes quite a few cookies. I've tried them, they aren't bad at all!!
Hope you are enjoying your Sunday.


Share this PostPin ThisShare on TumblrShare on Google PlusEmail This

Saturday, September 22, 2012

Sleeves On Saturdays

I hope this post finds you all having a lovely weekend.  
Today we are going to do a very simple sleeve, the dolman sleeve and give it a very big twist.
The Basic Dolman Sleeve
You can take a your favorite t-shirt pattern, a dress pattern, even a jacket pattern and turn it into this basic dolman sleeve.
 Begin with your bodice pattern.
 Draw a line out from the shoulder seam.
Fold your sleeve in half. There is no reason to worry about the front and back of the sleeve as this sleeve is not set into an armhole. Match the sleeve to the shoulder seam and place the folded edge along the line that was drawn from the shoulder seam. If you are using a pattern with seam allowances, be sure to over lap you seams at the shoulder.  
For the sleeve that we will be doing today, we will need a rather deep underarm curve. The curve begins just below the approximate elbow and curves back to the waistline of the bodice. I have drawn in the red line to show that this can also be a shallow curve if you like. Just remember, the deeper the curve, the more comfortable the top will be. 
The basic dolman sleeve. This sleeve offers a lot of ease for wearing, in other words, it is really comfortable.
The Twisted Dolman Sleeve
So now, let's have some fun. I'm sure you've seen lots of pictures on Pinterest of all the twisted tops that are designed by Japanese designers. They are so much fun and I've been wanting to give one a try. So here's my version. 
You will need to look closely at the picture above. One sleeve is over the neck and the neck opening is hanging off the arm.
Next, in order to ultimately get this top over the head, some of the sleeve will need to be cut away. I cut off approximately 10" of my sleeve.  
Because the entire top has been turned to the side, the right side seam is hanging away from the body. Pin that in so that it forms to your body. 
 The left shoulder where the original neckline opening is will need to be reduced. In the above picture you see a pin on the "new" shoulder. In the picture below you can see pins in the original top seam of the sleeve.
Cut open a new armhole. Here's where I made a little bit of a mistake. I cut the armhole while the piece was still on the form, so the armhole ended up a little larger than I wanted it to be. So my advice. Mark the armhole area and cut it once the piece is off the form.
In the picture below, I have the top laying flat. I have pinned in the area where I want to take it up in order for it to have a better fit. Notice that I will be closing the original neckline.
 You can see the pinned neckline a little better in the picture below.
The original straight sleeve pattern was used for the opposite side of my top.
And here I am in the top.  
 You can see in the picture below that the one side is very draped.
 And the other side is much more fitted.
This top was a blast to put together. Start to finish, the top took about 2 hours to complete. My exchange student actually stopped on her way out the door this morning to tell me how much she liked the top. That's quite a compliment from a 20 year old!  
A few notes in case you decide to give this a try;
1. Be sure to use a two-way stretch knit fabric. The knit should stretch as much in the length wise direction
    as it does in the crosswise direction. 
2. Because the top is twisted to the side, you can see in the picture below that one side will rise up. In order
    for my top to not be too short, or at least shorter than I would like for it to be, I added 7" to the     bottom of my original top. Even after the top was twisted to the side, this gave me a finished length that I was happy with.
One last thing, if you don't have a fitting form, try making the top in a knit that would basically be a muslin. To decide where the new armhole should go, you can hold the piece up to your body and make an approximate mark, or you might want to try and see if you can try it on and mark where the top of  your arm is and cut the arm hole after you take the piece off. Just remember, knit is VERY forgiving, so you can usually fix whatever it is that you don't like. 
Good luck if you decide to give it a try. As I said, I really had a good time with the top and it's rather fun to wear as well.


Share this PostPin ThisShare on TumblrShare on Google PlusEmail This

Thursday, September 20, 2012

Fabulous Free Pattern Friday/Fleece Sippers For The Family

Welcome to Friday!! I'm really giving you a free pattern today, Yea!!!!!!!!! Make sure and read all the way to the end.
Last winter I came across this slipper in a catalog. I liked it, especially for traveling, but look at the price. The $26.95 was not the price for two, it was the price per pair of slippers if you bought two. I don't think so. As I looked at them I thought, how hard can this be? As it turns out, not hard at all.
My finished slipper.
As I said, they are great for traveling as they fold flat and take up no space in a suitcase.  
The slippers that were advertised just had fleece on the bottom. I used the Slipper Gripper on mine. Really works great. 
For the slippers you will need a package of Slipper Gripper. There is enough in the package to make two pair of slippers. You will also need no more than 1/2 yard of fleece. Check out the remnant bins at the fabric store and be inventive.
 Cut 2 soles out of Slipper Gripper.
 Cut 2 soles out of fleece.
 The layer of fleece will be against your foot and inside the slipper.
 Cut 2 sock extensions. Serge the top of the sock extension as you see above and below.
 Fold the sock extension in half and serge the center seam.
Cut 2 of the toe caps and serge them to the sock extensions as you see below.
 The slipper is beginning to take shape.
Now match the soles to the top of the slippers. There will be ease in the slippers so pin in place before serging.

 Fold down the top edge of the slipper about 1".
 Zigzag over the serged edge.
 The slipper is complete.
 
If the slipper is too large, you can always go around it with another row of serging and just come in as much as will make a comfortable slipper for you.
So....the pattern is FREE!!! Just click HERE to download the pattern. There are 3 sizes on the pattern. The medium size was the slipper I originally made for myself. I wear an American size 7 shoe. The medium size would fit a size 8 as well. I sized the pattern up so that it would fit my husband. He wears a men's size 10 shoe. The slipper is definitely large enough to accommodate a men's size 11 as well. I sized the slipper down to a small. You may need to tweak it a bit, but I think you can make it work. If by chance you don't have a serger, you may always zigzag the edges. These make wonderful gifts. They are so fast to make, less than an hour for the pair, cut to finish. They would also be wonderful as items to sell in a bizarre.
I also have another slipper pattern available. This pattern is the same slipper, but it includes a small size for children, a medium size for women, and an optional cuff. Just click HERE to download the pattern. 
If you have any questions, email me at sewbussted@yahoo.com and I'll do my best to help.
Happy Slipper Sewing!
Rhonda


Share this PostPin ThisShare on TumblrShare on Google PlusEmail This