f

Thursday, December 29, 2016

Christmas Traditions and Christmas Creatures

The holidays are all about tradition. Whether it's a special pie, your auntie's fruit cake, holiday linens, or an annual trip to cut down a tree, it's the traditions that make the holidays special. In 2009 or 2010, a new tradition began in our home, Christmas Creatures. Each year I make a new ornament for my husband made from sticks, seeds, and any other natural bits that I happen to find. If you would like, HERE'S a link to the history of the ornaments.

Each year when a new creature comes to life, I always think that there is no way I'll be able to come up with a new one the following year, and yet they just seem to materialize.

This year's little creature, a little duck with a big acorn hat. 


The head and the body are tiny little gourds. When I was in Galveston, Texas back in November, I visited a favorite antique store, Somewhere In Time. She always has interesting and unique things. While I was there, I saw a big basket filled with extremely large acorn caps and these tiny little gourds. They looked interesting, so I purchased a number of the acorn caps and 2 of the gourds.  After playing around with the gourds for some time, the little duck began to come to life.


I used pine cone leaves for the wings.


As well as his little duck feet. His "skis" are a milkweed pod that I cut in half. 


Somewhere along the way, I picked up the tiny little acorns that I used for the tips of his ski poles.


There were some little divots in the acorn cap. I had a few more of the tiny acorns, so I decorated his cap. The eyes were marks that were on the gourds, so I didn't need to add anything more.


Just to give you an idea of how big he is.


 The crew :)


And a complete "family" photo. One is missing, Rudolph. He fell and broke apart, so maybe a new Rudolph will appear in an upcoming year.

I absolutely love making the creatures. It's a part of me that until 6 or 7 years ago, I had no idea even existed. 


Before I go, I thought I would share a few holiday memories. The boys pictured below belong to a very dear friend of mine. They came for a visit and fell in love with Gracie. Gracie was the BEST babysitter too! There were actually 3 little boys here. At one point I thought I was going to see 1 of them riding the dog! What is it about boys and dogs? :)


One of the quieter moments of the evening ;)


Not the best picture, but you haven't seen me in a while. I'm sitting in my favorite room, my dining room. It really looked so pretty this Christmas.   


The decorations are now down and the New year is just around the corner. I hope that you had a lovely holiday, and I wish you the absolute best year to come!


Share this PostPin ThisShare on TumblrShare on Google PlusEmail This

Wednesday, December 28, 2016

The 2016 Wednesday Showcase Hall of Fame

During this last week of the year, it's always great to take a look back as we think about moving forward. 

This past year brought a few changes to the blog, one of which was that I decided to end the Wednesday Showcase posts. I'm still going back and forth about whether I'll bring them back. For those of you who are new to the blog, I began doing the Wednesday Showcase posts, whew!!!, quite a few years ago. Each Wednesday I would choose 2 blogs to showcase, just a nice little surprise to say thank you to those who had chosen to follow my blog, and hopefully bring a little more attention to their blog as well. Some months back, I had a rather negative experience, and decided to just end the posts, at least for the time being. I have been working on something new, and I think exciting. More on that in a few days :) 

So, let's take a look back at some of the wonderful blogs that were showcased this past year.  

We began the year with Barbara Jane Made  A wonderful blogger from Australia. She loves to smile and her clothes reflect her happiness.


Beads and Barnacles is written by 2 sisters, Pippa and Nikki. Pippa is a sailor. Yep, a sewing sailor!!! Just love the picture below. They love to cook, sew, knit, dance, and sail, so inspiration abounds on this blog.


We then met Joyce of The Story Sew Far An avid sewist who does beautiful work and isn't afraid of a challenge.


Style Me Mary is written by the lovely Mary of course :) Below is a sample of her work. Those handmade buttons are to die for!!!


The Couture Counsellor is written by Wendy who is working hard to bring couture back to the courtroom. She's a fellow Haute Couture Club of Chicago member too! 


Lesley of Sew Nip Tuck is always up for a challenge, like this incredible blouse she made for her daughter.


We discovered a new way of blogging, Rather than being responsible for the entire content of the blog, 100 bloggers have joined forces and created Refashion Co-op. They inspire with their refashioned finds.


We were introduced to The Fold Line, a wonderful online sewing community that offers a newsletter, blog, sewing resources, pattern reviews, and sew much more!


Helen's Closet is written by Helen who lives in Vancouver, British Columbia. She's a talented and energetic sewist. Featured below is her free Messenger Bag pattern. Pop by her blog and check out her super cute culotte pattern.


Another group who is sharing the load is The Denver Sewing Collective  A very talented group of sewists who love sharing what they do. 


We then met Amy of SewsNBows. She loves to sew, and she makes the cutest bows. You can find a link to the Etsy shop on her blog.


We Sew Retro is another shared blog, but their focus is on vintage patterns. They have over 1000 contributors, so you are sure to see something new whenever you visit. 


We then traveled back to Chicago and met Steph of Siouxzeegirl Designs. She too is a fellow member of the Haute Couture Club of Chicago. She absolutely loves to design and shares her process as she goes. 


Domestic Deb is anything but domestic, she is a true artist. The jacket below is a testament to her artistic abilities.


We went on to meet Stephanie of Sea of Teal. She lives in Germany and writes her blog in both German and English. A very talented lady. Just love those striped pants!!!


We met Jo of Making It Well. She is always in search of a challenge and enjoys making the cutest pieces.


gMarie Sews,  her blog says it all, she enjoys living a creative life...daily. And she does it all so well! 


We met Lyric of Sew Lyrically Vintage. This is an amazing woman, she sews beautifully and does it all on a hand crank sewing maching!!! 


Iris of IrisArctica not only loves to sew, but she enjoys seeing something ready made and recreating it for herself like the beautiful skirt below.


Zoubi Zoubisou loves vintage and yet makes it look so modern.


Learning Patterns is written by Rene, another fellow member of the Haute Couture Club of Chicago. She is an extraordinary fabric designer. The fabric that she used in the skirt below is her design. Pop over to her blog and then jump over to her Spoonflower shop for some wonderfully tempting designs.


Whitney is a custom clothing designer from Indiana. She writes and shares her work at Tom Kat Stitchery.


Vacuuming The Lawn is written by the effervescent Kyle. She is always up to something fun!


Sue's Sew By Me is all about her creative journey. Sue restyles patterns in the most wonderful artistic manner.


Patti of Not Dead Yet Style is not a sewist, but on her blog she offers a wonderful place to showcase what you do and it's called Visible Mondays. By all means, check it out!


Lori of Monkeyroom is an American living in Germany. Doesn't the picture below make you want to jump on a plane, head to Germany and have a cup of coffee with her?!! 


By this point in the year, I had stopped officially doing The Wednesday Showcase posts, but I just had to talk about Kim of The Material Lady. She and her husband came to Chicago for a holiday. While they were here, I took them up for a ride and tour of the city. A gift like this is what makes doing the Wednesday Showcase posts so worth the time!


And finally, our last Wednesday Showcase post for 2016 featured the one and only Paco Peralta and his lovely patterns for Vogue Patterns. Paco has not been writing a blog for over a year now, but the site is still up and well worth checking out for inspiration and his wonderful tutorials. You can find it HERE


So other than the one negative experience, it was another great year of meeting some of the most amazing people. Each of you are such an inspiration! 


Share this PostPin ThisShare on TumblrShare on Google PlusEmail This

Sunday, December 25, 2016

Sunday Night Reflections


Share this PostPin ThisShare on TumblrShare on Google PlusEmail This

Thursday, December 22, 2016

The Islander Sewing Systems Cape Super Express Sew Along

Due to the holidays, and days away from work, the final post for the Cape Super Express may not get published on the Sew News blog for a week or so. So, rather than make you wait, I thought I would go ahead and post the final addition here. Once it's up on the Sew News blog, I will add the post link to the the Sew News Sew Along Links tab at the top of the blog so that you can easily find it whenever you might like to refer back to the sew along.

For the sew along, I chose to make my cape out of denim. A few of you have asked about wearing a denim cape in Chicago during the winter. It won't happen!!! I would freeze to death! The first cape I made for the magazine is really an evening cape. Although it is made out of faux fur and velvet, it is still rather light weight. But, when going out for the evening, I basically go from the house to the car, and the car to wherever I happen to be going, so I am not walking around in the cold. The denim cape will be worn in the spring and fall months when I need something, but nothing too heavy. So, I am all set for once the weather changes. But, if you are anything like me, the bad thing about making a garment that can't be worn now is the fact that I have to wait. I don't like to wait ;) I'm one of those make it and wear it kinda gals! 

The Sew News Islander Sewing Systems
Cape Super Express Sew Along
Week 3/Finishing


This will be the final post for the Islander Super Express Cape sew along. The name says it all, super express, and yes, it's a fast piece to make! So no reason to stretch the sew along out to 4 weeks.

One detail that I failed to mention in the last post is the shaped seams at the hem of the cape. This has been done on purpose and is a wonderful aide in hemming the garment as it reduces bulk in the hem. So when sewing the lower portion of the seam, be sure to clip the seam and continue sewing to the end of the seam with a 5/8" seam allowance. You will love how easy the garment is to hem with the reduced bulk.


Now that the outer shell of the cape is together, it's time to finish the arm slots. If you look at the instruction booklet, there are a number of steps to finish off the arm slot on the cape and then on the lining. It's a wonderful method, but I like to simplify things if I can, so I will show you my method for finishing the arm slots. With both methods available, you can then you can choose which method you would like to use.


Begin by interfacing the arm slot opening on the cape with a 1" wide piece of fusible interfacing.


Sew only the front lining pieces together. Lay the front lining on top of the cape with wrong sides facing. 


Fold back the top of the lining as you see above. 


Stitch the lining to the cape along from notch to notch of the arm slot opening. Be very precise in your stitching and only stitch from notch to notch. Be sure to back stitch at each end.


Repeat with the lower portion of the front lining.


Press the arm slot opening. 


The arm slots are beautifully finished on the outside and the inside of the garment. If you are a little concerned about ripping the seam, you may do a bar tack at either end of the arm slot opening. You may also top stitch around the opening.


Now sew the back of the lining to the front along the side seams with a 5/8" seam allowance. Press seams open.


Before attaching the facings, the hem of the lining should be finished. 


Simply turn up the hem allowance and stitch in place on the machine. 


Now attach the facings to the lining. I like to edge stitch my facing to the lining once the seam has been sewn. It helps to hold the seam allowance in place and looks lovely. The facing is stitched to the lining with a 1/4" seam allowance.
   

Attach the hood to the neckline. Sew the facing to the cape at the neckline. The seam allowance is 1/4".
   

Due to the method I used to attach the lining to the cape at the arm slot openings, you will need to sew the facing to the front of the cape along one side, and then sew the opposite side. You will not be able to sew the facing around the cape in 1 continuous seam.
  

Once the facing has been attached to the cape, we can hem the cape. Fold back the facing as you see below. Fold back the seam edge and stitch across the facing at the hemline.


Clip the corner of the facing, and then trim down the facing, leaving the hem of the cape intact. 


Press the hem of the cape. If you would like, the cape can be top stitched along the front edge and along the hem. 


To attach the lining to the hem of the cape, sew thread chains at the seams and then 3 more along the back between side seams.


The final step in finishing the cape will be the front closure. There are so many options. If you would rather not sew in buttonholes, you can sew on snaps as I did with the faux fur/velvet cape. On the outside I added buttons which gives the appearance of a buttonhole without the worry.  


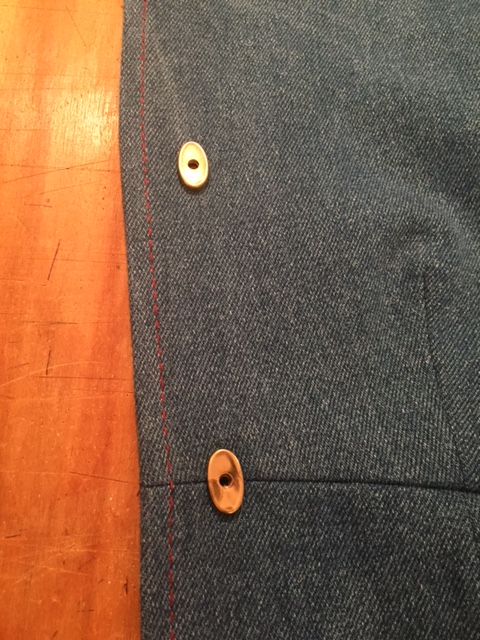
For my denim cape, I decide to use some vintage purse claps. Sadly, these are no longer available, but I hope that this will encourage you to think outside the box. Due to the heavy nature of outerwear garments, there are so many possible options for closures, including purse hardware.


This clasp simply folds over the edge.


And has a corresponding piece for the opposite side. Consider using a magnetic closure. If you do, then any button can be sewn to the front of the garment, and once again, you have not had to worry about buttonholes not turning out as you had hoped.


My finished cape. It really has such a lovely shape.


Due to the closure that I decided to use, I did not top stitch the front waist seam.


But the side seams have been top stitched as well as the hood.


Although the hood was a 'make it work" situation due to my lack of fabric, I was pleased with how it turned out.


The back of the cape.


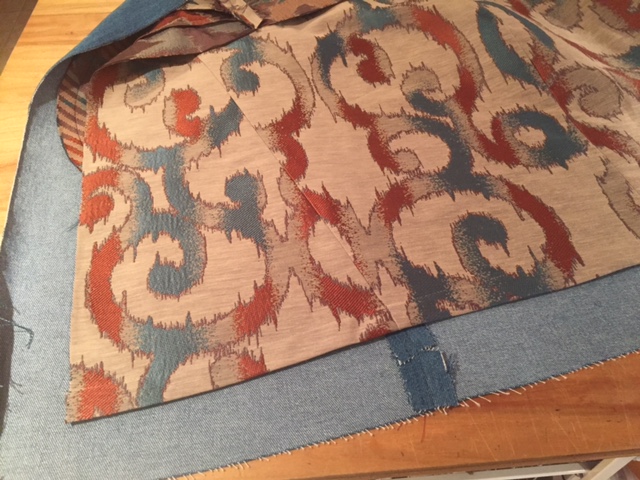
And finally, the fun interior lining.


Now you can see how very versatile the Cape Super Express pattern is. It's a great cape for throwing on to run errands, and it makes for a lovely evening piece to add to your wardrobe. 


If you have not purchased a pattern, but would like to, you can find it HERE at Shop Sew It All.

It has truly been an honor and a pleasure to sew along with you on the Sew News blog for the past 3 years. Along the way, I hope that I have been an inspiration. Remember, all of the sew alongs are always available on the Sew News blog. You can easily find links to all of them HERE.

Remember to always,
Sew On!!!
Rhonda Buss


Share this PostPin ThisShare on TumblrShare on Google PlusEmail This