Typically, I would save this for Sunday evening, but it is so beautiful and I feel that it should not be saved, but shared...now. It will only take 10 minutes out of your day, but I feel that it will add so much more than it takes away.
OH, caught my attention and made me present in this moment
MY, connects me with something deep in my soul
GOD,the personal journey that we all long to be on, to be inspired, to feel connected to a universe that celebrates life.
As this last day of the first month of this year comes to a close, may we all be mindful of the gift that it truly is. May we not just race through our days and not know how we spent our time.
I wish for you an OH MY GOD day!
Rhonda
Thursday, January 31, 2013
Monday, January 28, 2013
The Incredible Workmanship of Chanel
This video was posted on the Haute Couture Facebook page yesterday. I tried to find it on YouTube with no luck. Ann Steeves of Gorgeous Fabrics just posted it on Facebook so I was able to get the link. It will only take a couple of moments of your time, well that's if you only watch it once!! The music is beautiful and the opportunity to see the seamstresses in action is a treat.
Enjoy!
If you have a little more time, 17:03 minutes to be exact, here's the entire spring show.
Enjoy!
If you have a little more time, 17:03 minutes to be exact, here's the entire spring show.


Monday Morning Inspiration
We have made it to the end of my pile of Modes Royale pattern catalogues. I have had an awfully good time sharing these with you and I've loved your comments. I think the most often shared observation has been the emphasis on a small waist and hips. Remember, everyone wore girdles on a daily basis. You just didn't leave the house without one. When I was doing bridal gowns, a good portion of my business was reworking vintage gowns. It was interesting to see just how much girdles changed the body. Although my brides were quite thin, they were not the same shape as their mothers or grandmothers. The new generation has a very straight shape where their mothers and grandmothers had a waist, and a small waist at that. The catalogues that we have been viewing are before the days of photoshop. Rather than photographing a model and then thinning her down, everything here is drawn and so the artist can draw the "ideal figure." I love to shop for vintage clothes and I have found that just like today, women came in many different sizes. We really haven't changed that much, we just don't squeeze into girdles like we did at one time. Hopefully you have been able to take away a few ideas for a collar, a sleeve, or a pocket treatment.
Next week I have something rather fun, and vintage to share with you. I think you'll find it interesting. So, until next week...enjoy my last Modes Royale catalogue. This is the Fall/Winter 1952/53 edition.


Rhonda
Sunday, January 27, 2013
Sunday Night Reflections

I am reading more and dusting less. I'm sitting in the yard and admiring the view without fussing about the weeds in the garden. I'm spending more time with my family and friends and less time working. Whenever possible, life should be a pattern of experiences to savour, not to endure. I'm trying to recognize these moments now and cherish them. I'm not "saving" anything; we use our good china and crystal for every special event such as losing a pound, getting the sink unstopped, or the first amaryllis blossom. I wear my good blazer to the market. My theory is if I look prosperous, I can shell out $28.49 for one small bag of groceries. I'm not saving my good perfume for special parties, but wearing it for clerks in the hardware store and tellers at the bank. "Someday" and "one of these days" are losing their grip on my vocabulary. If it's worth seeing or hearing or doing, I want to see, hear, and do it...now! I'm not sure what others would've done had they known that they wouldn't be here for the tomorrow that we all take for granted. I think they would have called family members and a few close friends. They might have called a few former friends to apologize and mend fences for past squabbles. I like to think they would have gone out for a Chinese dinner, or for whatever their favorite food was. I'm guessing I'll never know. It's those little things left undone that would make me angry if I knew my hours were limited. Angry because I hadn't written certain letters that I intended to write "one of these days." Angry and sorry that I didn't tell my husband and parents often enough how much I truly love them. I'm trying very hard not to put off, hold back, or save anything that would add laughter and luster to our lives. And every morning when I open my eyes, tell myself that it is special. Every day, every minute, every breath truly is a gift from God.
This was written by an 83 year old woman to her friend.
Sunday's Soup
Before the day gets completely away from me, I wanted to share a very simple soup that I love to make. It all begins with a packet,

This is the most wonderful stuff!! If by chance your store does not carry this, you can google the name and find the company. I have ordered this, so regardless of where you are, you can get this little packet of wonderful. Inside the package are two small packages. For this soup, we will use both.
I call this soup,
Creamy Coconut Ginger Cilantro Soup

The ingredients;
1 package of A Taste of Thai Coconut Ginger Soup Base
2 14 oz. cans of Lite Coconut Milk

2 cubes of Knorr Vegetable Bouillon

1 bunch of green onions
1/2 cup of finely chopped cilantro
Juice of 1 lime
4 to 5 carrots sliced
1 10 oz. package of fried extra firm tofu, you can also use chicken or even shrimp

Open ginger packets and place in pot. Add the 2 cans of coconut milk and the 4 cans of water. Slice carrots and add to pot. Bring to a boil. Add chopped green onions. Cook until carrots are tender.
Add the juice of 1 lime to the rice and stir in cilantro.

Chop up tofu or your choice of meat.


This soup is very aromatic. I have not read the ingredients on the package of the soup base, but whatever is in it, it's GOOD!!
Hope you have had a lovely Sunday!
Rhonda
Saturday, January 26, 2013
Sleeves On Saturdays
I'm finally back with the first edition of Sleeves On Saturdays for the new year. It's about time!!!
Today's sleeve must be made from a knit fabric. It's very easy to do and adds a fun aspect to any basic top. It does not save fabric!! I'm calling this sleeve
The Bending Willow Sleeve
 You can see that the sleeve is cute full and has lots of drape.
 Begin with your bodice pattern. Remember, this top needs to be made from a KNIT fabric, if you make it out of a woven, you will not be able to move!!!!!


 Fold the sleeve pattern in half and match it to the shoulder of the bodice at an angle as you see below.
 To create the billow aspect of the sleeve, round off the lower portion of the sleeve as you see below.
 From where the sleeve intersects with the bodice, draw a 45 degree angle and extend it past the length of the bodice. This sleeve is 12" longer than a normal sleeve.
 Off of the 45 degree angle, draw a straight line. Measure your wrist. Remember we are making this top from a stretch knit so we can have a close fitting wrist. We want a close fitting wrist so the the sleeve will not fall off of our hand. As an example, if your wrist is 10", divide this measurement in half. Draw a line over at the wrist that will be 5". Do not add ease to the wrist measurement. Continue the curve that we started at the lower edge of the original sleeve and bring this down to meet with the drawn in wrist.
 I said that this sleeve is 12" longer than a normal sleeve. The extra12" begins at the wrist of the original sleeve. This is a very relaxed sleeve, so if your sleeve is a little longer, it will be fine, just not too much longer.
 We don't want sharp angles on out top, so round off the armpit seam and round off the angle that we drew in at the wrist as you see above.
 The final pattern. It looks rather funky, but it does make an interesting sleeve.
Enjoy!!
Today's sleeve must be made from a knit fabric. It's very easy to do and adds a fun aspect to any basic top. It does not save fabric!! I'm calling this sleeve
The Bending Willow Sleeve


We did a dolman sleeve and if you will remember, we lined up the sleeve with the shoulder of the bodice as you see below. WE DO NOT WANT TO DO THIS WITH THIS TOP.

As you can see from the garment, the sleeve is at an angle to the bodice.


Enjoy!!
Friday, January 25, 2013
Fabulous Free Pattern Friday
It's a MOOSE!!!! I just couldn't resist taking a picture with the town moose of Winter Park, Colorado. I would never want to be so close to the real thing. Once, while I was visiting here, I took a wonderful snowshoe hike and saw an entire herd of moose. They were down in a valley and probably 50 yards away, so no need to worry. It was such a highlight to see them in their natural habitat.


To begin, you will need a long rectangular piece that is wide enough to fit over your bust. For the length, measure around your neck and down the front, just as if you were measuring for a scarf. This panel should be lined, so you will need to cut 2.
Now for the back.
Measure from your shoulder to your waist for the length of the top back portion.
With the front panel draped around your neck, measure under your arm from the edge of the panel across your back to the opposite side. This will give you the width measurement of the top back portion.


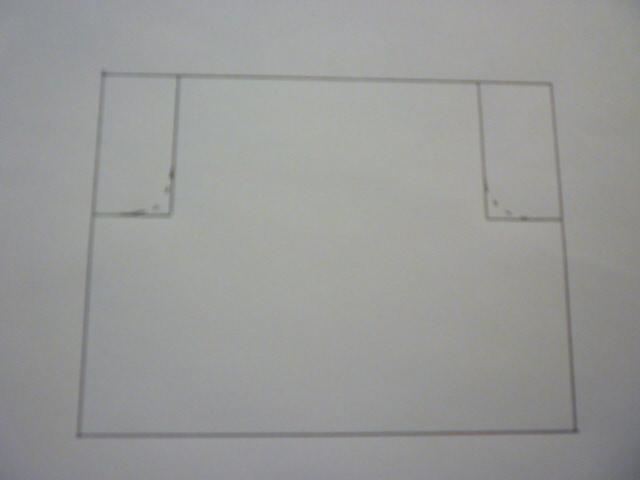


For the waist panel, use the measurement you just took from one edge of your front panel to the opposite edge of your front panel at your waist. Cut a band that is 2" wide(add seam allowance)by the length that you just determined. This waistband piece will be sewn to the top back piece.

For the lower portion of the back, measure your hips from one edge of the front panel across your back hips to the opposite edge of your front panel. Add at least 1" for ease. To determine the length of this panel, measure from the bottom of your waistband to the bottom edge of your front panel. Add hem allowance.


Hem the lower piece and then attach all 3 pieces to the front panel.
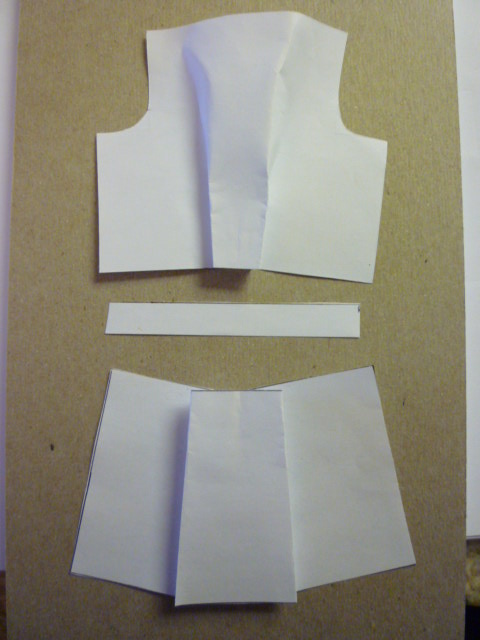
The front panel of my vest was made from a faux fur remnant I had left over from a stole that I made. The back is made from fleece.
The front panel is lined with a piece of silk in an animal print. Don't get too close or that cat will bite you!!!!


Rhonda
Subscribe to:
Posts (Atom)