f
Showing posts with label rectangles. Show all posts

Thursday, April 1, 2021

Fabulous Free Pattern Friday, A Look Back at The Flutter Top

If you aren't on Instagram, I strongly encourage you to open an account!!! The inspiration is incredible!!! 

For the month of March, Sam of Fruglisama, and Ruan of The Yorkshire Sew Girl  hosted a challenge, make up a dress with a free pattern, and use something from your stash. Okay, easy enough. As I thought about the free pattern that I would like to use, there are millions!!!!, I decided to use 1 of my own free patterns. Why not?!! After all, I've invested a lot of time and energy into my Fabulous Free Pattern Friday series. 

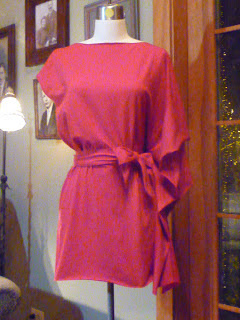
The tunic/top below was actually done 10 years ago :/ Amazing! But, it's still great all these years later. I called it The Flutter Top as the draped side flutters when you walk :) You can find the free instructions HERE


I had found a lovely piece of silk at the resale shop. I'm always amazed by what people give away. The size of the piece was perfect for the project. There wasn't enough to do a belt, but I also had a lovely piece of silk that had been given to me, and I liked how the 2 pieces worked together.  


This piece could not be simpler, it's just a rectangle. I left arm openings on the side seams. The drape section is created with just a simple vertical seam. A large buttonhole was done at the waistline for the tie belt to go through. The selvedge edge was so nice, so I left it and did not even hem dress.


Here you can see me move in the dress :)


Just in case you missed the link, you can find the instructions HERE. A great piece for spring/summer wear. If you make a shorter tunic length, it looks fabulous with pants, especially a pair of very flowy pants. 

Winter is quickly coming to an end. I am off for my very last day of skiing. Kinda makes me sad :(  But, there's so much to look forward to, kayaking, lovely hikes with Berkley, working in my garden. We always need to look for the bright side of everything!

Thanks for stopping by :)
 Rhonda


Share this PostPin ThisShare on TumblrShare on Google PlusEmail This

Friday, February 12, 2021

Fabulous Free Pattern Friday/The As You Choose Top, Wrap, Skirt

I can't remember the last time I did a Fabulous Free Pattern Friday post!!! At any rate, it's been quite some time, that's for sure :)

This is not a new post. I actually did this skirt 9 years ago :/ Wow, how could it be that long ago?!! I wore the skirt just a few days ago, posted it on Instagram, and a number of people commented on the shape, and loved it. So, I thought I would do a reminder post of the skirt. It is nothing more than a rectangle. It needs to be made in a knit. The end result is a piece that is quite versatile, and packs like a dream. And too, it's quite easy to wear.

Here's the picture I posted on Instagram. Since I originally made the skirt, I wear it with the drape on the side.   


Me 9 years ago ;) As you can see, I am wearing it with the drape in the back. 


I really like that I started doing videos to go along with my Instagram posts as it gives you a better idea of how the garment looks on the body, and how it moves.


And here's the magic of it all. It's just 2 rectangles with 2 ties. It cannot get any easier!!!


If by chance you would like to make 1 of your own, you can find my original post HERE.

Over this upcoming year, I am going to revisit a number of the pieces that I did for the Fabulous Free Pattern Friday series. It's been brought to my attention that they can be a bit difficult to find. In the event that you would like to take a look at some of the pieces I've done, you can find most of them HERE on my Pinterest page.  

What I love about this series is that it shows that fashion does not need to be complicated. Of course, complicated can be fun, but easy and fashionable is always a win, win situation in my book :)

Enjoy!

Rhonda


Share this PostPin ThisShare on TumblrShare on Google PlusEmail This

Monday, October 12, 2020

Put a Little Swish In Your Day

To start the week off, I am preempting the post that I had intended to do as I had promised this post, and was reminded that I had yet to post it :/ 

I actually made this skirt 7 years ago, YIKES!!! But, I still love it, and I still wear it. Such a fun skirt. I called it the Faux Ruffles Skirt as it looks like there are ruffles around the bottom of the skirt...but there aren't!


In the video you can see how the skirt moves when I walk. It's just super fun!!!


The skirt is nothing but rectangles. The faux ruffles are created with long rectangular strips. Sewing all the strips takes a bit of time, but the prize at the end is worth it.

Each row is a little longer than the previous row. One thing to keep in mind is that this is best out of a knit fabric. The edges of the strips are not finished. Since each row is a little longer than the previous row, the bottom actually forms a bit of a circle which gives the skirt that super swish when you walk.


If you would like to make a skirt for yourself, all of the instructions can be found HERE.

It's always fun to have a little swish in your day ;)

BTW, my peppers that I made last night turned out to be lovely. I used bulgar which is a cracked wheat for the base of my stuffing. While I thought they were quite good, I like THIS recipe for stuffed peppers that I did a while back. It's just a little heartier than the peppers I made last night. While I like what I did, I don't think the recipe is worth posting. But, new recipes are coming down the pike ;) 

Rhonda


Share this PostPin ThisShare on TumblrShare on Google PlusEmail This

Sunday, October 11, 2020

A Recipe and Some Rectangles

Happy Sunday to anyone who happens by :)

I am truly trying to get myself back on track. I have been cooking, and I have been sewing, just not posting. Although I do post everyday on Instagram. Hoping for a good, back on track week this week. Fingers crossed :)

Sunday's are special to me, and I always try and make something good for breakfast. This morning it was my Spinach and Rice Cakes. This is such a versatile recipe. Great for breakfast with poached eggs, and great for dinner with a mushroom sauce. The patties freeze well, so make up a batch, cook what you want, and freeze the rest for another meal. You can find the recipe HERE. When I originally posted them, so many wrote to me and told me how much they love the recipe. Like I said, a favorite of mine too!

I've posted a couple of garments on Instagram that a number of people have found interesting. Both were done for my Fabulous Free Pattern Friday series.

First up is a skirt that I wore yesterday. Such an easy piece to make, and it's so comfortable to wear.


I called this piece the Sweeping Rectangles Skirt as the lower portion of the skirt is 2 rectangles that sweep around the body. You can find the instructions for the skirt, as well as the top I made using this idea HERE


The second piece is a fun top. It looks complicated, but it is anything but. I called this piece The Rolling Rectangle Top, as it's really just a rectangle that rolls to the side.

Here the top is laying flat. You'll have to look closely, but it all begins with a rectangle. The neckline is on the left side. Like I said, it looks complicated, but it is not. You can find all the info on making 1 for yourself HERE.

                      ____________________________________________________________

I'm rather excited as I had an idea for a somewhat new version of vegetarian stuffed bell peppers. When the weather begins to change, I so long for warm, abundantly flavorful food. And anything that requires the oven, all the better! If it's as good as I think it will be, the recipe will be up tomorrow.

I'm off to do a little cooking, and I hope, a little sewing. I've been having the best time with my 1 year challenge. I plan to catch you up on that as well this week.

Happy Sunday!

Hope you have a great day :)

Rhonda


Share this PostPin ThisShare on TumblrShare on Google PlusEmail This

Tuesday, September 8, 2020

Fabulous Free Pattern Friday/A Recap

When I was growing up, and would visit my grandmother who had NO air conditioning, there were nights that I thought I would literally melt. I would complain. She would answer my complaint with, "just lay still, you'll cool off." Oh yea, right!!!(Note the sarcasm ;) A number of years ago, before we installed central air in our home, my husband had been out of town, and the temps were ungodly. We had yet to put the window units, and I wasn't going to do it alone. My husband arrived home late that night, came upstairs where I had the ceiling fan as well as floor fans going. But, when it's so hot, they are just whipping around hot air. He got ready for bed laid down and complained about how hot is was. I said, "just lay still, you'll cool off." :) With that, he got up, went to the basement and came up with an air conditioner. I'll admit, I was grateful.  

A few days ago, a delivery truck came down our back alley and tore out our cable line, leaving us without a television. Well, a television with cable anyway. I told my husband that it would be fine. We have a television in our bedroom that doesn't have cable. I usually only turn it on for the news. With that, he went down to my studio and got my little television, along with the antenna, and mounted it up on top of our television cabinet. It's really quite the funny sight :) But, I have admit that even I miss the cable. The repairman is coming today! Hallelujah!!! 

_______________________________________________________

Last Sunday, my outfit of the day was this Shibori dyed skirt and top. A friend gave me the fabric. You may not believe this, but this was the first piece of fabric that I have ever been apprehensive about cutting into. It just felt so special.  


I originally posted the skirt in 2012 :/ Wow, 8 years ago!!! You can find all of the instructions on how to create it HERE. It's really quite simple, 2 rectangles in the front, and 2 rectangles in the back.


In the video, you can see how the rectangular extensions on the top panel causes a drape.  


My top was made with the scraps I had leftover. Fortunately, I had pieces that I was actually able to match the pattern, and look like it was always meant to be.

You can see with the top laying flat that it is literally 2 rectangles in the front, and 2 in the back. So super easy to do. 

I just ordered a devise that will make making videos so much easier. As soon as it arrives...look out!!! I have a lot of tutorials that I have been wanting to do. A number of you asked me to do a tutorial on the asymmetrical knit dress that I recently posted. I know the top pictured above is very basic, but I think it would be a good tutorial to do as it's a confidence builder.

A number of you have sent notes telling me that I have inspired you with my daily outfits. That brings me so much joy. Believe it or not, I get up each morning actually looking forward to what I am going to wear, whether I have some place to go or not. This is the first time in my life that I feel I am really enjoying my wardrobe. Who would have thought that a virus named COVID would make that happen!

Have a wonderful day, and pull on something that you've made :)

 Rhonda      


Share this PostPin ThisShare on TumblrShare on Google PlusEmail This

Wednesday, August 12, 2020

The Magic Rectangle Dress

Magic: 
The art of producing an illusion

There is no real magic in the Magic Rectangle Dress, but, it does give the illusion that it's much more than it is!!! In reality, it's just 2 long rectangles. There are no shoulder seams, just a seam down the front, and a seam down the back leaving an opening for the head. And then of course, side seams.


Much of my day was spent in old clothes. I am in the final stage of  getting my friend's house ready to turn over to the new owner. It has been quite the journey. More on that in another post :) After a day of hard work, I was rewarded with an evening out for dinner. And, as I've said, I am celebrating everything! If it's dinner out, I am dressing for the occasion!!! So, I pulled out this dress that I made 7 YEARS AGO!!! 

I so love this dress. I used a piece of vintage fabric that I had for years. I think it's from the 1940s. The fabric is so soft, and feels so good against the skin. The only issue is that it wrinkles easily, but hey, we can't have everything ;)

The "magic" of the dress lies in the gathered detail. The gathering gives shape over the bust, and that's what makes the dress look like so much more than it is.  


If you think that you would like to give this little idea a try, you can find my original post HERE. This is a piece that's great for summer, and will also work well in the winter in maybe a wool challis with a turtleneck. Hmmm, I think I will be making another ;)

If you give the dress a try, be sure to let me know! Just send me an email :)
Have a wonderful day! I hope a little magic comes your way :)
 Rhonda


Share this PostPin ThisShare on TumblrShare on Google PlusEmail This

Friday, June 26, 2020

Shimmy Skirt Fabric and How To/Fabulous Free Pattern Friday

It's a rainy day in Chicago, but I am grateful. My grass looks wonderful, and gardens all around are a joy to see. I had hoped to fly today, but...another day.

I posted this skirt on Instagram yesterday and a number of people asked about the fabric and how it was done. Beyond simple!!! I didn't think about it, but it actually qualifies as a Fabulous Free Pattern Friday (remember those?) piece as it's just 2 rectangles. 


I did this super short video to show how the skirt moves when I walk. It's a little exaggerated as do not shake like that when I walk. At least I hope not ;) 


Below is the exact same type of fabric. You've seen it a million times I'm sure. I've placed it on the form just as you would see it on a bolt in a store. The grainline is running vertically. Sewn vertically, it's cute, can make a fun little dress, skirt or top.  


But, when it's turned so that the crosswise grain is vertical, it takes on a completely different look. The skirt I am wearing in the video has ruffles that are a gradation of white to dark gray, so a little more interesting than just the dark gray and the black of the fabric below. This works as the fabric has the same stretch on the straight of grain as well as the crosswise grain.


To make the skirt, I purchased just enough to fit across the front of my body, I think I bought about 5/8 of a yard. The fabric was cut in half, giving me a front and a back. I used the two selvedge edges for the hems, so no need to finish off a hem. All in all, the skirt took no more than an hour to put together. 


Rather than roll the top edge for an elastic casing, which would have been bulky around the waist, I used a 2" wide decorative elastic. I really like this elastic as it has a small ruffled edge.


I have no idea why this picture came out so fuzzy, but I think you can see what it is. I had a small piece of this ruffled fabric leftover from a project. Not enough to do much with, but rather than pitch it, I added it to the bottom of a t-shirt. I didn't have enough of the solid blue to make a t-shirt that would be the length that I would like, but the 2 combined, SCORE!!! I love wearing this with white pants. The pattern that I used for the t-shirt is the Molly Tee from Pattern Union. There was absolutely no fabric left for sleeves, so I just made a binding, and called it a day.    


I've not posted my thoughts on this year's Me Made May journey, or a little dream that I have, hint, hint ;) More on both in an upcoming post. But I will say this, maybe it's because we've all been couped up, not really sure, but what really came forward for me this year is that I want to truly enjoy what I choose to wear each and everyday. The shimmy skirt, and the ruffle edged top both fit that criteria, at least for me :)
  
Pull something fun out of your closet and celebrate the day!
Rhonda  


Share this PostPin ThisShare on TumblrShare on Google PlusEmail This

Friday, November 17, 2017

Fabulous Free Pattern Friday/The Cabbage Rose

Something a little sweet today, a beautiful cabbage rose. They look rather complicated, but are quite easy to make.


All it takes are a few rectangles and a circle.  


They look lovely on a hat, bag, pinned to a coat or jacket.

They can be scaled down. Decrease the measurements by 2" and you'll have a smaller rose. You can also increase the measurements by 2" for a larger rose. 

So, have a little fun and let your imagination run wild with all the possibilities. You can even make a bouquet for an arrangement that will brighten your home all winter long!

Enjoy!
Rhonda 


Share this PostPin ThisShare on TumblrShare on Google PlusEmail This

Friday, December 18, 2015

Fabulous Free Pattern Friday/The One Seam Evening Gown and Shrug

Last Saturday was my birthday, and it just so happened to be the date of the American Opera Society of Chicago's Holiday Gala. I always enjoy having something special to wear, and since it was my birthday, I especially wanted a new dress. 
I have been doing my best to use fabric that I have rather than purchase more. I had this beautiful piece of very glittery knit fabric and the companion fabric, but I didn't have a lot of either piece. In fact, I only had 1/2 yard of the solid gold, and a little over a yard of the patterned fabric. The fabric sat on my dress form for a week while I tried to decide what I wanted to do. Sadly, what I really wanted to do just couldn't be done with what I had, so it was make it work time. The result, a 1-seam dress and a 1-seam shrug.  
As you can see, the dress is a basic strapless tube dress. It has elastic at the top to hold it up.
The back. 
Below you can see the shape of the dress. The 1 and only seam is in the center back. 
The dress is approximately 10" wider than my hips at the hem.
Putting this dress together is so very simple. Just start with a piece of fabric that is approximately 10" wider than your hip measurement. Sew up a seam and create a tube. Slip the tube on and pin it in to fit your body. Rather than try and pin it from the back, I did my initial pinning from the side. After I did the initial pinning, I sewed it up, tried it on again, and then made adjustments to get the right fit. Once I was happy with the fit, I used the dress to cut a matching lining. Remember, this is a knit dress, so you need a knit lining as well.   
As I said, the top is held up with a band of elastic. But you don't see the elastic band. Very important.
Here you can see the inside of the dress. The elastic is sewn to the lining and not to the outside fashion fabric. Once the elastic was attached to the lining, the lining was then sewn to the fashion fabric.
Bra cups were sewn to the lining. You can see how was done HERE. I also attached a piece of elastic to the lining just under the bra cups for extra support.
From the outside, the top of the dress is smooth and seamless.  
A stitched in hem would make the dress look a little cheap. So rather than a machine stitched hem, or a hand stitched hem, I left an opening in the lining and then reached through the lining and sewed the lining to the hem. The dress is hemmed and no signs of stitching! Prior to hemming the dress, I tried it on and determined the length and decided that a 1 1/2" hem would be best. I then cut 1" away from the lining. I left the extra 1/2" for the seam allowance.  
Below you see the shrug laid out flat and folded in half. I actually used the entire width of the fabric for the shrug. An opening was left in the middle and then what became the sleeves was tapered to the wrists. You can see too that I added cuffs, which are just 2 small rectangles.  
Below you see the shrug before I cut away the selvedge edge. I thought that the cuffs were much more appropriate than leaving the selvedge edge :)
The dress was a hit. Believe it or not, I was asked, "who are you wearing?" I proudly said, "Rhonda Buss." I always get a kick out of that question!! Throughout the evening, I smiled to myself while thinking, it's just 2 seams!!!! Yes there is a little more to the construction with the addition of the bra cups, but it is really so very easy to do.
Sadly, I didn't get a picture of me wearing the dress. It was a very busy evening. But, I will be wearing it again soon, so I promise to get pictures the next time.
So in the future, if you need a dress and you are short on time, or fabric, or both, remember my 1 seam dress. Trust me, it'll be a hit!


Share this PostPin ThisShare on TumblrShare on Google PlusEmail This

Saturday, December 13, 2014

Fabulous Free Pattern Friday

A Gown In A Jiffy!
Believe it or not, this gown falls under the Fabulous Free Pattern Friday heading as it is nothing more than 2 rectangles and a triangle. The front panel that you see below is a rectangle as well as the black accent piece.
Now you can see the triangle.
I had the fabric that I used for the front panel, but there was really only enough to go around my bust. My hips are about 4" bigger than my hips. I could have stretched it around my hips, but then I would have run the risk of looking like a sausage.
If you look closely at the above picture, you will see that the top portion of the rectangle is stitched to the waist. A triangle was cut out of the black fabric, which happens to be a slinky knit. The triangle was sewn to the 2 seams. To tie in the black and give the gown a more finished look, I cut a 4" wide band, folded it in half and sewed it to the top of the dress.
To line the dress, I cut another rectangle out of spandex and fitted it to my body. To give support, I added the bra cups just as I did with this tank top. You can find the instructions for adding bra cups HERE.
 
The spandex piece with the bra cups was then sewn to the top of the dress and flipped inside. The dress has structure without boning!
The straps were created out of beads and crystals that I had on hand.
In the end, a lovely gown that took me approximately 2 hours to put together. So if you need or would like a gown and you don't have a lot of time to put one together, here's a fun and easy option!


Share this PostPin ThisShare on TumblrShare on Google PlusEmail This
