f
Showing posts with label sleeve drafting tutorials. Show all posts

Friday, April 27, 2018

Sleeves On Saturdays Hits The Road

Last Saturday I had the the opportunity to spend the day teaching a class on sleeve design. And guess what?!!!, I learned something too! Actually, as we were going through the drafting of a particular sleeve, I realized other design possibilities, and I can't wait to give it a try. But today, I wanted to share a few of the pieces I prepared for the class. You've seen them before, but I think it's always fun to see them in other fabrics and maybe with a little bit of a different twist. 

For all of the tops that I put together, I used Londa's Creative Threads Terrific T pattern. This pattern makes a wonderful block to use as a foundation for any design you might like to do in knits. There is a darted and non-darted version.


What I suggest is to make the top up and adjust the fitting. Once you are happy with the fit, remove all of the seam allowances, and then transfer the pattern to poster board. The reason for removing the seam allowances is that it can become quite confusing once you have done your design as to where seam allowance should be added, and where it should not. So if you remove the seams from your block, once you have made design changes, you'll know to add seam allowance to each seam. No confusion :)
  
This is going to be my go to top for the summer. I just love the design and the ease of wear. With this top, I did a boat neck neckline, front and back. 


This was the original top I did for the blog. You can find all of the instructions HERE. With the original top, I did a v-neck opening in the back. 


This is one of my favorites, the Draped Cowl Sleeve. In an upcoming post, I will show you how I drafted the neckline of this top. Once again, this is the Terrific T from Londa's Creative Threads.  


This is the original top that I drafted. Take note that although the neckline is a cowl, it is quite different from the one I did above. This one has an asymmetrical drape, and is much more fitted through the bodice. A bit more complicated to draft than the top above. You can find the original post and all of the instructions for drafting the sleeve HERE. 


The top below is not finished as I haven't quite decided what I want to do with the neckline. While I love the fabric I used, it wasn't quite the best for showing the design of the sleeve. The fabric is a washable merino wool that I purchased at Fabrications in Michigan. I am in love with washable merino wool! It feels like silk in your hand. So lovely. 
The front of the sleeve does not show the design.


All of the design takes place at the back of the arm.


This is a picture from the original sleeve that I did. Here you get a better idea. It's a lovely sleeve to wear, and such fun to draft. You can see the original post HERE with all the drafting instructions.


I began the class by telling everyone that I believe everything is easy, you just need to know how, and I was there to show them how :) What I loved most was at the end of the day, a number of the ladies came up and said, "Your right! It all looks so complicated, but it really is easy once you know how." A successful day! 

Tomorrow I will be attending the class on making leather sneakers at the Chicago School of  Shoemaking and Leather Arts. I'll give you a peek at my day in my next post. Always fun to learn something new :)
Rhonda



Share this PostPin ThisShare on TumblrShare on Google PlusEmail This

Friday, November 3, 2017

One Pattern So Many Ways, All In One Place/A Great Design Resource

I love patterns! There was a time when I couldn't wait for the new Vogue pattern catalog to come out. I would go to the store and literally sit for at least an hour(if not more!)and dream over the patterns. Better than a Christmas wishbook for me! 

Then...I went to school and learned how to design and draft my own patterns. One thing I learned is that a good basic design is really all you need, well that and some instructions :)

A while back, I took Butterick 5678, which is sadly out of print, but available on sites like Ebay and Etsy, and showed you how to take it from a basic shirt and add lots of design details. The instructions are a little difficult to find as they are all over the blog, so I thought I would consolidate them all here on this post. That way, if there is something you would like to try, you can easily find it. 


This was the first piece that I did. The basic shirt was used, but a Peter Pan collar added and a change in the sleeve. You can find the instructions for the Perter Pan collar HERE, and the sleeve instructions HERE.


While this looks rather complicated, it's really quite easy. The collar tutorial can be found HERE, and the sleeve tutorial HERE. 


This is a favorite of mine, the raised neckline. The collar tutorial can be found HERE, and the sleeve tutorial HERE.


This is a wide variation of the shawl collar. Look closely and you'll see that the collar sits up a little higher on the back of the neck. This is one of my favorite dresses for summer. The tutorial for the collar can be found HERE.


This is the narrow version of the shawl collar. You can find the tutorial for the collar HERE, the sleeve tutorial HERE, and the circular skirt tutorial HERE. 


I also showed you how to take the pattern and turn it into a summer jacket and add pockets HERE. The sailor collar tutorial is HERE. The sleeve has a turned up cuff, and that tutorial can be found HERE.


And finally, my favorite of all!!!!, my zebra dress. You can see my design process HERE.


This is a dress that I find every excuse to wear. 


Although the pattern I used is out of print, plenty of basic shirt patterns can be found. Any of these designs can be used with a pattern that has a good neckline, the shoulder seam sits at the shoulder, and has a princess line seam.

I think it's about time to choose another pattern and have some fun with it. I'll put that on the schedule for January. In the meantime, I'll start looking around for a good basic pattern and deciding how I can manipulate it. If you have any ideas, let me know :)


Share this PostPin ThisShare on TumblrShare on Google PlusEmail This

Saturday, November 26, 2016

Sleeves On Saturdays/A Complete Directory

The Sleeves On Saturdays directory tab is complete!!! I finally sat down and finished the page. I'm so happy :) Now you can easily click on the Sleeves On Saturdays tab at the top of the blog, scroll through and find a sleeve along with the link to the blog post. If you would like, just click HERE as well :) 

In the directory, you'll find links to 36 sleeves drafting tutorials. 


Lots of fun styles to try :)


I would like to thank Bev of sdBev for giving me the nudge I needed to finally get the page finished. I would also like to thank Joy of Joyful Expressions who also nudged me by wishing she could help. So nice :) 

So....if you find a little time to spare, click on the link and look to your hearts content!


Share this PostPin ThisShare on TumblrShare on Google PlusEmail This

Saturday, April 30, 2016

Sleeves On Saturdays/Stylized Gathered Sleeve

I have had this sleeve in my file for quite some time. It's such a pretty sleeve and would look so nice on everything from a t-shirt to a dress. So, very versatile. I had found a full length picture of the dress, but for the life of me, I was unable to find it this morning. I'm only giving you the drafting instructions for the sleeve today. Next Saturday I'll be back with a sample of the sleeve along with a sample of the Bell Shaped Sleeve that I did HERE. Hopefully I will have found my picture of the entire gown by then!


I'm calling this sleeve;

The Stylized Gathered Sleeve

It's really quite easy to do, but it does have a number of steps. So here we go!

Begin with a straight sleeve pattern.


Determine the length of your sleeve.


Draw in the diagonal style lines. The lines radiate from the notch points on the front and back of the sleeve.


The gathering that goes across the sleeve begins approximately 1 1/2" from the top edge of the sleeve. The gathered area is approximately 4" wide. Place notches 1 1/2" down from the top of the sleeve and then 4" down from the top notch. Use a single notch on the front and double notches on the back. 


Cut the side sections away from the center section.
Divide the gathered area into 4 equal sections. Be sure to number each section of the sleeve.


Draw a guideline on a piece of paper. 
Cut each section apart and spread evenly matching the center grainline to the guideline.
The spread between each section should be approximately 1".


The pattern for the center gathered area has now been established. Be sure to transfer the notches so that you will be able to perfectly match the enter section to the side sections of the sleeve.


Now to establish the gathered cap. 
We do not want to gather the entire cap, only the center section.
Begin by squaring a line across from the top notches of the center section that will be gathered. 
From the center of the sleeve cap, measure over approximately 1 1/2" to 2" on either side of the cap. Draw a diagonal line down to the squared line that we have just established. 


Divide the center section into 3 sections on either side of the center of the cap. Be sure to number each section as you see below.


To spread the cap and establish the gathering, begin by cutting from the top of the cap on the center line to the squared line and then across to either side of the sleeve. When cutting to the side of the sleeve, be careful to cut to the edge but not through.
Now cut from the top of the cap to the squared line of each section. 
Draw a guideline line on a new piece of paper and match the grainline of the sleeve to the new guideline. 
Spread the sections of the sleeve as equally as you can. Notice that the sleeve cap rises at the squared line that was established.


The rise in the cap that happens when the cap is spread will cause the top of the cap to be higher. You may want to raise the cap a little more. Do this by adding 1" at the center of the cap and blending back to where the beginning of the spread began.


The final pattern for the sleeve.


Be sure to establish the notches on the cap of the sleeve. The notches that are on the top of the cap are for the gathering. As you can see below,  the notches should be where the gathering was established. 


Just follow the steps, and the sleeve should come together easily.
Have fun!
Rhonda


Share this PostPin ThisShare on TumblrShare on Google PlusEmail This

Saturday, April 2, 2016

Sleeves On Saturdays/Bell Shaped Sleeve

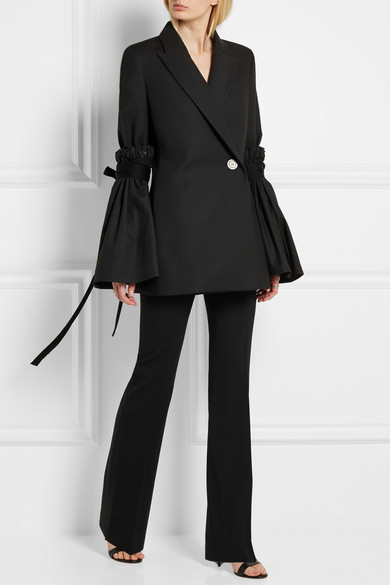
It seems that every time I see any garment featured for spring, I see a bell shaped sleeve. The new thing I guess. The sleeve shape has been used throughout the ages, but I think it does look rather fresh and fun.
The sleeve pictured below is quite a large, but would be fun on a jacket or a floaty top.  

I love how the one below was accented with a piece of lace at the intersection between the top of the sleeve and the bell, and then trimmed with the lace. Very pretty and feminine.


The Bell Shaped Sleeve

The sleeve is quite easy to do.
Begin with your straight sleeve pattern.


Determine where you would like the bell shape to begin. In the pictures above, the bells begin approximately at the elbow.
Square a line across and be sure to add notches so that the bottom portion of the sleeve can easily be matched back to the upper portion of the sleeve once the bell shape has been drafted.


Cut the lower section away from the upper portion of the sleeve. More than likely, your sleeve will be tapered at the wrist. Square a line down to the wrist section from the elbow line. 


Divide the  lower portion of the sleeve into equal sections. 
Be sure to number each section.


Cut from the wrist to the elbow line, but not through the elbow line. 
Draw a guideline on your paper.
Determine how wide you would like your bell to be. For a fairly small bell, spread each section 1".  Of course, the bigger the bell, the more you will spread each section. 
Begin with the middle section and spread it equally on either side of the guideline. If you are spreading each section 1", you would spread 1/2" on either side of the guideline which will result in a 1" spread.
Now spread your determined amount between each section. For this exercise, each section should be spread equally. In another post, I will show you how to draft a more stylized bell shape where the sections will not be spread exactly the same all the way around the bell shape. 


Connect between the sections with a smooth line to develop your final pattern. The guideline will become your grainline. Be sure to transfer the notches that were established before the original sleeve was cut apart. 


And that's just how easy a bell shaped sleeve is.

I found a couple of sleeves that are very stylized. I love how each looks. It would be easy to think that since each has an elastic top that they are just a rectangle. But I don't think so. I think that each of these sleeves use the same principle. 


Good luck with your bell shape sleeve drafting. I plan to have one made up for you next week. I really love the look and can't wait to have a garment with a bell shaped sleeve!


Share this PostPin ThisShare on TumblrShare on Google PlusEmail This

Saturday, January 9, 2016

Sleeves On Saturdays/Now Easy to Find

Happy Saturday!!!
This past week, I received a message about one of my sleeve tutorials, and I was told that it was a little difficult to find. So I thought that before I start adding more to the pile of tutorials that I have done(and there is quite a pile!!), I would add a Sleeves On Saturday page to the blog. I've only begun to add the links, it's a rather large job, but within the next week or two, all of the links to all of the sleeves that I have done to date should be much easier to find. In the meantime, you can always go to my Sleeves On Saturdays Pinterest page and find them as well.
Since there are so many sleeve tutorials, I thought I would do a little recap. You'll find more on the Pinterest page, but this will help to refresh your memory...and mine :)

You'll find sleeves with draped pleats. The 2 below look similar, but they are actually not the same at all. Fun to draft and wear!
The sleeves featured below also look rather similar, but again, the drafting is different and how they fall on the body is also quite different.
Over the past few years we've done a number of gathered and shirred sleeves. The outcome can be quite interesting! 
One of my favorite tops, I called this the Haute Hippy Sleeve. It's actually a regular sleeve that was crocheted into the armhole.  
This has been my most pinned sleeve to date. It was a special request by a follower who was trying to develop the traditional Philippine sleeve. On the top right you see a lovely lady who gave the tutorial a try and made such a beautiful outfit.
We did shirred accents and made something that could be boring a lot more interesting.
We've created drapes and did a little twisting! 
We created sleeves that gave the shoulder a very square look and then took it a step farther and made it really stand out. 
Along the way, we have had a few drafting exercises. I showed you how to draft a sleeve and then create a fitted sleeve with a dart.
We've had fun with gathers. The sleeve at bottom right actually has a fake cuff. The cuff is a part of the sleeve.  
We've also created a lot of pleats. 
We used a set-in sleeve pattern and created a raglan sleeve. From there we created a barrel shaped raglan sleeve.  
This is such a pretty sleeve. I actually created it to for the post I did for the Sew News blog on drafting Peter Pan collars. Take note that the sleeve remains fitted through the top portion and then flares into the round bottom with gathers at the cuff.
Here's a full view of the blouse. If you would like to see the post on drafting Peter Pan Collars, you can find it HERE.

We've drafted sleeves that are very structured in nature. 
And finally, we've taken a traditional sleeve and given it a new twist like the Twisted Petal Sleeve below,
 and this super fun sleeve which is great on a jacket or coat, The All Points South Sleeve.
Hope you've enjoyed this look back. Like I said, there are more, I just decided to pull these out. So check out the Pinterest page. Or until I finish doing the links, you can also put Sleeves On Saturdays in the search box to the right.
Enjoy!
Rhonda 


Share this PostPin ThisShare on TumblrShare on Google PlusEmail This