f
Showing posts with label diy. Show all posts

Sunday, April 29, 2018

Fun With Sneakers

I made a fabulous soup this past week that I will share, but my time is a little short this morning as I am taking a class this weekend. So look for the soup recipe on Tuesday.

A friend of mine sent me a note about a leather sneaker class that was being offered at The Chicago School of Shoemaking and Leather Arts. I have wanted to take a class, but I haven't made it a priority, so my desire continued to be placed on the back burner. When my friend told me that she was taking the leather sneaker class and asked if I would join her, I said, "Sure!," and I am SOOOO happy that I did.  

I did a little research before I went to the class, but just wasn't sure about what I would like to do. When I arrived, the sample pictured below grabbed me, and that was it! Loved the design.


Below is a sneak peek at what I am doing. When  I arrived, there was a table full of leathers to choose from. I vacillated between a red crocodile embossed leather and the teal blue crocodile embossed leather that you see below. I went with the teal blue, after all it is my favorite color :)


You're seeing the sides of my shoes and the tongue. In the background you see the inspiration sneaker. So today I will be sewing the shoes all together. Can't wait to see them all come together. 

I'm off to get dressed and head out for a super fun day! 
I'll post the finished shoes tomorrow.

Happy Sunday!
Rhonda


Share this PostPin ThisShare on TumblrShare on Google PlusEmail This

Friday, March 30, 2018

April Showers Bring Umbrellas!!!

An umbrella is something most of us don't think about...UNTIL WE NEED ONE!!! There have been so many times that I have not looked at the weather before leaving home, only to be caught in the rain, then running into a drugstore just to purchase a crummy umbrella. And then there are the times that I have an umbrella, but it has been left in the car. 

The Haute Couture Club of Chicago will be doing an umbrella workshop after our April meeting, so I needed to get mine together in order to conduct the workshop. What a fun projectthis turned out to be!

I chose this sweet bird print for the outside of my umbrella.


But as usual, I couldn't leave well enough alone, and decided to line my umbrella. There are no instructions for lining the umbrella, but it isn't difficult to do.


Not only is it my favorite color, I love how the fabric gives the feeling of clouds.


I did do the strap so that my umbrella will close completely, but I just love how it looks when the folds are hanging out. Too pretty to just leave in the closet :)


The pattern is from My Little World and you can find the pattern as well as the umbrella frame HERE.


All the notions you will need.


 This is the kit I used for the umbrella frame.


To line the umbrella, rather than serge my seams as the pattern instructs, I pressed my seams open.


I laid the top and lining fabrics together and sewed all around the bottom. Once stitched, I clipped the seam allowance, and then opened one of the seams and turned the fabrics to the right side.   


I have not sprayed the surface of my umbrella to make it waterproof, but I will before using it.

The fabric came from the sweet little shop I have told you about, The Fabric Nook in Granby, Colorado. If by chance you like what I bought, give Tina a call. The bird fabric is from Hoffman Fabrics, New Leaf Stitches. The blue/green fabric is from Moda Fabrics, made in Japan, pattern #30150. If you do order the fabric from Tina, just tell her that it was the fabric that Rhonda purchased, she'll know what you are talking about :)

It was such a fun project, and I can't wait to use my new umbrella. who would have thought I would actually want it to rain?!!!

Here's to April showers :)
Rhonda 


Share this PostPin ThisShare on TumblrShare on Google PlusEmail This

Friday, March 9, 2018

I'm an Ambassador for Olfa!

Now this is not something you've seen from me in a while...2 blog posts in a row, WOOHOO!!!!

I had the most amazing day yesterday. It began with a note to a former exchange student who wanted my advice on some life issues. Then, I received a text message from a favorite little gal who shared with me that she had been accepted in the master's degree program that she had applied for. I decided that a return message would not do, so I gave her a call. She told me that I was one of the very first to know the news. Finally, another young woman did a lovely post on Instagram in honor of International Women's Day, talking about the amazing women who have made a difference in her life, and low and behold, my picture was in the mix. Such an honor.

It goes without saying, but I have had some very low moments over the past few months. A few weeks ago, I happened upon this scripture verse,

He gives a home to the woman who could not give birth, and makes her the mother of children. 
Psalms 113:9

The verse felt like a promise, a gift, at least to me. I wrote it down in my book of quotes, and I was reminded of it yesterday. Isn't it interesting how something rather insignificant to one can mean so much to another? :)

So....my big news!!!!

I was chosen to be an ambassador for Olfa products. Amazing!!! 

I was sent a gift of their brand new products, turquoise and pink cutting mats, along with a fun pink rotary cutter. The new line is called Splash. Hey, we can all use a little color and fun in our days. I'm a little partial to the turquoise mat as it is my favorite color!!!

The new rotary cutters come in 3 fun colors, pink as you see below, purple and turquoise. You can see them all HERE


One of my favorite Olfa products is my great big 24"x36" cutting mat. I'm hoping to add the 35"x70" mat to my collection. Both mats are fabulous for cutting out larger projects.


I am not becoming a quilter, but from time to time I will do a quilting project. Although, for all of you amazing quilters out there, I can hardly call this project a quilting project. 

A number of years ago, I came across this great panel piece, but it was in a light mint green. I made it up and gave it to a couple of friends who were having babies. They LOVED them and used them as a way to teach the alphabet. Three friends are having babies, and I wanted to do something special. As luck would have it, I came across the same panel print, but in red. If by chance you are interested, I found it HERE on Fabric.com.


I was in Colorado and had the chance to pop into one of my favorite little stores, The Fabric Nook. You may remember the interview I did with Tina, the owner. Such a delightful lady :) Anyway, she helped me with the backing and the binding for my project. This will be my first project using my new Olfa mat and cutter. 


Olfa has a wonderful new blog. You can find it HERE. Each month they will be featuring a different designer as well as a special project. If you would like to check out the list of designers and ambassadors, you can find that post HERE. I have some fun things planned, one will incorporate the airplane. Should be fun!

Happy Friday!
 Rhonda 


Share this PostPin ThisShare on TumblrShare on Google PlusEmail This

Tuesday, December 5, 2017

A New Dress For Christmas

Well, a sorta new dress for Christmas ;)

I love popping into a resale shop just to see what I can find. We were away over the Thanksgiving holiday, in a small little town up in the mountains. As small as the town is, they have a fabulous resale shop, in fact, I call it a department store as you can find just about anything you may need there.

On this recent trip, I went in and found this little dress, and for some reason it spoke to me.
  

I rather like the black lace trim along the bottom of the skirt. When I saw the dress, I thought, hmmm, I can do something with this, but it was marked at $15.00. Not that $15.00 is a lot of money, but it was just more than I wanted to pay for something I am going to tear apart. In the past, Mondays are half price clothing days, so I decided to wait. Monday finally rolled around, I happily went skipping back into the store thinking I would get my dress for $7.50, but was surprised to see that the clothing wasn't on sale. I asked, and I was told that they are no longer doing the Monday sale. 
Bummer :( But I decided that persistence can pay off, so I went back the next day. On that trip, I found a super cute belt that I can wear with my ski pants, and it was only a dollar...SCORE!!! But, no half-price clothing. So, I went back the next day, fingers crossed as it was my last chance before we left. No luck. I was so bummed that I just stood at the front of the store while my husband took a look around.

As I stood there, the lady behind the register looked at me and asked if I bought the belt there at the store. I said yes. She commented on how cute it was with my ski pants. Totally unlike me, I told her that we had come back that day as I was hoping that it was half price day as there were 2 pieces that I wanted. The first was a little cashmere sweater that was completely trashed as it had holes in it, but it has beautiful rhinestone buttons. When I told her that it had holes in it, she said that it shouldn't be on the rack and that I could have it for free. Wow! But I told her no, the buttons are well worth $2.00 to me, so I would pay the $2.00. She asked about the second piece. I showed her the dress. She said that it had been there for quite sometime and that she would mark it down to $5.00. WOW, again!     


When I purchased the dress, I thought I would take the top off and add a velvet bodice, but then I remembered that I have this piece of black stretch lace.

As I said, I initially thought that I would take the bodice off, but when I laid the dress down and threw the lace over it, I changed my mind. I think I may keep the bodice and cut the halter straps off, making it a bustier. I would like long lace sleeves and a lace overlay. So, I'll see how it turns out. I also plan to add more beads and sparkle to the lace along the hem, make it a little more festive. It'll be fun to see how it all comes together. I'll be working on this later today, so I should be able to share the finished dress on Thursday.   


As I stood at the register paying for my little treasures, I couldn't help but think about asking for what you want... 

Seek and you will find, ask and it will be given...even a little resale shop dress :)

Have a wonderful day!
  Rhonda


Share this PostPin ThisShare on TumblrShare on Google PlusEmail This

Friday, November 17, 2017

Fabulous Free Pattern Friday/The Cabbage Rose

Something a little sweet today, a beautiful cabbage rose. They look rather complicated, but are quite easy to make.


All it takes are a few rectangles and a circle.  


They look lovely on a hat, bag, pinned to a coat or jacket.

They can be scaled down. Decrease the measurements by 2" and you'll have a smaller rose. You can also increase the measurements by 2" for a larger rose. 

So, have a little fun and let your imagination run wild with all the possibilities. You can even make a bouquet for an arrangement that will brighten your home all winter long!

Enjoy!
Rhonda 


Share this PostPin ThisShare on TumblrShare on Google PlusEmail This

Thursday, October 19, 2017

Make a Sewing Caddy

Finding a fun little project that will also enhance your life is just the best! I made up my little sewing caddy and was immediately so happy that I did. Such a wonderful place to store everything you may need while sitting at the machine. My husband even thought it was a great little item.


You will need to cut;
1 rectangle 6 1/2" x 15"
3 rectangles 6 1/2" x 6"
1 rectangle 6 1/2" x 11"

If you would like to quilt your large rectangle, you will also need a piece of batting (I like wool batting the best) 6 1/2" x 15". Quilting the backing for the pockets really makes for a much nicer caddy, so please don't skip this step.

Check out the video below for my how to. Once again, I apologize for my weak voice. I feel a sore throat coming on, so it's a little quivery. 


For those of you who enjoy written instructions;

You will need a 5" x 7" acrylic document frame. I found mine HERE


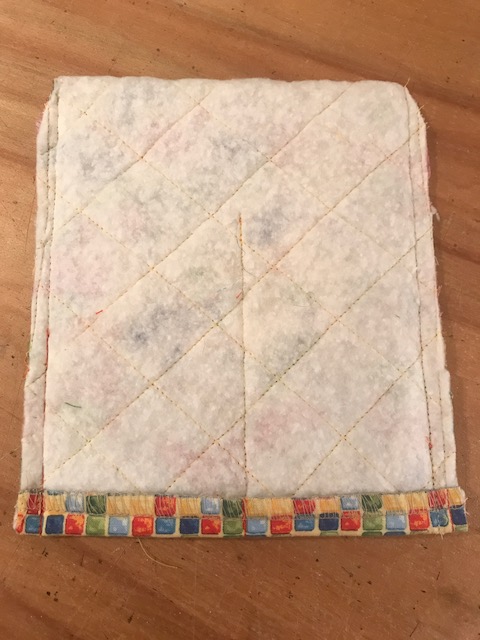
Cut 1 rectangle 6 1/2" x 15". Back it with a piece of wool batting and quilt it.


Cut 3 rectangles 6 1/2" x 6". Press in half. 


Stack on top of each other leaving 1 1/4" at the top between each layer. To reduce bulk, the top 2 rectangles do not extend to the bottom. 


For the opposite side, cut 1 rectangle 6 1/2" x 11". Fold in half and press. Line up with the edge on the opposite end of the long rectangle. 


Baste the pockets to the large rectangle. Find the center and stitch from bottom to top on the 3 stacked pockets. 
Serge the lower edge to to give it a nice finish. 


Fold the large rectangle in half, fold up the bottom edge and stitch the sides with a 1/4" seam allowance.
Clip the corners and turn. 


And voila, you have a fabulous little caddy!


This little caddy can be made for a multitude of things, a desk organizer, maybe a place to keep paint brushes easily at hand. So get those creative juices going and sew up a storm!

Enjoy!
Rhonda


Share this PostPin ThisShare on TumblrShare on Google PlusEmail This

Friday, October 28, 2016

Fabulous Free Pattern Friday/Toiletry and Lipstick Bag

The first of this month, I had the wonderful opportunity to teach a bag making class for the Peoria, IL American Sewing Guild chapter. It was a packed day, but everyone left with a finished tote bag. I named the large bag, The Parisian Travel and Market Bag. The companion bags are a toiletry bag and a lipstick bag. Now the smaller bag can be used for anything. It's especially great for small items...like lipstick, cotton pads, or anything that could possibly get lost in a larger bag. 


The toiletry bag has a front zippered pocket, great for combs, nail files, anything that's rather flat.


Both bags have a gusset that allows for plenty of storage room.


October is my official blogging anniversary. Now, truth be told, I did 1 blog post and then went months before I ever posted again. That was in 2009, so 7 years ago. Amazing!!! In reality, I've been blogging on a regular basis since 2012. But since October is the official anniversary, I thought I would do a little something special today and give you the patterns for the toiletry bag as well as the lipstick bag. Nice :) You can find the Lipstick Bag and Toiletry Bag patterns HERE.

In the true spirit of Fabulous Free Pattern Friday, I am going to make you draft the gusset for the toiletry bag. You will need to draw a rectangle that is 4" x 27 1/2".  

For the lipstick bag, you will need a 7" dress weight zipper.

For the toiletry bag, you will need a 9", and a 14" dress weight zipper.

The bags require 3 1/2 yards of piping. I like to make my piping from cording that can be purchased in the home dec section.

All exterior pieces of the bag are interfaced with a woven cotton interfacing, including the pocket pieces. The lining is not interfaced. I light to use a medium weight home dec fabric. Waverly fabrics are my favorites. 

Begin with the front toiletry bag pocket. Press in a 1/2" seam allowance on both straight edges of the top and bottom pocket. Align the 9" zipper so that there is 3/8" seam allowance on either end of the zipper.   


Edge stitch the zipper in place.


Baste the zippered pocket to the front of the bag.


Sew the exterior gusset to the lining gusset at either end with a 3/8" seam allowance.  
From this point on, all seam allowances will be 3/8". Turn the gusset the right side, press and edge stitch the ends. Baste the side seams together.


Make the piping. Cut 3 1/2 yards of piping strips 1 1/2" wide. Sew strips together as you see below.


Once sewn, wrap the fabric around the cording and stitch together with a zipper foot.


Sew the cording to the front and back pocket panels, beginning at the bottom of the panel. Leave approximately 2" free. 


Open up 1 end of the cording and reveal the cord. Lay the opposite cord next to the exposed cord and cut away so that the cording from the opposite end will lay inside the bias strip.Be sure to fold back the raw edge. Wrap the fabric around the cording and stitch down.


Transfer the small dot from the pattern onto the front and back. The zipper will be sewn from 1 dot to the other.


Fold back the seam allowance of the piping and align the end of the zipper with the dot at 1 end. The teeth of the zipper should be even with the edge of the piping. 


Fold back the end of the zipper tape prior to sewing.


Stitch the zipper to the bag by sewing from 1 dot to the other and stitching in the ditch between the bag and the piping.


As you can see, the zipper will be longer than the top edge of the bag.


Now install the gusset. Transfer the larger dot to the bag. The gusset will be sewn from large dot to large dot. 


To sew the lining to the bag, simply match the right sides together of first the front.Stitch the lining from small dot to small dot, leaving the top edge of the lining open. Once sewn, turn right side out. Repeat for the back side of the bag.


Hand stitch the top of the lining to the zipper. 


In order to have the gusset fold into the bag when the bag is closed, the gusset will need to be stitched. 


Simply fold the gusset with right sides together and stitch down from the top edge 2 1/2".


To finish off the end of the zipper, sew a square tab to the end. The end of the zipper can be left outside the bag, or tucked inside.


The lipstick bag is sewn together the same as the toiletry bag, minus the exterior zippered pocket. When stitching down the gusset, stitch it down 1" rather than the 2 1/2" as was down with the toiletry bag. 


The bags are finished and ready for an adventure!


The companion bag will be available for purchase in a few weeks. It features a top zipper as well as an interior zippered pocket. What I especially like about the bag is the zippered slip pocket. The pocket slides over the handle of a rolling suitcase. With the zipper at the top, you have a safe and secure place to stash your ticket as well as your I.D.


Hope you enjoy making the small bags!

Let's see what the next 7 years bring :) 
Rhonda


Share this PostPin ThisShare on TumblrShare on Google PlusEmail This