f
Showing posts with label Raglan Sleeve. Show all posts

Tuesday, August 28, 2018

A Month of Woven Tees/Week 4

What a lovely month it has been, except for the incredibly hot temperatures we have had in Chicago! As a child, I lived without air conditioning. For the past few weeks, every night as I crawl into bed, one of the last things I say is, "thank you Lord for air conditioning!" Complaining aside, I have so enjoyed the push that Becky of Trial Balloons gave me. Had it not been for her, I would not have ended up with all the new pieces in my wardrobe. 

THANK YOU BECKY!!! 

Now, this is just the best!!! You may remember the piece I painted and then had made into fabric. Well, I sent a piece to Becky and look at the AMAZING top she made!


Oh my, I am beyond flattered. The panel that I sent to her was unfinished, which I felt a bit bad about, as I thought she might just turn the edges and use it in a bread basket. What she did with it is a masterpiece. Be sure to pop over to her blog and see the back, as well as all the other lovely pieces that she made...and the poor woman has had pneumonia!  You can see all her work HERE.  

When Becky asked if I would like to participate in a month of woven tees, she said that she would put a Pinterest page together for us. The top below is one that she found and pinned to the page. I thought it was rather nice, so I used it as my inspiration for my tee, which is really a dress. To be honest, I wear more dresses than anything else in the summer, so a new, pop over the head dress is always up my alley. 


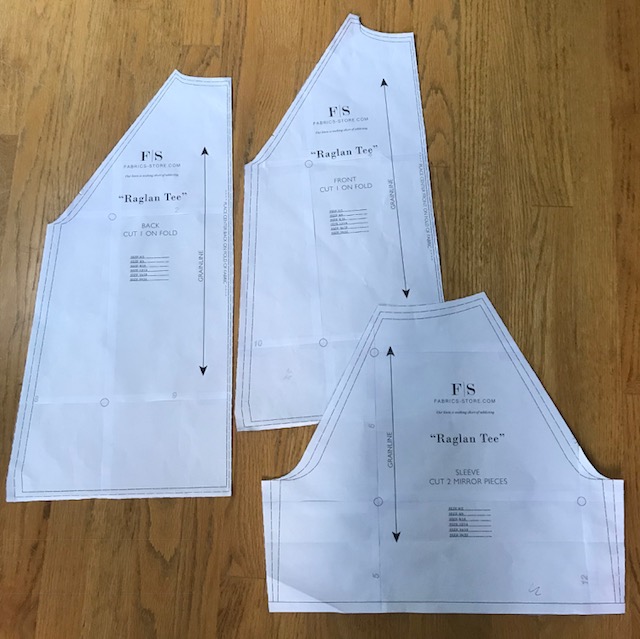
Once again, I used the free raglan tee pattern from fabric-store.com You can find the pattern HERE

Rather than dividing the sleeve, I decided to just start my design line from the underarm intersection. 


I did do a funnel neckline, which I really like. Super easy to do BTW.


If you look closely, you can see that I tapered the side seams just a bit, but not so much so that I can't get the dress over my head. I also added a pocket.


I think you can see the lines of the pocket better in the picture below. The seam line begins at the style line of the bodice and comes down to the pocket, but not all the way to the hem of the dress.


It makes the pocket area a little trickier to sew, but not that much. The reason that I did not want the seam down to the hemline was because of the shirttail hem that I wanted to do. Having the seam line to the hem wouldn't have made that much of a difference, but I just didn't want the extra bulk in the hem.


To balance the dress, I used the white for the bias binding along the hem. It should give the eye of anyone who bothers to look, something to notice


If by chance you would like a tutorial on how to make the funnel neckline, or how to draft the pocket, just let me know. They are both fun to do, and you can see that they can easily be added to a basic pattern such as this.

I do have a fun tea inspired recipe to share with you, but it is going to have to wait a few days as it has just been much to hot to bake. I hold my head in shame, especially when Becky has had pneumonia, and managed to get sooooo much accomplished :( 

I hope you have enjoyed the month of woven tees, and I hope that it has inspired you to maybe venture out and do something a little different :)



Share this PostPin ThisShare on TumblrShare on Google PlusEmail This

Wednesday, August 22, 2018

A Month of Woven Tees/Week 3

I'll tell the story in full at another time, but what a couple of days I have had. It even included me having to run and hide between houses at 2:30 in the morning. When we last touched base on Monday, I had said that Mr. Berkley was doing so well, I spoke too soon. He had gotten me up due to a sick stomach, and it was while I was out with him that we encountered a car that was doing some strange things, and which made me feel the need to run and hide between houses. But hey, I'm here to tell the story. A good ending is always a good thing!

For the month of August, Becky of Trial Balloons and I are doing a month of woven tees. I decided to just use the same pattern for each of my tees. Since I have been using the free raglan tee from fabric-store.com, this week's challenge of using a raglan tee pattern was a cinch. Becky did a layered tee that is absolutely smashing. You can find it HERE

I had this piece of double faced fabric that I have been wanting to use, black on 1 side, white on the other. 
  

I must say that I really took the easy way out on this challenge, as I basically just made up the pattern as is. But, a raglan tee offers a nice option for color blocking. So I used the black side of the fabric for the sleeves, and the white side for the body. 


Rather than sew the bias binding to the inside of the neckline, I sewed it to the outside to continue the color blocking aspect.


For the sleeve cuff, I rolled the hem to the outside so the opposite side of the fabric would be seen on the cuffs.


And I rolled the hem of the top to the front side as well. What you see below is the serged edge of the side seam. I could have done a flat-felled seam, but I was fine with the small amount of the serged seam showing. 


 Now that the top is done, I need to crank out a pair of pants, and this is 1 fabric that will be out of the stash ;)


My recipe this week is also very easy. It can be a refreshing afternoon drink, or served as a cocktail.

I begin with the Wild Berry Hibiscus tea from Mighty leaf. Any hibiscus or berry tea will be fine.
  

I brew up a pitcher full, and then pour some of the tea into an ice cube tray.   


Place frozen ice cubes in a lovely glass.


Fill the glass about 1/3 full of the brewed tea.


Now, here's where you can take it from an afternoon treat to a cocktail. 
For an afternoon treat, I like La Croix Berry flavored sparkling water.


Fill with the glass with the sparkling water, and you have a delicious drink. If you would like a cocktail version, just substitute the sparkling water with Prosecco, or your favorite sparkling white wine. 


What I love is that when the ice cubes begin to melt, the drink does not get diluted, and the flavor remains delicious from beginning to end!

Be sure to check out Becky's recipe for Earl Grey French Macaroons. My mouth is watering!!!


Share this PostPin ThisShare on TumblrShare on Google PlusEmail This

Thursday, June 28, 2018

Thrifty Thursday/Free Raglan Tee

A nice easy tee that can be made out of a woven fabric...sounds like a great idea to me!

A few weeks back, Fabric-Store.com posted the raglan tee below. It's a nice clean design, so I thought I would give it a try.


I had just a couple of issues with the pattern. There are no sizes marked, and there are no notches, which can be confusing when it comes to attaching the sleeve to the front and back. Prior to cutting, I put my own notches on the raglan seams to mark front and back. Easy enough to do. As for the sizing, just measure across the lower portion of the pattern and then decide based on your hip measurement which line to cut on. 

One other issue is that in the instructions, there is no seam allowance specified. I used 5/8". Other than those 3 issues, the pattern went together easily.
  

I decided to give it a whirl with some fabric that I found as I was cleaning up the studio, a calico print that I had completely forgotten about. Thought it would make a nice pair of summer pajamas.

The instructions call for 2 small tucks on either side of center in the front and back. When I made up the tee, the tucks were not needed. Look closely at the picture below and you can see that a small dart is needed on the shoulder.


Once the dart was added on the shoulder, the garment laid flat and there was no need for front and back tucks.


My finished pajamas. I had to cut the tee with a seam down the center of the back and front. I had the crocheted trim, so I threaded a piece of ribbon through, sewed it down the center and covered up the center front seam. I had another piece of crocheted trim that I added to the sleeves and the hem of the pants. The center picture on the right below shows how I mark the back of my pants. Great use of bits of ribbon.

And me in the pajamas :)


I had a small piece of silk that was just enough for another top. This time I had enough to do the cuffs. 


I once again added a dart on the shoulder.


I really like how the top wears, so I decided to lengthen it and make a t-shirt dress.


With this fabric, I did not need to add the shoulder darts as the neckline laid flat without them. 


I added a shirt tail hem. To finish the hem, I cut a 2" wide piece of bias. I made the back a little longer than the front.  


And finally, I added a small front pocket. It looks so cute on. I'll post pictures of me in the dress soon.


The pajama pants as well as the striped pants are from a free pattern, the Martha Stewart pajama pant that I posted HERE. I find the pattern to be a great basic elastic waist pant. 

You can find the Raglan Tee pattern HERE

Happy Sewing!
Rhonda


Share this PostPin ThisShare on TumblrShare on Google PlusEmail This

Tuesday, September 26, 2017

A Furry Sneak Peek

I am so excited about having the opportunity to give a lecture on working with fur at the upcoming Original Sewing and Quilting Expo in Schaumburg, IL and Fredricksburg, VA!

I'll be showing a number of jackets and coats, but this one I am especially partial to. In my last post about the coat, I told you that this is the 3rd reincarnation. Talk about recycling!!! 
Below is the early stages of a raglan sleeve coat with a swing hemline.  


When you love fur, it seems that friends will shower you with fabulous gifts. The collar and cuffs that I am using on the jacket came from a friend. The coat had belonged to her grandmother. 


Once the expo is over, I will share more of the coat, but for now, here's the sleeve with the fur cuff. A friend of mine had given me the embroidered trim and I loved how it worked with the fur. 


The jacket has a center front zipper. For those of you living in Chicago, go by Leonard Adler on Montrose in Chicago. They have a fabulous selection of zippers.
With any garment really, but especially with furs, a little extra touch is always fun, so I added the trim down the front along the edge of the lining. Now when the coat is opened, the eye will get a glimpse of something special.


I wanted to give you a closer look at this trim as it really is quite special. It's actually hand embroidered. For the most part, it is perfect, but if you look closely, there are wonderful little imperfections that give it that special made by hand appeal :) 


I am doing 2 fur classes in Schaumburg, one on Thursday morning, and the other on Friday midday. Even if you don't take one of my classes, stop by, I would love to meet you!


Share this PostPin ThisShare on TumblrShare on Google PlusEmail This

Tuesday, July 11, 2017

Fast Really Can Be Fabulous!

Making a garment that requires many steps, underlining, lining, handstitching, bound buttonholes, etc. can be a wonderful challenge. But there are times when we just want to make something up quickly that will still result in a good looking garment, and of course, something that doesn't look homemade. The Fast and Fabulous Jacket from Islander Sewing really fits the bill. It's super fast to make, and the results are, well, fabulous!


Since this is an unlined jacket, I chose a fabric that basically does not have a right or wrong side. 


 Here's my almost finished jacket. 


The back. As you can see, the fabric is a bit of an abstract stripe/plaid, so it required a bit of matching, but not down center back since there is no center back seam.


Although the garment is unlined, we still want the inside to look polished and finished. The first step has you serge the edges of the front, back, and sleeves. Another option would be to bind the edges, but of course this takes more time. And because of the way the way that the pattern has been designed, lining it would also be a snap. So lots of options.
In the photo below, I turned my jacket wrong side out so you could see the serged seams.


Love the shaped hemline. A nice aspect about a shaped hemline is that it is especially slimming. 
If you look closely, you'll see that I have not hemmed my sleeves. One thing to keep in mind is that I found the sleeves to be short, and I do not have long arms. So in cutting your jacket, you might want to add a few inches to sleeve. Remember, the extra can always be cut off. A bit of a challenge to add it back. For me the fix will be easy as I'll just bind the edge of the sleeve.
  

The facing finishes the jacket in a snap. I sewed my facing together and then pressed back 1/4" prior to sewing the facing to the jacket. Once the facing was attached, I pinned down the facing and stitched it down. Finished!!!


The jacket was designed to either be made with no buttonholes, or just 1 at the neckline. I decided to do a little something different and used a purse clasp.


I like the unexpected touch :)


I did make a slight alteration to the jacket and tapered it in at the waistline. I did find the pattern very true to size, so pay attention to the measurements prior to cutting


The jacket is designed with raglan sleeves, so it's easy to fit and even easier to sew. 

I have not sewn in the pockets at this point. I wanted to get the jacket together before adding the pockets. If you've never done a welt pocket, by all means, give it a try on a scrap prior to sewing it into your jacket. But, the instructions really make the process quite simple, so give it a try.

If you didn't catch yesterday's post, Janet is offering the pattern at a 20% discount to all who come by the blog. Just use the code SEWBUSS at checkout. You can find the paper pattern HERE, and the downloadable pattern HERE. The discount is good until July 22, 2017. 

Happy Sewing!
Rhonda


Share this PostPin ThisShare on TumblrShare on Google PlusEmail This

Friday, February 17, 2017

A Thrifty Thursday Repeat/Raglan Sleeved Top

Almost 2 years ago to the day, I made up this raglan sleeved t-shirt for a Thrifty Thursday post. Wow, I can't believe that it was 2 years ago!!! 


The pattern is from On The Cutting Room Floor. It's a rather boxy top that includes a hip band.


You got a glimpse of the top in my last Sewbussted's Material Witness video. A number of you sent notes asking to see more...
So here it is,


If my memory serves me well, I believe that I added 2" to the bottom of the top to compensate for leaving off the bottom band.

As for the pattern placement, this was a fussy cute situation. The pattern was placed on the fabric to get just the right design. It's not perfect, but close enough ;) 


I recently wore the top to dinner at a friend's home. Two other couples had been invited whom I'd never met. When the hostess asked if I had made the top(she knows I sew), I said yes, and the other 2 women were shocked! Always a great compliment :) 

If you would like to give the pattern a try, you can find the FREE DOWNLOAD HERE

A few things to take note of:
*Be sure that the guide box is the correct size after printing.
*It is a boxy fit, so in order to get a fitted look, you will need to taper the side seams.

This is a fun pattern for mixing fabrics and a great way to use up a few scraps that are just too large to part with. 

There are a number of other free patterns on the website, so be sure to look around. 


Share this PostPin ThisShare on TumblrShare on Google PlusEmail This