f
Showing posts with label t-shirt ideas. Show all posts

Sunday, September 6, 2020

All the Same, and Yet Different

It's a rainy Sunday in Chicago. A day that feels peaceful, quiet, restorative. I think that days like this are a gift, at least for me, as they are so very good for my soul. It's a day that makes me want to make soup ;) My soup posts are coming back. I don't know what happened. Maybe it's COVID...maybe. I always find it interesting how events have an effect on us. 

As I have shared, my One Year Challenge of wearing a garment everyday that I have made is proving to teach me so much. It's really taking on a life of itself. All good though :) 

The last few days have been difficult, quite difficult. I spent the better of the last 2 days crying. I'll be fine, in time. My husband has been so kind and gentle with me. He came home yesterday and said that he needed me to come to the door. He had purchased 2 containers of yellow chrysanthemums, my favorite color. It was a lovely day in Chicago. He suggested that we go out for dinner. We went to a wonderful Italian restaurant that I have never been to before. We had an appetizer of polenta with mushrooms that made me want to lick the bowl clean. We will be going back. If by chance you live in the Chicagoland area, the restaurant is Osteria Rusticana. Truly amazing food!

So, I dressed for dinner. As I've shared, I'm celebrating everything :) I made the dress below a few years ago. It's a very asymmetrical piece.   


Last Saturday, we were out to celebrate my mother's birthday. While it looks like a dress, I am actually wearing 3 pieces, and the top is exactly the same as the dress above. 


Here's the top paired with a pair of jeans. Each outfit looks so very different, and yet, they are all basically the same.


Here's a flat of the top.


And a flat of the dress. The only difference with the dress is that I added a flounce on the side. I think that with the flat of the dress, you can see how it was executed. I just began with a basic t-shirt pattern. It was cut and spread just under the but area to obtain the asymmetrical form. Other than the flounce that was added to the side seam, the bottom of the dress is just a straight piece. Really quite easy to do. 

If you would like me to do a tutorial on how to make this piece, I'll be happy to do so. Just let me know in the comments, or email me.

I hope you are having a lovely Sunday, and finding someway to celebrate the day :)

 Rhonda



Share this PostPin ThisShare on TumblrShare on Google PlusEmail This

Thursday, August 9, 2018

Bragging On You!

Another day at the zoo! ;) Night before last, Mr. Berkley woke me up at 1 in the morning, thrashing around in his crate, the horrible cone scraping against the sides. I listened, thinking he would settle down, he did, so I went back to sleep. When I got up at 5, and opened the crate, I saw that this little bugger had managed to pull out some of his stitches. So, another trip to the vet. Now he is wearing a lampshade sized cone on his head, and has brand new staples in his incision. But, I figured out that I could take the cone off of his head when we go for a walk. He and I are so much happier. And, no crate for sleeping, he has found a place beside me. So, I don't know, maybe I would have been the worst mom in the world, or maybe the best ;)

There is nothing I love more than being able to brag on things that you do, especially if I have given you a bit of inspiration.

A few weeks ago, I received a note from Jelena telling me that she had made the Caught In A Wave dress, but in a woven fabric. I asked that if she had time, to send a picture. I am SO very happy that she did!!! Isn't this a lovely dress?!!!


I love how it drapes. Check out those fabulous shoes! 
The dress was worn to a Tango Festival. She said that it moved beautifully, and that she received tons of compliments, and she should have, it is gorgeous. Jelena was a little concerned about the dress staying in place with it being such a slinky satin, but it did. Thanks so much for sharing your lovely creation! 
   

You can find the original post and how tos on the Caught In A Wave Dress HERE.

I also received a note from Penny. I did not inspire this make, but since I posted something on working with tea towels, she thought she would share these pics of her daughter. It was actually her daughter's inspiration that brought about these lovely tees. She was shopping at Ikea, found the towels, and thought they would make great summer tops. Had her mom put them together for her. 


I especially like the top below with the embroidery along the hem. Who would ever think that these were initially intended for the kitchen?!!


Thanks so much for sharing your lovely makes. This is where my inspiration originates :)
Rhonda


Share this PostPin ThisShare on TumblrShare on Google PlusEmail This

Tuesday, August 7, 2018

Tea and Tea Towels/ A Challenge

Well, I am getting a taste of what it's like to be a mother today. Little Berkley went in to be neutered yesterday, and has had a few issues with the medication. Add to it that he does not want to leave my side. And then I have Gracie, who is terribly afraid of the rain. Between fast trips outside, if you know what I mean :/, and 2 dogs that are wanting lots of attention, I've had a difficult time getting anything accomplished. But the rain will come to an end, and Berkley will heal, in the meantime, I'm just enjoying the fact that they look to me for comfort :)

Today is the first day of woven t-shirt challenge that Becky of Trail Balloons and I are doing as a collaboration. The fun part about it is that we have a specified challenge each week, but we have no idea what the other will be doing.

This week, the challenge was to work with tea towels. Becky picked up a lovely towel while on vacation and used it as the basis of her design. You can see her post HERE. It really turned out to be the perfect 'throw it on and go' top as well as an airy, 'stay cool through the summer' piece. For anyone who loves good tea, she offers a wonderful idea for making your own tea bags. 

I have a box full of vintage linens and tea towels that I have collected over the years. When Becky suggested using tea towels, I thought of a pile that I had found, all new/old stock, so, old but never used. And, all the same. They were especially wide, so maybe not really tea towels, but they would work for this project. 

I decided to use the free raglan tee pattern that I used in THIS post. The pattern plus my pile of towels resulted in this!      


I was able to turn the pattern so that I could use the finished edge of the towel for the hem of the top. There's a faint black accent line woven into the fabric, so I decided to use a piece of vintage black gingham as an accent. One corner was cut, turned on the bias, and then laid on top of the gingham to create the pocket. 


For the back, I used another corner to cover up an issue. While the towels had never been used, there were some age spots that I could not work around. For fun, I added a piece of the gingham to the back and topped it with some embroidered initials from another tea towel.


A lovely time when towels were monogrammed :) 


Below is the age spot that the back overlay covers up. I also used the black gingham to bind the neckline.


I felt that the sleeves needed a little interest, so I added a stripe of the gingham. Just stitched it over 1 of the stripes in the towel.


Not quite sure what I will wear the top with, maybe a pair of linen pants. 

And now for my recipe...

Like Becky, I love tea, and I have quite the collection. During the summer, I especially like a glass of lavender iced tea. While the tea is great to drink, it's also great to cook with! Believe it or not, it's the secret ingredient in my lemon bars. 


I begin with a box of lemon cookie thins that I get from Trader Joe's. If you don't live near a Trader Joe's, I'm sure you can find something comparable in your grocery store.


The cookies are crushed to make a  cookie crust.


Mashed into a foil lined pan and baked until golden brown.


All of the ingredients for the lemon/lavender filling are combined in a blender, and then poured over the baked crust.


The result is a lemon bar that is sinfully good!


Lemon Lavender Bars

Crust Ingredients;
8 oz. butter, melted
2 teaspoons vanilla extract 
2 cups crushed lemon cookie thins

Filling Ingredients;
8 large eggs
1 1/4 cups fresh squeezed lemon juice
2 3/4 cups lavender sugar
zest of 2 lemons
1/2 cup flour

To Prepare Crust
Crush cookie thins. Add vanilla extract and melted butter. Mix well. Foil line a 9"' x 13" pan. Spray or grease the foil. Pour cookie mixture into pan and press out smoothly. Bake in a preheated 350 degree oven for 30 minutes or until crust is golden brown. 

Filling;
While the crust is cooking, place eggs in blender and blend until frothy smooth. Add lemon juice, and continue blending. Add lemon sugar and flour and blend until smooth. Finish with the lemon zest. 

Once the crust is golden brown, pour the filling over the crust and place in oven, reducing the heat to 325 degrees. Bake for approximately 30 minutes, or until filling is set.

Remove from oven and allow the bars to cool. Sprinkle the top with powdered sugar. The bars will store well in the refrigerator for up to a week. 

Lavender sugar can be purchased, but you can also make your own. I used the lavender tea to make mine. Use 2 tablespoons of crushed lavender to 3 cups of sugar. This is a very nice sugar to keep on hand. Use it in cookie recipes, as well as pancakes.

Enjoy!
Rhonda


Share this PostPin ThisShare on TumblrShare on Google PlusEmail This

Thursday, May 10, 2018

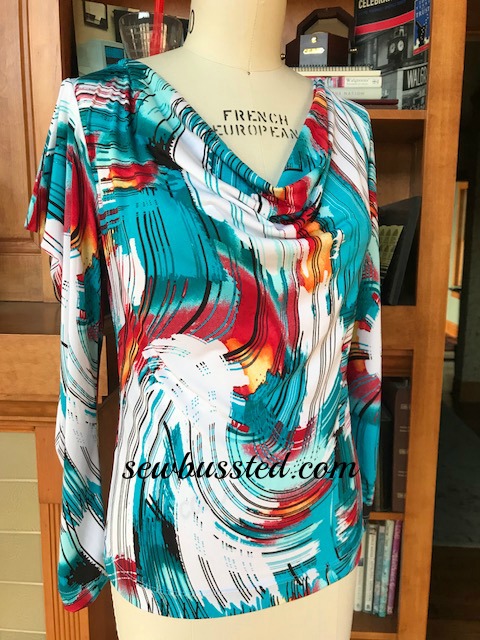
T-Shirt Tango/Cowl Neck Tee

Thanks so much to all of you who sent such supportive messages on my post about my extremely out of control studio. Stay tuned for next week's video. The cleanup will not be completed, but progress will be made. Some of you asked questions. I will answer those questions when I do the next video. 

The beginning of the T-Shirt Tango posts! Always fun to start something new :)

We'll begin with the Cowl Neck Tee. As you'll see, it's very easy to do.


I'm using Londa's Creative Threads Terrific T pattern. If by chance you missed yesterday's post, I am sponsoring a giveaway of the pattern, so be sure to visit THIS post and leave a message for a chance to win.


I like this pattern as it's truly a basic pattern. I am using the round neckline that sits just at the base of the neck. Her pattern offers a straight side seam which gives a relaxed fit, or a tapered side seam for a little more fit through the waistline. 

I took the basic pattern and created a sloper. To do this, I removed the seam allowances and then transferred the pattern to a piece of poster board. By removing the seam allowances, I will never be confused once I begin manipulating the pattern as to where I need to add seam allowance and where the seam allowance was left on the pattern. I know that I need to add seam allowance to each and every seam.    


Now that I have a basic sloper, I can trace around it to begin my design. 

I did not want my cowl neckline to fall too far below my bust area, so I measured down 3" below my armhole and squared a line across the front bodice pattern. 


Cut on the line from center front to the side seam, being careful not to cut through the edge.
I spread my cutline open 3 1/2". For a less dramatic drape, 2 1/2" will be fine.


Rather than cut the entire pattern all over again, I simply taped the piece I had cut onto another piece of paper to develop my cowl. 
The center front edge of the pattern was extended up.
I did not want the neckline to be close to my neck, so I marked the shoulder 2" from the shoulder edge. From that point I developed my cowl facing. 


In the picture below, you can see that my ruler is resting along side the center front line that was extended from the original pattern. From the neckline to the top of the cowl facing, measure up 7". From the 7" mark, round a line back to the mark that was made to establish a 2" wide shoulder seam.  


The final pattern. You do not need to cut the pattern as  a full front as I did. The pattern can be placed on the fold of your fabric. 


Remember to reduce the shoulder seam on the back pattern to 2" as you did the front. 

If you would like construction instructions, let me know and I will be happy to do a video and walk you through it.

Cowl neck tees are wonderful to have in your pattern collection. This tee can be worn with jeans, and paired with a skirt. The pattern can also be extended into a dress, so it is extremely versatile.

Enjoy!
Rhonda


Share this PostPin ThisShare on TumblrShare on Google PlusEmail This

Friday, February 17, 2017

A Thrifty Thursday Repeat/Raglan Sleeved Top

Almost 2 years ago to the day, I made up this raglan sleeved t-shirt for a Thrifty Thursday post. Wow, I can't believe that it was 2 years ago!!! 


The pattern is from On The Cutting Room Floor. It's a rather boxy top that includes a hip band.


You got a glimpse of the top in my last Sewbussted's Material Witness video. A number of you sent notes asking to see more...
So here it is,


If my memory serves me well, I believe that I added 2" to the bottom of the top to compensate for leaving off the bottom band.

As for the pattern placement, this was a fussy cute situation. The pattern was placed on the fabric to get just the right design. It's not perfect, but close enough ;) 


I recently wore the top to dinner at a friend's home. Two other couples had been invited whom I'd never met. When the hostess asked if I had made the top(she knows I sew), I said yes, and the other 2 women were shocked! Always a great compliment :) 

If you would like to give the pattern a try, you can find the FREE DOWNLOAD HERE

A few things to take note of:
*Be sure that the guide box is the correct size after printing.
*It is a boxy fit, so in order to get a fitted look, you will need to taper the side seams.

This is a fun pattern for mixing fabrics and a great way to use up a few scraps that are just too large to part with. 

There are a number of other free patterns on the website, so be sure to look around. 


Share this PostPin ThisShare on TumblrShare on Google PlusEmail This

Monday, May 30, 2016

Monday Morning Inspiration/T-Shirt Tango Part 2

Now that summer is officially here, at least in the northern hemisphere, I think that most of us begin to think about cool, comfortable clothing. So last week, for our Monday Morning Inspiration post, I shared a number of t-shirt ideas that I've collected and gave you the opportunity to share some of your work. I had hoped for a number of entries and lots of ideas, but only 3 shared their work. But the 3 who did shared some great ideas.

First up, from Pauline is a Rachel Roy knockoff that she did. Love the combination of the lace and print. 


From Amy is her Boho t-shirt refashion. The addition of the prints really takes a t-shirt from boring to fabulous.


Ernie K Designs also shared a top that she made. Sadly, I couldn't copy the picture from Instagram, but you can see it HERE.

So many of you liked the addition of the lace on the piece below. 


I like the idea of doing a cut out design and adding the lace to the shoulders and sleeves.


This is a great idea for making a basic cami extra special.


For other t-shirt ideas, I really like the addition of the fabric insets in the examples below.


The bow could be tied a little neater, but what a fun idea.


Here are a couple more embellishment ideas that will make a simple tank really pop.


It looks like a vintage tablecloth was added to the hem of this tank. Really cute.


I came across this top and it reminded me of a top that I did for Sleeves on Saturdays. I like the strips that are pieced together to form the sleeves.


Below is the top that I made. The sleeves were crocheted to the bodice. You can see the post HERE.


Do you have a concert tee, or a tee from a vacation that shrunk, but you just can't part with it? Add an inset, and extend the length with coordinating and contrasting fabrics.


Here's a vacation t-shirt that I purchased and couldn't bear to part with. I turned it into a skirt! You can see the post HERE.


The nice thing about all of these ideas is that they are fairly quick and easy to execute. So before you thrown on that boring basic tee again, have a little fun and make it tango!


Share this PostPin ThisShare on TumblrShare on Google PlusEmail This

Monday, May 23, 2016

Monday Morning Inspiration/T-Shirt Tango

Happy Monday! I hope your week is off to a great start :) 

I have a secret pin on Pinterest where I pin what I think are fun t-shirt ideas. Hey, I enjoy a basic tee just as much as anyone, and I think they are a necessary part of our wardrobes. But why wear basic all the time when we can be a little inventive and wear something interesting? So I thought I would share a few of the ideas that I've saved as I thought you might enjoy them as well.

This top is so easy to do. Just a little different take on the Sweeping Rectangles Tee that I did HERE.


If you're a little short on fabric, adding insets can really be an eye catching idea. Take note of how the black band around the neckline pulls the whole look together. 


I thought that this was such a sweet look. Add a sheer piece of organza and use up a few left over pieces of lace to create this top.


With this top, zippers were added to the side seams and a half circle contrast was added.  


The neckline was cut a little deeper and then the contrast added. Notice that the neck piece is a simple rectangle as are the cuffs that were added to the sleeves. 


A great look for what could be a simple striped t-shirt. Cut an asymmetrical seam and trim with the stripe in a different direction.


If you have a basic tee that you would like to have a little fun with, this top offers lots of inspiration. Slice it open and add the button tab. Or you could just sew a fake tab down the side. Use a couple of coordinating fabrics for the ruffle hem and you are set to go. Fun!


With this example, just slice up to the neckline and add in a triangle. Add one triangle and then slice into that triangle and add another. 


This top is very oversized, but I really like the idea of adding the darted tucks to the side. It's a little difficult to see, but there is a seam on the other side of the top that adds to the fullness. Great top for when you want all out comfort. 


Those are just a few of the ideas I've saved. Hope they've given you a little inspiration for you summer t-shirt sewing.

Do you have some t-shirt ideas that you might like to share? Or have you made a t-shirt that isn't just a basic t-shirt that you would like to share? I've added a link-up to this post, so share away. I would love to show off your ideas and what you've made!

Happy creating!
Rhonda


Share this PostPin ThisShare on TumblrShare on Google PlusEmail This