f
Showing posts with label t-shirt patterns. Show all posts

Sunday, September 6, 2020

All the Same, and Yet Different

It's a rainy Sunday in Chicago. A day that feels peaceful, quiet, restorative. I think that days like this are a gift, at least for me, as they are so very good for my soul. It's a day that makes me want to make soup ;) My soup posts are coming back. I don't know what happened. Maybe it's COVID...maybe. I always find it interesting how events have an effect on us. 

As I have shared, my One Year Challenge of wearing a garment everyday that I have made is proving to teach me so much. It's really taking on a life of itself. All good though :) 

The last few days have been difficult, quite difficult. I spent the better of the last 2 days crying. I'll be fine, in time. My husband has been so kind and gentle with me. He came home yesterday and said that he needed me to come to the door. He had purchased 2 containers of yellow chrysanthemums, my favorite color. It was a lovely day in Chicago. He suggested that we go out for dinner. We went to a wonderful Italian restaurant that I have never been to before. We had an appetizer of polenta with mushrooms that made me want to lick the bowl clean. We will be going back. If by chance you live in the Chicagoland area, the restaurant is Osteria Rusticana. Truly amazing food!

So, I dressed for dinner. As I've shared, I'm celebrating everything :) I made the dress below a few years ago. It's a very asymmetrical piece.   


Last Saturday, we were out to celebrate my mother's birthday. While it looks like a dress, I am actually wearing 3 pieces, and the top is exactly the same as the dress above. 


Here's the top paired with a pair of jeans. Each outfit looks so very different, and yet, they are all basically the same.


Here's a flat of the top.


And a flat of the dress. The only difference with the dress is that I added a flounce on the side. I think that with the flat of the dress, you can see how it was executed. I just began with a basic t-shirt pattern. It was cut and spread just under the but area to obtain the asymmetrical form. Other than the flounce that was added to the side seam, the bottom of the dress is just a straight piece. Really quite easy to do. 

If you would like me to do a tutorial on how to make this piece, I'll be happy to do so. Just let me know in the comments, or email me.

I hope you are having a lovely Sunday, and finding someway to celebrate the day :)

 Rhonda



Share this PostPin ThisShare on TumblrShare on Google PlusEmail This

Wednesday, July 17, 2019

A Pile of Tees!

It seems that t-shirts have become a wardrobe staple. At least they have for me! I wear them for workouts, and casual dress with everything from jeans to skirts. And, I even wear them to bed with my pajama pants. 

There are lots of great t-shirt patterns out on the market. I love the Terrific 'T' from Londa's Creative Threads. This pattern offers the option of a dart, or no dart, as well as a number of neckline and sleeve options. 

    Londa's Terrific 'T' Knit Top Talking Pattern Booklet - Printed

A new favorite is the Molly Tee from Pattern Union. There are a number of sleeve length options, and it also offers the option of bust cup sizes from A-G.  

Molly Tee

I have made a pile of Molly Tees!!!


The basics, black and white with long and short sleeves. 


I especially love the extended shoulder seam that rolls to the front. The pattern works so well for stash busting leftover knits.


Another example with the print in the front and also used for the sleeves.


 More basics. I absolutely love the print tee on the left. Got the fabric at Tina's Fabric Nook in Granby, Colorado. She has more!!!


And finally...
I bought a maxi dress at a resale shop just because I liked the fabric, and then cut it up to make this top.


I have quite a few more tees in the sewing lineup. They literally take no more than an hour from cut to finish. So, no wasting time shopping, settling for tops that are cut off grain, and inferior fabrics.

Hope I've inspired you to make a pile of tees too!!!
Rhonda


Share this PostPin ThisShare on TumblrShare on Google PlusEmail This

Thursday, June 28, 2018

Thrifty Thursday/Free Raglan Tee

A nice easy tee that can be made out of a woven fabric...sounds like a great idea to me!

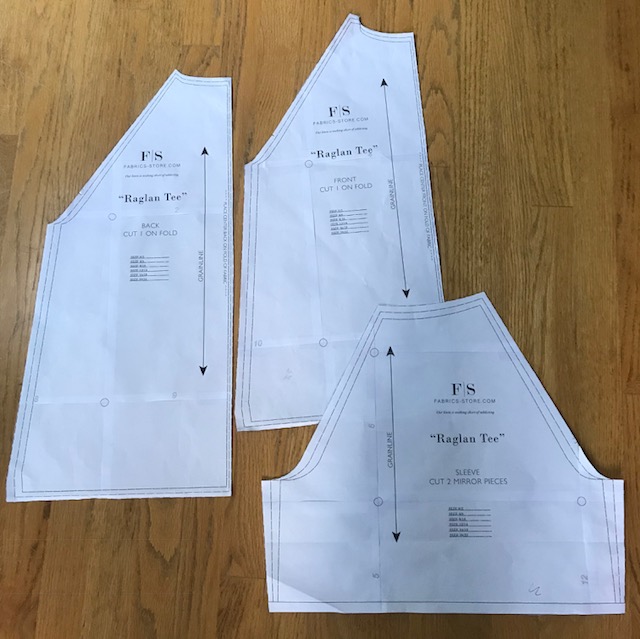
A few weeks back, Fabric-Store.com posted the raglan tee below. It's a nice clean design, so I thought I would give it a try.


I had just a couple of issues with the pattern. There are no sizes marked, and there are no notches, which can be confusing when it comes to attaching the sleeve to the front and back. Prior to cutting, I put my own notches on the raglan seams to mark front and back. Easy enough to do. As for the sizing, just measure across the lower portion of the pattern and then decide based on your hip measurement which line to cut on. 

One other issue is that in the instructions, there is no seam allowance specified. I used 5/8". Other than those 3 issues, the pattern went together easily.
  

I decided to give it a whirl with some fabric that I found as I was cleaning up the studio, a calico print that I had completely forgotten about. Thought it would make a nice pair of summer pajamas.

The instructions call for 2 small tucks on either side of center in the front and back. When I made up the tee, the tucks were not needed. Look closely at the picture below and you can see that a small dart is needed on the shoulder.


Once the dart was added on the shoulder, the garment laid flat and there was no need for front and back tucks.


My finished pajamas. I had to cut the tee with a seam down the center of the back and front. I had the crocheted trim, so I threaded a piece of ribbon through, sewed it down the center and covered up the center front seam. I had another piece of crocheted trim that I added to the sleeves and the hem of the pants. The center picture on the right below shows how I mark the back of my pants. Great use of bits of ribbon.

And me in the pajamas :)


I had a small piece of silk that was just enough for another top. This time I had enough to do the cuffs. 


I once again added a dart on the shoulder.


I really like how the top wears, so I decided to lengthen it and make a t-shirt dress.


With this fabric, I did not need to add the shoulder darts as the neckline laid flat without them. 


I added a shirt tail hem. To finish the hem, I cut a 2" wide piece of bias. I made the back a little longer than the front.  


And finally, I added a small front pocket. It looks so cute on. I'll post pictures of me in the dress soon.


The pajama pants as well as the striped pants are from a free pattern, the Martha Stewart pajama pant that I posted HERE. I find the pattern to be a great basic elastic waist pant. 

You can find the Raglan Tee pattern HERE. 

Happy Sewing!
Rhonda


Share this PostPin ThisShare on TumblrShare on Google PlusEmail This

Thursday, May 10, 2018

T-Shirt Tango/Cowl Neck Tee

Thanks so much to all of you who sent such supportive messages on my post about my extremely out of control studio. Stay tuned for next week's video. The cleanup will not be completed, but progress will be made. Some of you asked questions. I will answer those questions when I do the next video. 

The beginning of the T-Shirt Tango posts! Always fun to start something new :)

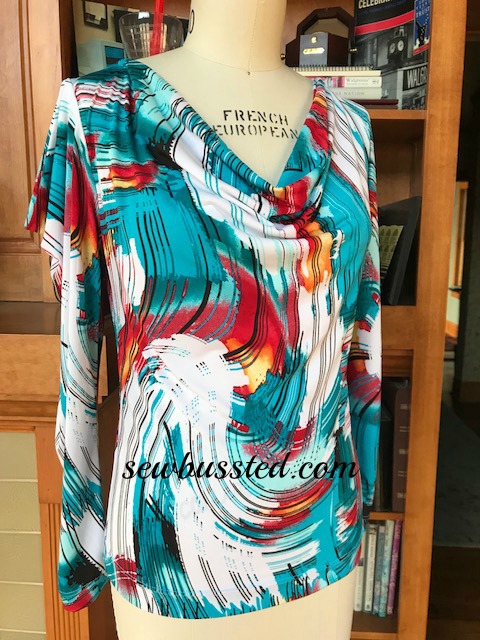
We'll begin with the Cowl Neck Tee. As you'll see, it's very easy to do.


I'm using Londa's Creative Threads Terrific T pattern. If by chance you missed yesterday's post, I am sponsoring a giveaway of the pattern, so be sure to visit THIS post and leave a message for a chance to win.


I like this pattern as it's truly a basic pattern. I am using the round neckline that sits just at the base of the neck. Her pattern offers a straight side seam which gives a relaxed fit, or a tapered side seam for a little more fit through the waistline. 

I took the basic pattern and created a sloper. To do this, I removed the seam allowances and then transferred the pattern to a piece of poster board. By removing the seam allowances, I will never be confused once I begin manipulating the pattern as to where I need to add seam allowance and where the seam allowance was left on the pattern. I know that I need to add seam allowance to each and every seam.    


Now that I have a basic sloper, I can trace around it to begin my design. 

I did not want my cowl neckline to fall too far below my bust area, so I measured down 3" below my armhole and squared a line across the front bodice pattern. 


Cut on the line from center front to the side seam, being careful not to cut through the edge.
I spread my cutline open 3 1/2". For a less dramatic drape, 2 1/2" will be fine.


Rather than cut the entire pattern all over again, I simply taped the piece I had cut onto another piece of paper to develop my cowl. 
The center front edge of the pattern was extended up.
I did not want the neckline to be close to my neck, so I marked the shoulder 2" from the shoulder edge. From that point I developed my cowl facing. 


In the picture below, you can see that my ruler is resting along side the center front line that was extended from the original pattern. From the neckline to the top of the cowl facing, measure up 7". From the 7" mark, round a line back to the mark that was made to establish a 2" wide shoulder seam.  


The final pattern. You do not need to cut the pattern as  a full front as I did. The pattern can be placed on the fold of your fabric. 


Remember to reduce the shoulder seam on the back pattern to 2" as you did the front. 

If you would like construction instructions, let me know and I will be happy to do a video and walk you through it.

Cowl neck tees are wonderful to have in your pattern collection. This tee can be worn with jeans, and paired with a skirt. The pattern can also be extended into a dress, so it is extremely versatile.

Enjoy!
Rhonda


Share this PostPin ThisShare on TumblrShare on Google PlusEmail This

Wednesday, May 9, 2018

My Studio, and a Giveaway!

I can never buy another piece of fabric for the rest of my life!

I spent 3 hours in my studio yesterday afternoon clearing off shelves and organizing fabric. Here's the worst part of it, I am no where near finished!!! For quite some time, I have wanted to clean up and organize my studio. For far too long, I've gone from 1 project to the next without cleaning in between. 
I am beyond mortified to share the video below. You will see that even Gracie holds her head in shame. 


As I went through my fabric, I realized that I own some of the most amazing pieces. The idea of not buying fabric is heartbreaking, but what I have vowed to hold true to my goal, and not purchase anything until September 1st. At that point, I will assess how I am doing and go from there. That's 3 months, so that should give me plenty of time to begin to look into my soul and discover a little more about my obsession with fabric. Stay tuned for more posts on my progress. As some of you know, I have tried to set this as a goal in the past, and failed. This time I am taking a little different approach. Rather than try to find a huge block of time to clean, I am giving myself a small pocket of time each day. I had planned to only do an hour yesterday, but became immersed and just kept going. That's okay. Today I will may only do 30 minutes. 

Since the beginning of the year, I have had a goal to read through certain books of the Bible. The goal I set for myself was to read the books of Psalms, Proverbs, Song of Solomon, Job, Ecclesiastes, the books of Wisdom and Sirach(from the Catholic Bible), and finish out the year by reading through the New Testament. By setting small daily goals, I have finished Psalms, Proverbs, Song of Solomon, Ecclesiastes, Wisdom, and I am currently reading through Job. Now, reading books from the Bible is not for everyone, and I understand, but what I have learned from my goal is that by setting small daily goals, it adds up to big goals accomplished. It's just amazing! So, I am translating that same goal setting strategy to my studio space. 

Now for something fun!!!

Londa, of Londa's Creative Threads is sponsoring a give away here on the blog. Some of you have already purchased her Terrific T pattern, so whoever wins will have the opportunity to choose from her Terrific T, 


OR, her Trendy Tunic Tops pattern.


I will begin a new segment on the blog tomorrow on using a basic t-shirt pattern to create lots of fun tops. Londa's tee is perfect for this. But, if you've already purchased the t-shirt pattern, you can still enter the giveaway and try for the Trendy Tunics pattern. Very generous of Londa :)

To enter, just leave a message on this post. I will announce the winner next Wednesday, May 16, 2018.   

Good Luck!
Rhonda    


Share this PostPin ThisShare on TumblrShare on Google PlusEmail This

Thursday, February 16, 2017

Terrific Thursday With A Terrific 'T' Pattern Giveaway!

Happy Thursday Everyone!!! It's always a wonderful day when I get to give something away :)

What a great response there was to Londa Rohlfing's Terrific 'T' pattern giveaway! I had said that I would reveal my t-shirts today, but I am going to wait until next Tuesday. Later today I'm going to post a top that I did a while back for a Thrifty Thursday post. So many have asked to see it on me. You got a glimpse of it in the last Sewbussted's Material Witness video. Sorry to make you wait on my Terrific 'Ts', but I think the wait will be worth it :)

The winner of Londa's Terrific 'T' Pattern is.....


Kelly!!!!

Congratulations Kelly!
For those of you who don't know Kelly, you can find her at WeSewRetro as a contributing blogger. 
Be sure to email me at sewbussted@yahoo.com with your mailing info so I can pass it on to Londa.


For those of you who didn't win, you can find the Terrific 'T' pattern HERE. Londa also offers a PDF version which you can find HERE. I highly recommend spending the few extra dollars and waiting a few days for the printed version. A much better value. Remember that the pattern offers a darted and un-darted version of the t-shirt. A great feature. 

One little word of warning for those of you who have never made your own t-shirts...it's addicting!!!! Not a bad addiction though ;)  


Share this PostPin ThisShare on TumblrShare on Google PlusEmail This

Thursday, February 9, 2017

Making A Terrific Tee and A Giveaway!!!

About a week ago, I received a lovely package from Londa of Londa's Creative Threads, a thank you gift for featuring her on The Wednesday Showcase. So nice, and so unexpected. 

Like so many of you, I love a good t-shirt. A great fitting pair of jeans, a comfortable t-shirt, my completely worn out pair of pink cowboy boots, and I'm a happy girl. You should see these boots. Unless you look closely, they look worn, but not so bad(at least that's what I tell myself). But on closer inspection, 1 layer of the sole has worn through, and there are cracks in the leather. My husband even remarked that he's surprised that I haven't gotten rid of them. But for anyone who knows and understands a good old pair of boots, there's nothing more comfortable, and even more than that, they actually take on the persona of a good close friend. How can one throw away a friend? ;) 

Included in Londa's lovely gift was a pattern for her Terrific 'T'. 


As you can see, there are a number of mix and match options for sleeve lengths and necklines. The instructions are in booklet form, something I really like, no big pages to deal with, or shuffling around of pages. It comes with a tissue pattern, so no printing or taping of a PDF pattern, and even better, there's an option for a darted tee and an un-darted tee. 

If you've ever sewn with Londa, you may already know that she has a very unique feature to her patterns, and that's a link to the talking pattern. There you can see large color photos and Londa walks you through the process of making the garment. It's like having her right by your side! 

Over the next week, I will be making up a few of the tees. One can never have too many! 

In the meantime, if you would like a chance to win a Terrific 'T' pattern of your own, just leave a message on this post. You'll have until midnight Wednesday, February 15, 2017 to leave a message. I'll announce the winner on Thursday, February 16, 2017. 

So, you'll have the chance to make your own Terrific 'T'. The only thing that will be missing is a worn out pair of cowboy boots. I'm not giving those away!!! 

Good Luck!


Share this PostPin ThisShare on TumblrShare on Google PlusEmail This

Saturday, April 11, 2015

Thrifty Thursday on Saturday/Free T-Shirt Pattern

Over the past couple of years, I have been absolutely amazed by so many of you who have taken on the challenge of not purchasing any ready made clothing. I have not jumped in as there are pieces that I buy from time to time, especially for skiing, that I would rather not make. It's not that I can't, it has more to do with the fabric that's used. I get cold so very easily and I have found pieces that keep me warm like nothing else can. But, with all of that said, I really do make most of my clothes. It has become a very rare situation that I purchase something and I think that's a good thing.
I have a t-shirt pattern that I drafted some time ago that I use to make lots of tops with, but since I haven't gotten to the point that I can make that available to you, I thought I would look around for a very basic t-shirt pattern that was not only a great pattern, but free!! And I found one. The pattern line, Skinny Bitch Curvy Chick was designed for the petite woman, so typically, someone who is 5'4" tall or less, and has a shorter torso, legs and arms. There is a free t-shirt pattern offered on the site, so I thought that although I am not a petite person, I would give it a try and the result is that I REALLY like this pattern. The pictures below are from the SBCC website.
Not only does she offer 1 free t-shirt pattern, she offers 2! Even better. The first version is a basic long sleeved t-shirt. You can find the pattern HERE.
The second is a basic short sleeved t-shirt. You can find the pattern HERE. The pattern is basically the same as the long sleeved version, it just takes the guesswork out of determining how long the short sleeve should be.
I included the line drawing for you.
The pattern is very easy to download and especially easy to tape together. The taping will take less than 30 minutes. Here's a schematic of the pattern once it has been taped together. Take note that she has also included a neckband pattern. I just love it when all the pieces are included!!!
I still need to hem my top, but other than the hems, it's finished and as I said, I really like it.
 The neckline is quite nice, not too high and not too low.
If you decide to download the pattern, a few things to keep in mind.
The sleeves were perfect for me, but I have short arms, so you will most likely want to lengthen the sleeves. I took mine in just a little at the waistline. I do not have a short torso, in fact, I will quite often spread my patterns at the waist if the pattern has a defined waist. I did not have an issue with the waist of this pattern being too short. If you are very long waisted, you may want to slash the pattern at the waist and lengthen it an inch or so.
One thing that I like about the pattern is the length of the front and back. They are long enough that you can scrunch your top along the hips when wearing jeans, and since there is a little extra length, you won't feel that your top is going to ride up when you move.
This is a great basic pattern that can be used for all you t-shirt making needs. Make a bunch in different colors and you can even layer them, one of my favorite things to do. So although this pattern  is intended for a petite frame, don't shy away from it if you are not.
Pictures of me in the top will hopefully come in just a few days :)
Happy t-shirt making!!!


Share this PostPin ThisShare on TumblrShare on Google PlusEmail This

Tuesday, April 7, 2015

Adding a Shirttail Hem to the iCandy Summer Tee

I mentioned that I had made another iCandy Summer Tee, but that I had kind of a high-low thing going on with the hem. I absolutely love the pattern, but I felt that the hem was just a little fiddly. My opinion for sure, others might think it's great.
With the first top that I made, I ended up just cutting the back off and making a straight hemline. This is the tee with the lace back. You can find the original post HERE.
My second tee, looks exactly the same from the front, although this time I used 2 coordinating knits to create the top.
From the side you can see that the back is longer than the front.
You get a better idea of the hem with it laying flat. What's nice about the hemline is that it hangs over parts that we may not wish to emphasize, if you know what I mean ;), and the hemline is also quite easy to sew. No fiddly edges to deal with.
So here's what I did. As you can see, the back of the top is longer than the original pattern. I lengthened the back pattern piece  2".
In order for the front to gracefully flow into the back, the front side edge will also need to be lengthened.
To do this, begin by matching up the front and back pattern pieces and overlap the seam allowance. The seam allowance on this pattern is 1/4". Remember, the hem will not match as the back is already longer than the front.
Tape a piece of paper to the hemline of both the front and back pattern pieces.
Add 2" to the back hemline. Now draw in the hemline. When drawing the line in, just draw it in. Once the desired line is drawn in, go back and clean up the line with a ruler and if you have a hip curve or a French curve, you can clean up the curved lines. If you don't have a curved ruler, this is such a small area and it doesn't affect the fit, so I think you can eye it and get a fairly nice curved line.
Now simply cut on the lines that you drew in and your pattern is ready to go!
After I made my first top, I received a message from Julia of https://titesmains.wordpress.com/ She said that she had made a few of them, loves them and wears them all the time. You can find her post on the tops HERE. You can see in her picture that she too cut the back hemline off and made it straight across.
If you would like to give the top a try,you can find the pattern HERE. Sadly, it only comes in a medium size, but they do give some pointers on how to enlarge it a little if you would like to give it a try. And if you do give it a try, I hope you'll try out the curved hemline. Hey, if you don't like it, you can always cut it off!!!!
Enjoy!
Rhonda


Share this PostPin ThisShare on TumblrShare on Google PlusEmail This