f
Showing posts with label free pajama pant pattern. Show all posts

Tuesday, December 1, 2020

It's a Pajama Party!

 A few years ago, I read Madame Chic by Jennifer Scott, and thoroughly enjoyed it. You can find all 3 of her books HERE. I've read them all and enjoyed each of them. 

In her first book she talks about going to France and being an exchange student(something dear to my heart). Not long after she arrived, she had given her clothes to her host mother to wash. Her host mother took 1 look at her pajamas, at least what she was wearing for pajamas, I think they were an old pair of sweat pants that had belonged to her sister, and an old sweatshirt. They were full of holes. Her host mother was horrified as she thought that she may have done something in the wash to cause the holes. Jennifer told her that no, the holes were there. Her host mother just couldn't understand why she would want to wear something like this. The conversation prompted her to go out and purchase a proper pair of pajamas, and she said that she was amazed by how much better she felt, and how much better she slept.  

This prompted me to take a closer look at what I was wearing to bed. Not the best. So, I have been on a mission to revamp my bedtime wardrobe, and find pieces that feel wonderful, that I enjoy wearing, and will keep me warm in the winter. I thought I would share my makes as they are simple, comfortable, and I actually look forward to putting them on at night.

I have found that I REALLY love wearing leggings to bed, at least in the winter. They stay in place, and aren't riding up my leg during the night. The legging pattern that I have used over and over again is the Loveland Legging pattern from Sew News. I can make these in less than an hour. The top that I am wearing below is a free pattern from Fancy Tiger Crafts. It's their One Hour Top pattern, and you can find it HERE. I lengthened the top a bit, and lengthened the sleeves. Love it!     


I recently made a pullover out of a wool fleece blanket that I love wearing. I used an old Great Copy Pattern that is out of print. It's their New York Style Pullover. I looked on Etsy and found a number of Great Copy patterns, but not this one. But, if you are persistent, I'm sure that sooner or later it will pop up. For cold mornings, it's just the perfect pullover to wear with my pajamas.   


This pair of pajamas is exactly the same as the pair above, just in a different fabric. 


I absolutely love the dolman style sleeves.  


The pajama pants that I am wearing below are another free pattern from Martha Stewart. I have used, and used this pattern, for pajama pants to street wear pants. You can find the pattern HERE. I've paired it with another fleece top, the La Megeve Pullover from Naughty Bobbins Patterns.  


Underneath the pullover, I'm wearing my favorite pajama top, the Molly Tee from Pattern Union. 


The next 2 pairs of pajamas are both made with the Loveland Leggings pattern and the Molly Tee. This has become my standard pajama outfit.


My friend Cennetta of The Mahogany Stylist makes pajama pants for her family for Christmas. She loves the idea of the leggings and tee shirt. I told her that if she makes these for her family, she is going to create a monster as they are going to want more and more. Leggings and a tee to bed is just the best!!! :)

Happy Sleeping!!!

Rhonda


Share this PostPin ThisShare on TumblrShare on Google PlusEmail This

Friday, July 10, 2020

Fancy Pants Without The Hassle/Wrap Pants Tutorial

I'm going for a record here!!! ;) Three posts in 3 days, unprecedented! 

This past Wednesday, I posted a favorite pair of pants on Instagram, my outfit of the day :) A number of people wanted to know how I made them. They are beyond simple to do.


They are basically a wrap style of pant, somewhat anyway. 


The over panel has ties that hold the panel in place.


In the above picture, I've untied the panels and I am holding them to the side. What you can't see is that there is a panel in the front and in the back.

You get a better picture of the pants in the video below. 


While I enjoy a challenge, I also don't like for things to be anymore complicated than they need to be. I began with this free pajama pant pattern from Martha Stewart. It's really just a good, basic elastic waist pant pattern.  


*The front and back overlay panels on the pants are just 2 rectangles. Nothing more. For the panel width, I measured from the side seam to the midpoint of the opposite leg. 

*For the length of the panels, I measured from the waist to the hemline.

In the picture below, you can see that the panels extends from the elastic foldline to the hem foldline. 


Make 2 ties and attach them to the edge of the rectangle at the waistline. The ties should be approximately 18" long. The ties are the very last thing you will do, so I recommend using a length of ribbon that is basted to the edge of the panel to determine just how much length you will need for your tie. You want enough length to tie a nice bow.  


Like I said, this design is so very easy to do. I had the border print and thought it would be fun, but this looks just as lovely in a solid. There are so many possibilities. You can do a sheer overlay. Maybe use something really special for an evening pant. The fabric that I used is a rayon batik so it has a lovely drape. Silk, light weight cotton, a lovely poly would all work beautifully.

If you give it a go, by all means let me know...and send a picture! I would love to feature your make :)
Rhonda


Share this PostPin ThisShare on TumblrShare on Google PlusEmail This

Wednesday, August 14, 2019

Pants...All Month Long!

You may remember that last summer Becky of Trail Balloons and I did a fun challenge making woven tees. Believe it or not, those tees have been a staple of my summer wardrobe. It was such a great challenge!

We teamed up again to do woven tops for winter, but I managed to slip on the ice, break both bones in my arm at the wrist, have surgery, and basically be incapacitated for 3 months. Oh well,best laid plans :(

This summer, we thought it would be fun to do something a little different and spend the month talking about pants. Becky and I have very different shapes. She is very long and lean, where I have curves. So we thought that with the 2 of us doing pants, with our different shaped bodies, we would appeal to most everyone. 

For our 1st week, we are showcasing our favorite pant pattern. Becky loves the Flat Bottom Flo from Style Arc. It's as if the pattern was designed with her in mind.

By far, my favorite, or at least most used pattern is the free pajama pant pattern from Martha Stewart. This is a very basic elasticized waist pant pattern. I love it because, it's super easy to fit, and it's also easy to manipulate into lots of fun designs.

You may be looking at the picture below and thinking, "this is not a pant, it's a skirt!" It does look to be a skirt, true enough.


But see, it is pants!!!


All I did was use the basic pattern, then cut 2 rectangles, my favorite thing ;), and attach those rectangles into the right side seam of the pant. Because this is a border print, I had to be careful in lining up the print, but other than that, the pants were a snap to make. 


I added ties to the rectangles so that the rectangles could be tied and held in place at the waist. 


The pant has an elegant look, and yet it's made casual with a pair of fun sandals.

If you have shied away from making pants, get an elastic waist pattern and start having some fun. Typically, the only adjustment you will have to make is to either lengthen, or shorten the crotch. 

Becky gives lots of details on how she altered the Flat Bottom Flos to fit her beautifully. You can see that post HERE

Out next installment for the challenge will be Getting To The Bottom Line. With our first post, Becky was early and I am late, but we should both be on schedule for this Friday! :)

Hope we can encourage you to give pants a try!
Rhonda


Share this PostPin ThisShare on TumblrShare on Google PlusEmail This

Saturday, June 22, 2019

Sewing, But No Blogging/Towels, Tops and Trousers

Happy Saturday Everyone!!! 

It's a glorious start to the day here in Chicago, the sun is shining, but...not for long :( A few nights ago, my husband and I went out for our evening walk with the dogs. When I opened the door, I saw that it was raining, yet again. We have had sooo much rain. But, I'm very careful about verbalizing what I feel in my heart as I know that times without rain are not something we want. In all things be grateful...at least try :)

So yes, I have been sewing, but just not blogging. This morning I was determined to make myself sit down and write a note. I know that it's just a matter of getting back in the habit, and as we all know, habits are easily broken and difficult to create.

I've made a number of easy summer outfits that I can just throw on and go. The pants I'm wearing below I also did in THIS post. A super simple gathered leg that makes the pants look special. The top is the Helen's Closet Elliot Sweater and Tee pattern. I made a long sleeve version of the top before I broke my arm this past winter. Loved it. Super easy to make, and just as easy to wear. It's difficult to see in the picture, but I had a piece of embossed knit that matched the pants, so I decided to give the pattern a try as a summer top. At the rate I am going, it will only last 1 summer as it will be worn out!!!


I was intrigued by an email I received from fabrics-store.com They actually have linen toweling that is 19" wide. They had a little tutorial on making linen kitchen towels using a 1 yard length of the fabric. I love linen towels, so I decided to give it a try.  


I began with a 1 yard length, and just hemmed the bottom and top edges, leaving the selvedge edge along the sides. I then put them in the washing machine and dryer. As you can see below they came out a crumpled heap. The above picture is after ironing. The natural linen has the most wonderful smell, and the texture is also quite lovely. I bought enough for 3 sets of towels, 1 to keep, and 2 to give. I'm so pleased that I think I will order enough for a few more sets as they will make wonderful gifts. You can find the fabric HERE.   


As I said, I have been making a number of throw on and go pieces. The top below is the free Zoe Top pattern from Tessuti. I am so very pleased with how it turned out. I had this lovely bordered fabric, and thought it might work well. 


The neckline is quite wide, and a little wider than I wanted for this top. So, I decided to cut a piece of the border and fill in the neckline. 


The pattern features a dolman sleeve. Rather than leave the sleeve plain, I cut some of the border and appliqued it to the bottom of the sleeve. In the end, I felt that it all came together quite nicely.


A picture of me in the top will follow shortly. I'm making a pair of white Barb pants from Style Arc patterns. I blogged about that free pattern HERE. Another easy to make, easy to wear pattern. 

Berkley and I will be going to camp! Actually, I signed Berkley up for an agility class. I think he is going to love it! And...me too :) It won't begin until the 3rd week of July. Can't wait!

Have a lovely weekend!
Rhonda


Share this PostPin ThisShare on TumblrShare on Google PlusEmail This

Thursday, June 28, 2018

Thrifty Thursday/Free Raglan Tee

A nice easy tee that can be made out of a woven fabric...sounds like a great idea to me!

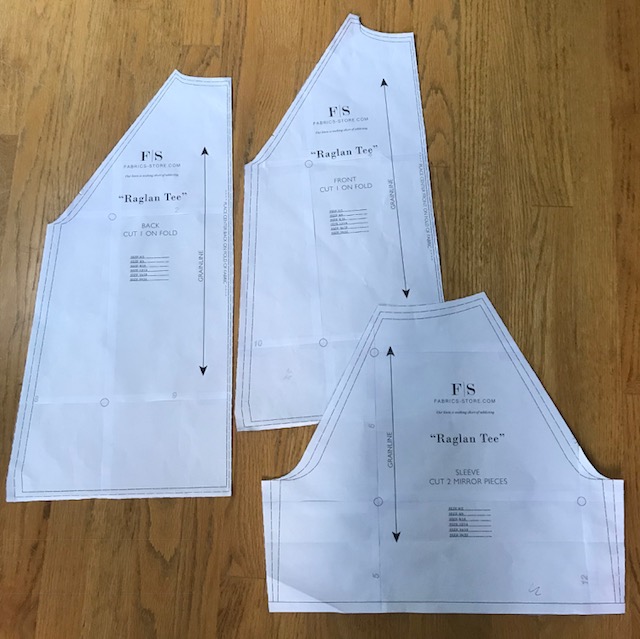
A few weeks back, Fabric-Store.com posted the raglan tee below. It's a nice clean design, so I thought I would give it a try.


I had just a couple of issues with the pattern. There are no sizes marked, and there are no notches, which can be confusing when it comes to attaching the sleeve to the front and back. Prior to cutting, I put my own notches on the raglan seams to mark front and back. Easy enough to do. As for the sizing, just measure across the lower portion of the pattern and then decide based on your hip measurement which line to cut on. 

One other issue is that in the instructions, there is no seam allowance specified. I used 5/8". Other than those 3 issues, the pattern went together easily.
  

I decided to give it a whirl with some fabric that I found as I was cleaning up the studio, a calico print that I had completely forgotten about. Thought it would make a nice pair of summer pajamas.

The instructions call for 2 small tucks on either side of center in the front and back. When I made up the tee, the tucks were not needed. Look closely at the picture below and you can see that a small dart is needed on the shoulder.


Once the dart was added on the shoulder, the garment laid flat and there was no need for front and back tucks.


My finished pajamas. I had to cut the tee with a seam down the center of the back and front. I had the crocheted trim, so I threaded a piece of ribbon through, sewed it down the center and covered up the center front seam. I had another piece of crocheted trim that I added to the sleeves and the hem of the pants. The center picture on the right below shows how I mark the back of my pants. Great use of bits of ribbon.

And me in the pajamas :)


I had a small piece of silk that was just enough for another top. This time I had enough to do the cuffs. 


I once again added a dart on the shoulder.


I really like how the top wears, so I decided to lengthen it and make a t-shirt dress.


With this fabric, I did not need to add the shoulder darts as the neckline laid flat without them. 


I added a shirt tail hem. To finish the hem, I cut a 2" wide piece of bias. I made the back a little longer than the front.  


And finally, I added a small front pocket. It looks so cute on. I'll post pictures of me in the dress soon.


The pajama pants as well as the striped pants are from a free pattern, the Martha Stewart pajama pant that I posted HERE. I find the pattern to be a great basic elastic waist pant. 

You can find the Raglan Tee pattern HERE

Happy Sewing!
Rhonda


Share this PostPin ThisShare on TumblrShare on Google PlusEmail This

Thursday, September 21, 2017

Thrifty Thursday/Pajama Pants for the Street

Just to set things straight from the beginning, I do NOT wear my pajama pants outside of the house. Okay, okay, truth be told, I have gone out to the garbage can in my pajama pants. And now that I'm thinking about it, I have thrown on a jacket and taken Gracie out for a quick trip in the back alley, but I promise you, that's it!!!

A couple of years ago, I shared this free pajama pant pattern from Martha Stewart. Since them I have made piles. I love the pattern and the pants are super comfortable to sleep in. I've made them in both cotton and flannel.


You never know where you'll find inspiration. A few days ago, I was out for a morning walk and I encountered 2 ladies who were walking with strollers. Since they were taking up the width of the sidewalk, I had to slow down. As I slowed my pace, I noticed the pants that one of the ladies was wearing. They were so, so cute. By now, they had made room for me, and as I passed I said, "I love your pants," and got a closer look. 

As I went on my way, I realized that what had been done was really quite simple. It was just a straight pant leg that had been gathered on the side. Hey, I can do that!

That evening as I pulled on my pajama pants, the thought occurred to me that I could just gather the side of the pant and have the exact same look. Her pants were just an elastic waist pant, so I thought the pajama pant pattern might work well.

I was actually rather pleased with the outcome.


Please excuse the crummy selfy. I rather like the side drape.


To make the casing, prior to sewing the side seams together, I serged the seams, sewed them together, and then pressed the seam open.  The hem was sewn in prior to sewing the side seam. So, I sewed the crotch seam together and then did a stitched hem before sewing the side seam.


I had some rattail cording that would work, and since this was just going to be a wearable muslin, I didn't cover the cord. Below you can see that I stitched in a casing. I left the top end of the casing open until I had threaded the cord through. Once the cord was through the casing, I them stitched it across the top, catching the cord in the stitching.


Once the cord was secured, I then pulled it up and tied it. The nice thing is that if I would like, I can untie the cord and wear the pants as plain straight leg pants.


One final little note. I save all of my left over ribbons and sew just a bit at the center back of my pants, or pajama pants, whatever the case may be :) Makes it easy to always know where the back is. 

  
If you decide to give the shirred leg a try, be sure to use a fabric with drape...rayon, poly, silk. 

Go take a walk. Inspiration just might be on the sidewalk!


Share this PostPin ThisShare on TumblrShare on Google PlusEmail This

Thursday, May 18, 2017

Thrifty Thursday Ideas

I had such a lovely day yesterday. So many took the time to congratulate me on a great presidency with the American Opera Society of Chicago, and voiced that they were sad to see me step down. Really nice. Good for the soul :) 

Some asked what I would do now. I love the movie Working Girl and I jokingly used a line from the movie, "Oh, I think I'll redecorate the country house, go to Europe for a while ;)" What I'll actually be doing is continuing to talk to all of you through the blog on a regular basis, continue working on the new Sewbussted interview series (BTW, a new one will be up tomorrow!!!), working in my garden, and a couple of other things that I'm just not ready to talk about. 

Change is good as it allows us to take a new direction. One of my projects requires a considerable amount of research and reading, which I'm loving, but it takes time. So, I'm happy to have my mind a little freer in the months to come :).  

Now that warmer weather has finally hit Chicago, I'm wanting some fresh new pieces for spring/summer wear. What I REALLY need are some new pajamas. I received the new issue of Sew News recently and they have a simple, but cute pair in the issue and even better, it's a free download!


The pajamas are intended to be made from a woven fabric. They recommend crepe de chine, but any light weight woven would be fine. I have not made up the pattern yet, so I can't vouch for the drafting or fit, but with something so simple,  especially drawstring pants and an easy tank, I think you'll be safe to give it a try. I've downloaded the pattern, so I should have it made up soon. You can find the FREE PATTERN HERE

This must be a stripe kind of a week for me! Another super cute pattern that is a free download in the current issue of Sew News is this linen striped top.


I really like the front yoke and the interest that is added with the stripes. This pattern could easily be lengthened and made into an easy to wear summer shift dress. 


The instructions in the magazine are quite detailed, so if you've never ventured into the stripe world, you'll be sure to have a successful garment. You can find the FREE PATTERN DOWNLOAD HERE. If you think you would like to have 1 or both of the patterns, be sure to download them now as they will no longer be free after July 31, 2017!

A few days ago, Sewingelle of He Cooks...She Sews posted this sweet picture of she and her daughter on Mother's Day. I think her daughter is one of the luckiest girls in the entire world as her mom makes the most fabulous wardrobe for her.


Sewingelle commented that since the dress is black, it's a little difficult to see the style lines, but she likes it so much that she intends to make another for herself. 

 
Now, here's the good news!!!

The exact same pattern is on the cover of the current issue of Sew News, and..... 


You can get the pattern for 20% off when you enter the code, PocketDress20 at checkout, WOOHOO!!!

You can find the pattern HERE at BurdaStyle. 


This dress was made in a scuba knit, so it gives the dress a different look from the soft stretch velvet that Sewingelle used for her daughter's dress.  

Free patterns and a discount, I think that makes for a pretty good day!

Have a great one!
Rhonda


Share this PostPin ThisShare on TumblrShare on Google PlusEmail This
