f
Showing posts with label free raglan sleeve t-shirt pattern. Show all posts

Wednesday, August 22, 2018

A Month of Woven Tees/Week 3

I'll tell the story in full at another time, but what a couple of days I have had. It even included me having to run and hide between houses at 2:30 in the morning. When we last touched base on Monday, I had said that Mr. Berkley was doing so well, I spoke too soon. He had gotten me up due to a sick stomach, and it was while I was out with him that we encountered a car that was doing some strange things, and which made me feel the need to run and hide between houses. But hey, I'm here to tell the story. A good ending is always a good thing!

For the month of August, Becky of Trial Balloons and I are doing a month of woven tees. I decided to just use the same pattern for each of my tees. Since I have been using the free raglan tee from fabric-store.com, this week's challenge of using a raglan tee pattern was a cinch. Becky did a layered tee that is absolutely smashing. You can find it HERE

I had this piece of double faced fabric that I have been wanting to use, black on 1 side, white on the other. 
  

I must say that I really took the easy way out on this challenge, as I basically just made up the pattern as is. But, a raglan tee offers a nice option for color blocking. So I used the black side of the fabric for the sleeves, and the white side for the body. 


Rather than sew the bias binding to the inside of the neckline, I sewed it to the outside to continue the color blocking aspect.


For the sleeve cuff, I rolled the hem to the outside so the opposite side of the fabric would be seen on the cuffs.


And I rolled the hem of the top to the front side as well. What you see below is the serged edge of the side seam. I could have done a flat-felled seam, but I was fine with the small amount of the serged seam showing. 


 Now that the top is done, I need to crank out a pair of pants, and this is 1 fabric that will be out of the stash ;)


My recipe this week is also very easy. It can be a refreshing afternoon drink, or served as a cocktail.

I begin with the Wild Berry Hibiscus tea from Mighty leaf. Any hibiscus or berry tea will be fine.
  

I brew up a pitcher full, and then pour some of the tea into an ice cube tray.   


Place frozen ice cubes in a lovely glass.


Fill the glass about 1/3 full of the brewed tea.


Now, here's where you can take it from an afternoon treat to a cocktail. 
For an afternoon treat, I like La Croix Berry flavored sparkling water.


Fill with the glass with the sparkling water, and you have a delicious drink. If you would like a cocktail version, just substitute the sparkling water with Prosecco, or your favorite sparkling white wine. 


What I love is that when the ice cubes begin to melt, the drink does not get diluted, and the flavor remains delicious from beginning to end!

Be sure to check out Becky's recipe for Earl Grey French Macaroons. My mouth is watering!!!



Share this PostPin ThisShare on TumblrShare on Google PlusEmail This

Tuesday, August 14, 2018

A Month Of Woven Tees/ Week 2

I am getting this post in by the skin of my teeth! At least it's still Tuesday in Chicago ;)

This is week 2 of the Woven Tee Challenge that Becky of Trial Balloons and I are doing. This week, we looked to the Orient for our inspiration, using vintage kimono fabrics as inspiration.

Check out Becky's fabulous tee! You can read all about her inspiration, how she put the Kung Fu Bunny tee together that she made for me(a great story), and see her lovely tea recipe HERE


I decided to use the same pattern for the entire challenge. I think it's fun to see lots of possibilities with just 1 pattern. and since it's a free pattern, all the better! You can find the pattern HERE on the Fabric-store.com site.

A friend of mine from Texas had a wonderful store in Galveston for years. At that time, she was able to get bundles of vintage/antique kimonos from Japan. She told me that when the bundles would arrive, it was a lot like Christmas as you never knew exactly what might be in the bundle. Of course the kimonos, but sometimes fabrics, and other clothing. The kimonos that were in good shape, she would sell, the others, she meticulously took apart and used the pieces for the most incredible table runners that she would make and then sell. She ultimately closed the store, and brought home all of the leftovers. In time, she realized that her years were growing short, and that she would never be able to use all that she had, so she began finding homes for her beloved fabrics and scraps. I was the lucky recipient of some wonderful pieces. 

My top. 
I had quite a bit of the black fabric, I think it must have been an entire kimono. The contrast strip was just a small piece, initially about twice as wide as what you see. Since the kimono fabric is only 14" wide, and I'm not!!!, I had to piece the fabric, and decided to offset the contrast.     


Rather than sew the raglan seam together on the left sleeve, I left it open, used a bit of the cream fabric from the contrast strip to accent the opening. I gave a nod to the beautiful Chinese knots with the ties.  


I used the leftover piece of the contrast strip on the sleeve. 


For the back, I was able to just put a seam down center back.


I had just a bit of the cream fabric leftover, so I folded it and did an insert on the right sleeve. Once again, the fabric is only 14" wide, so the sleeve needed to be pieced and this made it look like it was intentional.


This was such a fun project, and I am in love with my tee. It will make a great travel piece as I can pair it with a lovely pair of pants, or a skirt for an evening out, and it can also be worn a little more casually as well. I'm going to Galveston the end of October, and I know my friend is going to be so very pleased :)

Now for my recipe. Like Becky, it's a drink, but rather than a hot tea drink, this one is perfect for a hot summer afternoon. 

My favorite chai tea is from Adagio Teas. The name is of course a play on the slang term for Chicago, Chi Town. The tea comes in a lovely tin.


Take a look at the lovely spices. Heavenly.


For my Frozen Summer Chai, I brew a cup of the chai tea, you'll need 1 cup.
I mix the tea with 1/2 cup of Almond and Coconut milk. Place the mixture in a blender, and add sweetener of choice. Mine is stevia.


Add a handful of ice, and blend.
I serve the drink in a big wine goblet and sprinkle a bit of cinnamon on top.


Guaranteed to cool you on the hottest of days :) And it will satisfy that late afternoon sweet tooth too!

I hope that Becky and I have inspired you a bit. There are a number of vendors that come to the sewing expos with baskets of vintage kimono pieces. So pick up a few and make your own tee!


Share this PostPin ThisShare on TumblrShare on Google PlusEmail This

Thursday, June 28, 2018

Thrifty Thursday/Free Raglan Tee

A nice easy tee that can be made out of a woven fabric...sounds like a great idea to me!

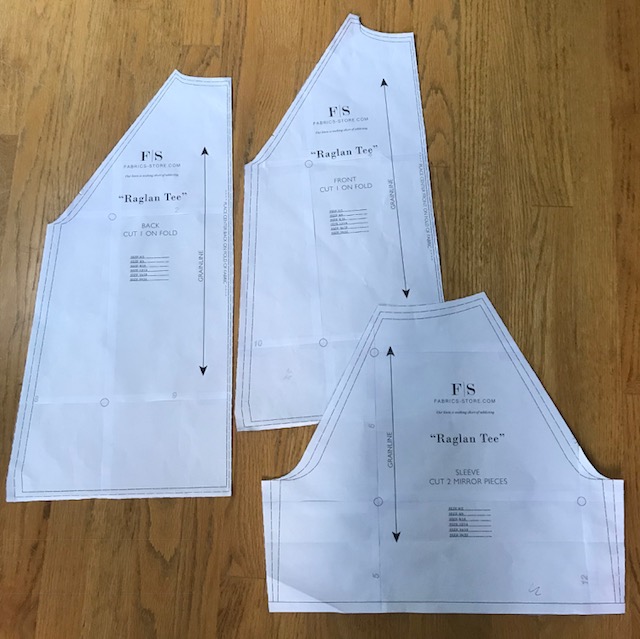
A few weeks back, Fabric-Store.com posted the raglan tee below. It's a nice clean design, so I thought I would give it a try.


I had just a couple of issues with the pattern. There are no sizes marked, and there are no notches, which can be confusing when it comes to attaching the sleeve to the front and back. Prior to cutting, I put my own notches on the raglan seams to mark front and back. Easy enough to do. As for the sizing, just measure across the lower portion of the pattern and then decide based on your hip measurement which line to cut on. 

One other issue is that in the instructions, there is no seam allowance specified. I used 5/8". Other than those 3 issues, the pattern went together easily.
  

I decided to give it a whirl with some fabric that I found as I was cleaning up the studio, a calico print that I had completely forgotten about. Thought it would make a nice pair of summer pajamas.

The instructions call for 2 small tucks on either side of center in the front and back. When I made up the tee, the tucks were not needed. Look closely at the picture below and you can see that a small dart is needed on the shoulder.


Once the dart was added on the shoulder, the garment laid flat and there was no need for front and back tucks.


My finished pajamas. I had to cut the tee with a seam down the center of the back and front. I had the crocheted trim, so I threaded a piece of ribbon through, sewed it down the center and covered up the center front seam. I had another piece of crocheted trim that I added to the sleeves and the hem of the pants. The center picture on the right below shows how I mark the back of my pants. Great use of bits of ribbon.

And me in the pajamas :)


I had a small piece of silk that was just enough for another top. This time I had enough to do the cuffs. 


I once again added a dart on the shoulder.


I really like how the top wears, so I decided to lengthen it and make a t-shirt dress.


With this fabric, I did not need to add the shoulder darts as the neckline laid flat without them. 


I added a shirt tail hem. To finish the hem, I cut a 2" wide piece of bias. I made the back a little longer than the front.  


And finally, I added a small front pocket. It looks so cute on. I'll post pictures of me in the dress soon.


The pajama pants as well as the striped pants are from a free pattern, the Martha Stewart pajama pant that I posted HERE. I find the pattern to be a great basic elastic waist pant. 

You can find the Raglan Tee pattern HERE

Happy Sewing!
Rhonda


Share this PostPin ThisShare on TumblrShare on Google PlusEmail This

Friday, February 17, 2017

A Thrifty Thursday Repeat/Raglan Sleeved Top

Almost 2 years ago to the day, I made up this raglan sleeved t-shirt for a Thrifty Thursday post. Wow, I can't believe that it was 2 years ago!!! 


The pattern is from On The Cutting Room Floor. It's a rather boxy top that includes a hip band.


You got a glimpse of the top in my last Sewbussted's Material Witness video. A number of you sent notes asking to see more...
So here it is,


If my memory serves me well, I believe that I added 2" to the bottom of the top to compensate for leaving off the bottom band.

As for the pattern placement, this was a fussy cute situation. The pattern was placed on the fabric to get just the right design. It's not perfect, but close enough ;) 


I recently wore the top to dinner at a friend's home. Two other couples had been invited whom I'd never met. When the hostess asked if I had made the top(she knows I sew), I said yes, and the other 2 women were shocked! Always a great compliment :) 

If you would like to give the pattern a try, you can find the FREE DOWNLOAD HERE

A few things to take note of:
*Be sure that the guide box is the correct size after printing.
*It is a boxy fit, so in order to get a fitted look, you will need to taper the side seams.

This is a fun pattern for mixing fabrics and a great way to use up a few scraps that are just too large to part with. 

There are a number of other free patterns on the website, so be sure to look around. 


Share this PostPin ThisShare on TumblrShare on Google PlusEmail This

Thursday, February 26, 2015

Thrifty Thursday/Free Raglan Sleeved T-Shirt Pattern

Well, at least it's still Thursday in America :)
I came across this cute raglan sleeve t-shirt pattern from On The Cutting Room Floor and decided to give it a try.


The pattern is quite simple, just 3 main pattern pieces. A band for the neckline is included as well as a bottom band of the top. The pattern is boxy with no real shape at the waist, but I knew that could be easily changed.
  

My finished t-shirt. I'm very happy with it. I used a sweater knit for the main body and a stretch velvet for the contrast. As you can see, I gave the top some shape along the sides. Just a matter of pinching it in at the waist. The band was left off of the bottom. I felt it gave the top a more casual look and took away from the overall look of the top.


I rarely use the neckband if it is provided in a pattern, as I would rather make my own. I cut a 2" wide strip for my neckband.


The fabric pattern matches fairly well. I could have been a little more precise, but all in all, it looks rather nice.


If you decide to give the pattern a try, pay attention to the scaling and make sure that the guide box measures out correctly after printing. I didn't pay attention when I printed out the pattern the first time and the pattern was a mess. My fault, not the pattern's.
The style is great for just about anyone. It's quite easy to put together. There is an instruction sheet, but I didn't use it.
You can find the pattern HERE. On The Pattern Room Floor has a number of free patterns that you might want to take a look at. There's a couple that I think I will be giving a try. Just click on Sewing at the top of the web page and you will see a link to the patterns.


Share this PostPin ThisShare on TumblrShare on Google PlusEmail This