For many, drafting a pattern seems like a deep, dark, mystery. Hopefully, you are beginning to see just how simple it really is. What I would like to do is continue on with this series throughout the year. Once the bodice is drafted, we'll draft a sleeve and a skirt. Once we get a good fit, we can then move on into drafting fun designs. After all, that is what it is all about!! Now I say we, sadly this is not a classroom situation and I cannot personally fit each and everyone of you, so as I've said, for now, you'll only be able to see the changes I make in my own pattern. When I move to drafting a basic sloper for a client which is required by one of the modules for the Master Sewing And Design Certificate Program, you will then be able to see me fit another person which I'm sure will be interesting. That won't happen until later this year.
Today we will be drafting the fitted back bodice pattern.
Begin by tracing the back basic bodice pattern.
Transfer the J-K line from basic back bodice and label it as A-B.
Mark C at center back waistline.
C to D is 1/4 of waist measurement plus 1" for the dart.
Connect B to D.
Measure between C and D and find the center. Draw a right angle from C-D line at center point to A-B line. Mark this point as G.
E and F are 1/2" on either side of line G.
Measure down 1" from G and mark as H.
Connect E and F to H.
Our next step will be to adjust the front fitted bodice side seam and and true our darts. Once this is completed, we'll add seam allowances and begin the fitting process.
Master Sewing and Design Certification Program
Showing posts with label Drafting Basic Bodice. Show all posts
Tuesday, January 21, 2014
Thursday, January 16, 2014
Drafting The Front Fitted Bodice, Adding Darts
Now that we've drafted the basic bodice, we can now start adding the darts. The darts will give the bodice the shape and fit that we are looking for. I really enjoy this part of the drafting process!
Begin by tracing off the basic front bodice pattern.
Transfer K-L line and remark as A-B. Transfer the W-V line along with X at bust point and remark as E at waistline.
C-D is 1/4 of waist measurement plus 2" for dart. Example; if your waist measurement is 32", 1/4 of 32 is 8. Add 2 to 8. Line C-D would then be 10".
Mark F and G 1" on either side of E and connect B to D with a straight line. .
Measure down from bust point 1 1/2" and mark as H.
Connect F to H and G to H.
The side seam dart can be placed anywhere along the side seam, but I like to place the center of the dart 3" below the underarm. Mark this point as I.
To determine the width of the side seam dart, measure the side seam of the front basic bodice and the side seam of the back basic bodice. The difference between the two will be the width of the side seam dart. As an example; if the side seam of the front basic bodice is 10" and the side seam of the back basic bodice is 11 1/2", the side seam dart width will be 1 1/2".
Draw a guide line from I to bust point. Measure 1 1/2" from bust point and mark as L.
Divide the difference of the front and back side seam difference in half and place a mark on either side of I. Mark as J and K.
Connect J and K to L.
Once you have added the darts to the front bodice, set this aside. Our next step will be to add the darts to the basic back bodice. Once we have added the darts to the back bodice, I will show you how to true the darts, my favorite step!!
After the darts are trued, I will then cut my bodice out of muslin and we will begin the fitting process. As I said when we started, my fitting issues may not be yours, but hopefully you will learn something from the changes that I will make to my bodice.
Begin by tracing off the basic front bodice pattern.
Transfer K-L line and remark as A-B. Transfer the W-V line along with X at bust point and remark as E at waistline.
C-D is 1/4 of waist measurement plus 2" for dart. Example; if your waist measurement is 32", 1/4 of 32 is 8. Add 2 to 8. Line C-D would then be 10".
Mark F and G 1" on either side of E and connect B to D with a straight line. .
Measure down from bust point 1 1/2" and mark as H.
Connect F to H and G to H.
The side seam dart can be placed anywhere along the side seam, but I like to place the center of the dart 3" below the underarm. Mark this point as I.
Draw a guide line from I to bust point. Measure 1 1/2" from bust point and mark as L.
Divide the difference of the front and back side seam difference in half and place a mark on either side of I. Mark as J and K.
Connect J and K to L.
Once you have added the darts to the front bodice, set this aside. Our next step will be to add the darts to the basic back bodice. Once we have added the darts to the back bodice, I will show you how to true the darts, my favorite step!!
After the darts are trued, I will then cut my bodice out of muslin and we will begin the fitting process. As I said when we started, my fitting issues may not be yours, but hopefully you will learn something from the changes that I will make to my bodice.
Wednesday, January 15, 2014
Drafting The Basic Bodice, Taking Measurements
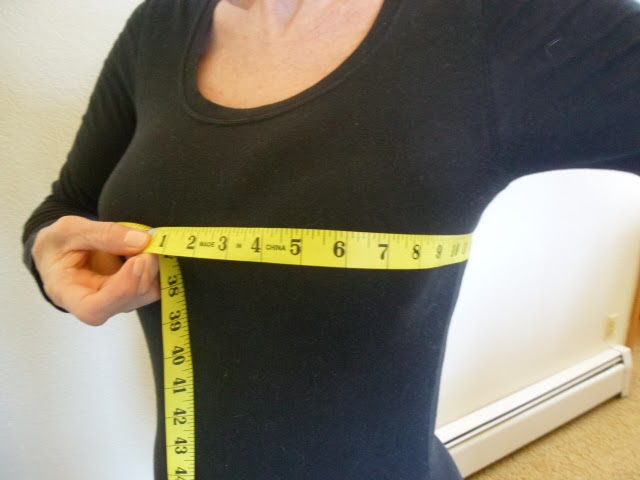
A number of you had asked to see me taking my measurements. A video would probably be a little better than pictures, but hopefully, the pictures will help to answer some of your questions.
Begin by measuring your neck circumference. This measurement does not have ease as we are looking for the exact neckline for our slopersNext, measure from your shoulder to bust point. The tape measure should be placed right at the intersection of the neck and shoulder and then extend to the bust point.
The high bust measurement should be above the bust and from the bottom of the arm to the other side. This measurement does not go all the way around the body.
Full bust measurement. I put one finger under the tape measure when I take this measurement. Be sure to measure at the fullest point of the bustline.
Shoulder to waistline. Measure from the neck and shoulder intersection to the bust point. From there measure to your waistline.
To find your true waist, place your hands on your waist,
and then bend to one side. Where you bend is your waistline. Measure your waist at this point.
When measuring your hips, turn side ways in a mirror and be sure to measure at the fullest point. Place a pin on you side seam at the hip point.
For your hip length, measure from your waistline to the pin you placed at your hip point.
Most of the measurements for the bodice are taken from the front, so we only have three points for back measurements.
Shoulder to shoulder measurement. Measure from the edge of the shoulder bone at your arm to the other side.
Center back length. Measure from the bone at the center of your neck at the shoulder to your waistline.
Across back measurement. This measurement is very difficult to take by yourself. It is taken from the bottom of your arm where your arm meets your back and then across.
If you have any questions, please ask and I will do my best to answer them and post any more pictures that may make taking your measurements a little clearer.
Good luck!
Tuesday, January 14, 2014
Drafting The Basic Back Bodice, Master Sewing and Design Program
I have an apology to make. In the first drafting post for the front bodice, I drafted the neckline curve correctly, but gave instructions to equally divide the wrong line for the curve. Thankfully, I have the most wonderful followers and my mistake was brought to my attention. I have made the correction to the written instructions, so if you copied off the original instructions, please go back and find the corrected version. Also, please note that I have labeled the drafting posts with pattern drafting, Drafting Basic Bodice and Master Sewing and Design professional Certificate program. By clicking on any of these links at the bottom of the posts, you should be able to easily find all of these posts. Remember, drafting a basic bodice, skirt and sleeve is part of the Master Sewing and Design Program. The difference with the program is that you will need to do this for a client. If you are thinking that you might like to work through the process and earn a certificate, making the basic slopers for yourself is a perfect place to start. You can learn so much by fitting your own body.
If by chance you find something that doesn't make sense in the instructions, please email me at sewbussted@yahoo.com. As much as I try to proof read my work, sometimes I miss things, so letting me know is a great help.
I had hoped to do a post on taking my measurements yesterday, but my day got away from me. I should be able to get this post up later today. I think it will help greatly to see how I take my measurements. In the meantime, here are the instructions for
Drafting the Basic Back
Draw a right angle and mark the corner as A.
A to B is 1/12th of bust measurement minus 1/4", the same as for front.
B to C is 2 3/4". From C draw a right angle down 3/4" and mark as D.
Connect B to D and extend line.
A to E is 1/2 shoulder to shoulder measurement. From E draw a right angle guideline down to extended line and mark as F on B-D line.
A to G is 3/4".
Draw a right angle line down from B and out from G. Mark corner as H.
Divide G to H into 3 equal sections and mark I nearest H. Connect B to I with a smooth curved line.
G to J is 1/6 of bust measurement plus 2". From J draw out a right angle line. J to K is 1/4 of bust measurement plus 1/2" for ease.
G to L is back length. Draw a right angle line out from L. L to M equal J to K.
Connect K to M.
Divide G to J in half and mark as N. Draw a right angle out from N. N to O is 1/2 of Across Back measurement. (For Across Back Measurement, refer to Taking Measurements)
Connect F to O with a slightly curved line.
Draw a right angle down from O to J-K line and mark as P.
Divide O-P into 3 equal sections and mark section closest to O as Q.
Connect Q to K with a straight line.
From K-Q line, draw a right angle to P and mark R on Q-K line.
Divide P-R line into 3 equal sections and mark section closest to R as S. Using a French curve, draw a smooth curved line from Q through S to K.
Congratulations, you have now drafted a basic back bodice. Using the basic front and back bodice, we will now begin the process of drafting the fitted bodice. Once the fitted bodice has been drafted, we will then begin the fitting process. Fun, right?!!
If by chance you find something that doesn't make sense in the instructions, please email me at sewbussted@yahoo.com. As much as I try to proof read my work, sometimes I miss things, so letting me know is a great help.
I had hoped to do a post on taking my measurements yesterday, but my day got away from me. I should be able to get this post up later today. I think it will help greatly to see how I take my measurements. In the meantime, here are the instructions for
Drafting the Basic Back
Draw a right angle and mark the corner as A.
A to B is 1/12th of bust measurement minus 1/4", the same as for front.
B to C is 2 3/4". From C draw a right angle down 3/4" and mark as D.
Connect B to D and extend line.
A to E is 1/2 shoulder to shoulder measurement. From E draw a right angle guideline down to extended line and mark as F on B-D line.
A to G is 3/4".
Draw a right angle line down from B and out from G. Mark corner as H.
Divide G to H into 3 equal sections and mark I nearest H. Connect B to I with a smooth curved line.
G to J is 1/6 of bust measurement plus 2". From J draw out a right angle line. J to K is 1/4 of bust measurement plus 1/2" for ease.
G to L is back length. Draw a right angle line out from L. L to M equal J to K.
Connect K to M.
Divide G to J in half and mark as N. Draw a right angle out from N. N to O is 1/2 of Across Back measurement. (For Across Back Measurement, refer to Taking Measurements)
Connect F to O with a slightly curved line.
Draw a right angle down from O to J-K line and mark as P.
Divide O-P into 3 equal sections and mark section closest to O as Q.
Connect Q to K with a straight line.
From K-Q line, draw a right angle to P and mark R on Q-K line.
Divide P-R line into 3 equal sections and mark section closest to R as S. Using a French curve, draw a smooth curved line from Q through S to K.
Congratulations, you have now drafted a basic back bodice. Using the basic front and back bodice, we will now begin the process of drafting the fitted bodice. Once the fitted bodice has been drafted, we will then begin the fitting process. Fun, right?!!
Subscribe to:
Posts (Atom)