f

Wednesday, March 2, 2016

The Wednesday Showcase

So many succumb to the idea that having a blog would be lots of fun, and it is. When I look at my list of blogs that I am following, I'm always a little disheartened by the blogs that have not had a post in over a year. Either they are a little disheartened, or they find out that it can also be a lot of work and give up. 
I especially wanted to showcase this next blog as I think it is such a great idea. It's hosted by a group rather than just one person. They all live in Denver, Colorado, so their proximity to each other is quite helpful. And the nice thing about it is that the entire work of the blog doesn't land on just one person. They call themselves the Denver Sewing Collective and you can find them here, http://denversews.com/
There are 6 ladies in The Denver Sewing Collective. On the side of the blog, you'll find the list of contributors. Just click on their icon and it will take you to all of the posts that this person has done.
I just had to showcase this dress, such a pretty 1940's...1970's dress. She called it her Moby Dick of a dress. Click HERE and you can read the entertaining story that I'm sure we can all relate to.
Each person brings something unique to the table. Love these organizers.
And aren't these little train cases cute?!!
One of the ladies took this beautiful silk panel from Anna Sui...
 And made this gorgeous kimono. 
Check out the beautiful stitching detail. Is that inspiring or what?
They even had a challenge where each person had to show their sewing space. This one is so compact, but so perfect. I think I need to have her come help me organize!!!

If you've thought about a blog, but are a little intimidated by the work, maybe team up with a few friends. It'll spread out the work and make it fun for all. Did you notice that The Denver Sewing Collective has a dynamite logo? The scissors forming a mountain is genius! 

Next up is a very energetic young woman. Her name is Helen and her blog is simply, Helen's Closet. Cute! 
She recently took a trip to Mexico with her family and they camped on a beach!!!! I am not a camper, so this seems a little incredible to me, but it looks like they had so much fun. And what does someone who sews do to prepare for their trip? Why make new outfits of course!
Helen made this adorable swimsuit. So perfect for Mexico. She actually made 2, so check out her blog to see the other.
She drafted and made a new pair of culottes for the trip. If it were me camping, I know I would not look so well put together.
This was not for her trip, but I thought it really nice and that you might like to see it. It's the Cascade Duffle Coat from Grainline Studios. Love the treatment along the zipper.
Helen also has a pattern out, and it's free!!! The bag features a snap closure or a flap. She hosted a sew along recently and you can find all of the posts HERE. Just click HERE to get the pattern. All you'll need to do is sign up for her newsletter.  

So once again, so much inspiration on the Wednesday Showcase. 
If you have a number of friends that you can pair up with to do a blog, I hope you will. I think this is just the best idea. Great for any sewing group too!
Happy Wednesday Everyone!
Rhonda 



Share this PostPin ThisShare on TumblrShare on Google PlusEmail This

Tuesday, March 1, 2016

Master Sewing and Design Certification/Drafting and Pockets

Whether you are sewing for yourself, or for clients, having the ability to make changes, even simple changes to a pattern is a skill that will come in quite handy.
When I initially made the Clover Pant from Colette Patterns for Sew News, I was pleasantly surprised by how much I liked the pattern. The pants are a slim fit, with a side seam zipper. 
I decided that I would like to use the pattern again, but I wanted side pockets and a fly zipper. 
To do this, we will only need the front of the pant. 
Measure over from the side seam 2 1/2" at the waistline. 
At the side seam notch, fold an angled line from the notch to the mark we made at 2 1/2" from the side seam.
From the folded edge, at the waistline, measure in 3 1/2" and place a mark. 
From the side seam notch, measure down 4", and place a mark. 
Now draw in the shape of the pocket as you see below. 
When I do drafting exercises, I like to use white paper. You can purchase a roll at your local office supply store. The cost is minimal. My roll is a fairly good size roll and I paid about $5.00 for it.
Take a piece of paper and slide it under your pattern. copy off the shape of the pocket. Be sure to transfer the grainline.
Add 1/4" to the angled line of your pocket for seam allowance. I incorporated seam allowance into the measurements that I gave for the rest of the pocket. This will be the pocket facing.
Now, fold the angled edge of the side seam back and trace off the pocket once again. Be sure to transfer the grainline. This will be the pocket insert.
To cut out the pants, fold the angled line back in and pin in place. When cutting the pants, BE SURE TO REMEMBER TO ADD 1/4" SEAM ALLOWANCE  TO THE ANGLED LINE.
Cut 2 pocket facings and 2 pocket inserts.  

Now that we have the pockets drafted and cut, it's time to put them together. 
Begin by matching the pocket facing to the front pant, right sides together. Stitch along the 1/4" seam line.   
Open out the pocket facing and edge stitch along the side of the pocket facing.
As you can see below, the seam allowance should be laying towards the pocket facing. 
Fold the pocket facing back inside the pant and stitch along the edge. We have now stitched the pocket opening edge 3 times. All of the stitching will help to keep the pocket opening edge from stretching when putting your hands in the pockets.  
You can see the stitched edge a little better in the picture below. 
Now lay the pocket insert over the pocket facing and stitch the 2 together. Finish the seam however you choose.
Now we have the pocket assembled. 
Before we begin to insert the zipper, we need to baste the pocket  to the pant leg along the side seam and the waist line.   
We now have a pocket where there was never one before!!!
Adding a pocket to a pencil skirt or a pair of pants is so easy to do. This is a basic pocket, but once you've mastered a simple pocket, you can do anything.
Hope you enjoy adding to pockets to all of your pants and skirts!
Rhonda


Share this PostPin ThisShare on TumblrShare on Google PlusEmail This

Monday, February 29, 2016

Monday Morning Inspiration/Great Ideas

To start off the new week, I thought I would share a few pieces that I've found which I think are quite inspirational. Of course, I dream of doing them all, but even if I just adopt one into a garment, then that's a good thing too :)

I absolutely adore this skirt and how easy it would be to do. The skirt is just an a-line skirt with an added pleat, and of course a zipper. 

The pleated detail on this skirt is so pretty.
I tried to find the website that this jacket came from, but no luck. This is just amazing!


 Here's another raglan sleeve with great seam details. 


The next time I make a raglan sleeved garment, I want to give this a try. What a fun peek-a-boo treatment.


The neckline on this jacket is wonderful. Look closely, the princess line develops into a notched collar.


Now for a little draping inspiration.
Love how the drape folds into a pleat.


From Haider Ackermann.


Such a pretty back.

Another interesting piece from Haider Ackermann.

A subtle, but incredible pocket detail. Would be great color blocked.


Another amazing pocket detail. I think I have to figure this one out!


And finally, just because it is just-so-pretty.


 Isn't this the most incredible jacket?!!!

I hope this has made for an awe inspiring start to the week!
Happy Monday :)
Rhonda


Share this PostPin ThisShare on TumblrShare on Google PlusEmail This

Sunday, February 28, 2016

Sunday Night Reflections/The Good Samaritan


"You're always the good Samaritan."

When I have a number of very large items to wash, I like to head to the laundromat. The machines are large and the job gets finished in record time. I always take something to read, a knitting project, or just plan to check emails, so I have plenty to keep me busy. 
My husband dropped me off and I told him when I thought I would be finished. When he returned, he found me talking and helping someone fold their clothes. While I was sitting there waiting for my things to dry, I noticed that this woman was having a rather difficult time with her laundry. She had not said anything, but I could see that it was all rather overwhelming, so I offered to help fold. At first she refused, but I insisted. She told me that her husband usually does their laundry, but he had been injured, so she had to do it. She just couldn't believe that I would help. I had nothing better to do, and besides that, I enjoy folding. As we folded, she told me about her life, her dog, and even her dreams. The time passed quickly, and I could see that her spirit changed, she became happy. 

My husband and I had been out skiing for the day. During the day, he noticed that I had stopped to help a number of people who had fallen. At this point in my life, I ski well, but that was not always the case. So when I can help, pick up poles, help someone get up, or just make sure that they are okay, I feel like I am giving back to those nameless people who helped me along the way.
At the end of the day, as we were walking to our car, we passed a man who was balancing skis on his shoulder, trying to carry his son's skis in his other hand and hold his son's hand all at the same time. I walked over and asked where they were parked and asked if I could help. He thanked me and said, it was okay, but I could see that it wasn't so I just took the son's skis from his hand and said, "now you can hold on to your son." He was grateful. When we reached his car, I gave back the skis. As we walked away, it was then that my husband said, "you're always the good Samaritan."

Many years ago now, someone very close to me did the unthinkable. The experience changed my life and not in a positive way. I was broken and confused. After a number of years, I was able to find the grace to forgive. I made contact, but learned that just because you forgive, it doesn't mean that the person who has harmed you will really want forgiveness, which is fine, because forgiveness is not for the one who has harmed, but for the one was harmed. 
During the brief time that I tried to have a relationship with this person, I was introduced to the man who would become my husband. I have always felt that my husband was the gift I received for stepping out and trying to do what I thought to be the right thing.

I do not see myself as a good Samaritan. There have been so many times that I have missed opportunities that I have regretted not taking, but as my husband and I walked back to our car at the ski hill, I told him that I believe that when we take the time to help another, be it with their load or with a pain that may be in their heart, it always comes back to us. After all, he came to me because I reached out to another. 

If you think about the story of the good Samaritan, take note that we are never told his name, he is only known by what he did. He went out of his way to help the man who had been beaten. Did he ever receive a thank you? I don't think so, and that really isn't the point, but he has gone down in history as being a hero. When we step away from what's comfortable and easy, when we try to help, or do the right thing, there's always a reward. The reward may not be immediate, and it will rarely come from the person who was helped, but in time it does come back to us, and sometimes in the form of a loving and loyal husband. 


Share this PostPin ThisShare on TumblrShare on Google PlusEmail This

Sunday's Supper/Fettuccine with Walnuts, Lemon and Herbs

Happy Sunday All! I'm quite early with this post today, and it may be a good thing as it will give you time to pop over to the store and pick up any ingredients that you don't have and make this pasta for yourself. Trust me, your mouth will be happy if you do :) Aromatic herbs, lemon and walnuts over pasta? YUM!!!
The recipe that I'm sharing today comes from a very interesting website called, Not Without Salt. The blog is written by Ashley who began her career plating desserts at Spago in Beverly Hills. On her way to becoming a pastry chef, she found out she was pregnant, and life changed. Ashley believes that good food is simple, and her blog is about helping us eat well and enjoy the process of cooking. Her posts are beautifully written. 
This pasta is so easy to make and there are only a few ingredients, but the flavor almost jumps out of the bowl.
The recipe that is posted was adapted from a recipe found on another website, so changes are easy to make based on your tastes. Once again, I made a few changes.
You can find the recipe HERE, and my changes are below. 
*I used 2 cups of chopped parsley rather than just 1.
*Rather than just the rosemary, I used a mix of fresh rosemary and thyme.
*I added broccoli to my pasta
*I used Romano rather than Parmesan cheese. I like the sharper taste of Romano cheese.
*And finally, I added a little of my red pepper mix. I like to grow Habeneros, Cayenne, and Jalapenos in the summer. Once they are harvested, I let them dry and then I grind them down to use as seasoning.     
The fresh herbs and the grated lemon rind smelled heavenly as they cooked. 
When I add broccoli to my pasta, I like to add the broccoli to the boiling pasta 2 minutes before the pasta is ready to drain. Works perfectly. The broccoli is steamed and yet still has a bit of a crunch. 
All the ingredients have been combined and the pasta is ready to serve. 
My husband said that the addition of the walnuts made the pasta all the more special.
This is a pasta that not only your family will enjoy, but it would be lovely for a dinner party as well. In fact, I don't think anyone would miss not having meat. The pasta would be great paired with the Tomato and Roasted Lemon Salad that I posted HERE.
Enjoy!
Rhonda


Share this PostPin ThisShare on TumblrShare on Google PlusEmail This

Thursday, February 25, 2016

Thrifty Thursday/I-Pad Stand

Like a child waiting for Christmas, I have seen SO excited all week as I've waited to share this little item with you. I make a lot of wonderful things, but this has to be my favorite in quite some time.
A funny little story, my husband gave me an I-pad for my birthday a few years ago. It's a very nice I-Pad, but I didn't see why I really needed it, so it sat in the box for a very long time. Finally, I needed to do some training on a new GPS system for aviation and it required the use of an I-Pad. Finally the thing came out of the box, very reluctantly I might add. I now love my I-Pad and I wonder why it took me so long to start using it. Technology...I have kicked and screamed with every new step, and then once I use it, I'm hooked :)
As I've shared in other posts, I especially enjoy listening to podcasts, interviews, TedTalks, audio books, all sorts of things while I am in my studio. The I-pad is perfect for this. The problem that I've had is that I needed a stand. I'm forever trying to prop it up. 
Thanks to a very inventive Australian, I now have a super cute I-Pad stand.     

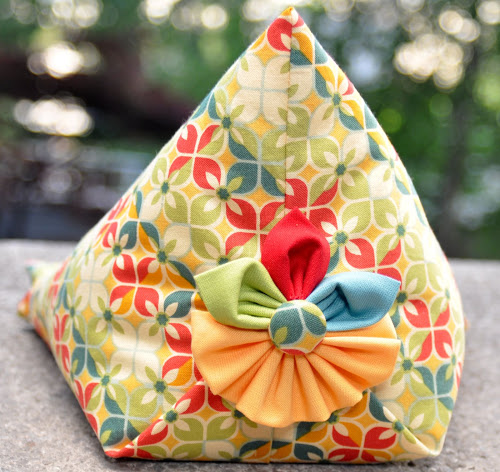
Here's the I-Pad stand that Teresa From Down Under made. So cute :)


Notice that hers has a sweet little flower on the back. I wanted a cleaner finish to my stand, so I eliminated the flower and sewed my flap so that it is hidden inside the pyramid.


Here's the video tutorial. 


Rather than leave the flap on the outside of the stand, once the center seam and the end seams were sewn, I left the bag on the wrong side. I then folded the top as you see below. The center seam is facing up. 


I then folded 1 of the flap ends back, and pressed on the folded edge.


I stitched across where I pressed the flap back, and clipped off the point of the flap. Once this was done, I then turned the bag to the right side and completed the bag as you see in the video.


My I-Pad sits so nicely in the cradle.


*One last change that I made* In the video, you'll see that she just sewed 1 stitching line between the pyramid and the edge that holds the I-Pad. I actually sewed in 3 stitching lines about 1/8" apart. I wanted an actual channel for my I-Pad to sit in. It seems to be a little more secure, at least to me.


You will need to cut an 18 1/2" x 12" rectangle to make the pyramid. You'll need to print out the pattern for the cardboard base. A note on the base, 
1. I increased my base 1/2" on either side and I also increased the length by 1/2".
2. I used a heavy weight chip board for my base. You can find chip board at an art supply store.
Be sure to follow the instructions and add lentils are rice once the top portion has been stuffed. I used about 3/4 of a bag of lentils in my pyramid. Once I had the lentils in, I then slid in my chip board and rearranged the lentils. Makes for a very sturdy piece.

This is something that just about anyone might enjoy receiving, so great fro gifts, especially your fellow sewing friends. 
You can find the tutorial HERE, and the free base pattern HERE
Have fun!
I now smile every time I go into my studio :)
Rhonda
By the way, the weather man was super wrong, no snow, YEA!!! But poor Indiana was clobbered. Hope any of you who live in Indiana are safe and warm. 


Share this PostPin ThisShare on TumblrShare on Google PlusEmail This