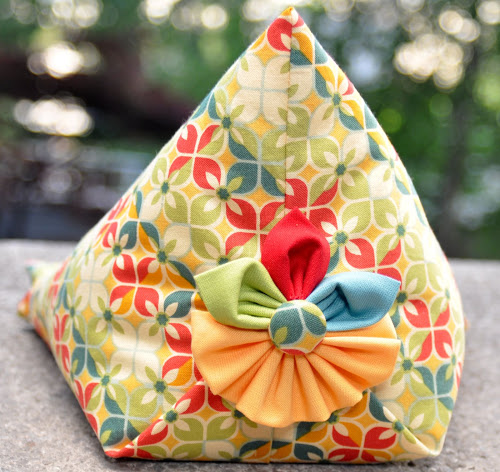
Like a child waiting for Christmas, I have seen SO excited all week as I've waited to share this little item with you. I make a lot of wonderful things, but this has to be my favorite in quite some time.
A funny little story, my husband gave me an I-pad for my birthday a few years ago. It's a very nice I-Pad, but I didn't see why I really needed it, so it sat in the box for a very long time. Finally, I needed to do some training on a new GPS system for aviation and it required the use of an I-Pad. Finally the thing came out of the box, very reluctantly I might add. I now love my I-Pad and I wonder why it took me so long to start using it. Technology...I have kicked and screamed with every new step, and then once I use it, I'm hooked :)
As I've shared in other posts, I especially enjoy listening to podcasts, interviews, TedTalks, audio books, all sorts of things while I am in my studio. The I-pad is perfect for this. The problem that I've had is that I needed a stand. I'm forever trying to prop it up.
Thanks to a very inventive Australian, I now have a super cute I-Pad stand.
Here's the I-Pad stand that Teresa From Down Under made. So cute :)
Here's the video tutorial.
Rather than leave the flap on the outside of the stand, once the center seam and the end seams were sewn, I left the bag on the wrong side. I then folded the top as you see below. The center seam is facing up.
You will need to cut an 18 1/2" x 12" rectangle to make the pyramid. You'll need to print out the pattern for the cardboard base. A note on the base,
1. I increased my base 1/2" on either side and I also increased the length by 1/2".
2. I used a heavy weight chip board for my base. You can find chip board at an art supply store.
Be sure to follow the instructions and add lentils are rice once the top portion has been stuffed. I used about 3/4 of a bag of lentils in my pyramid. Once I had the lentils in, I then slid in my chip board and rearranged the lentils. Makes for a very sturdy piece.
This is something that just about anyone might enjoy receiving, so great fro gifts, especially your fellow sewing friends.
You can find the tutorial HERE, and the free base pattern HERE.
Have fun!
I now smile every time I go into my studio :)
Rhonda
By the way, the weather man was super wrong, no snow, YEA!!! But poor Indiana was clobbered. Hope any of you who live in Indiana are safe and warm.


Great idea! The triple row of stitching in the groove is inspired. ! Love your fabric choice too. Cheers, Michele
ReplyDeleteThanks Michele :) The fabric was a leftover piece from kitchen curtains I had 20 years ago!!
DeleteWhat a great item. If I make one I'll have to go out and buy an Ipad, tho. :-)
ReplyDeleteA warning...you'll love it :)
DeleteLOL LOL, Rhonda. Should have an I-Pad ready for pick up this afternoon. Your holder just sent me over the edge! ;) Now to get sewing.....
DeleteOMG!!! Let me know what you think once you get it home.
DeleteClever!
ReplyDeleteI think this is just what my mum needs - her arms get tired holding her tablet when she is making Skype calls (or she s just reminding me that she can do something I can't!). Thanks Rhonda, I think you just filled a birthday gift gap.
ReplyDeleteI think she is going to love it :) So glad I could be of a little help. Birthday gifts can be so difficult.
DeleteI have the key board that my I-Pad sits in but it isn't very stable. Can I use this stand with the keyboard?
DeleteIf the keyboard needs to be attached to the I-Pad screen, then it won't work.
DeleteI just purchased everything to make this. It will be a selfish sewing project for myself. (as a test before attempting to make for others) I however do want the flower on the back.
ReplyDeleteHave fun! I think you are going to love it 😍
Delete