f
Showing posts with label border prints. Show all posts

Sunday, May 3, 2020

Sunday Brunch and Me Made May

Regardless of the fact that at least at the moment, one day feels about the same as another, I've made a conscious decision to keep Sundays special. I get up, shower and dress just as if I will be going to church. In a round about way, I do "go" to church as I listen and watch one of my favorite service online, and I make a lovely breakfast for my husband and me. 

A little over a year ago, I posted a recipe for spinach and rice cakes, and called them Patty Cake Rice Cakes. If I may say so myself, these things are delicious! When I make rice, I always make more than we can eat in one sitting. Rice is comfort food for me, I will have it for lunch with vegetables and hot peppers, I'll pour a little almond milk over a bowl of rice, sprinkle it with cinnamon and a packet of Stevia, heat it in the microwave, and I have dessert. So, a pot of rice never goes to waste in my house. But, my favorite item to make with leftover rice is the spinach and rice cake recipe. The cakes can be made up, and then frozen before cooking. Just take out what you would like, let them thaw a bit, and you'll have a fresh meal in relatively no time. I recently made up a batch, so we had rice cakes with poached eggs for breakfast this morning. So good!


I served the rice cakes with tomatoes that I broiled in the oven with a little salt, pepper, and olive oil. Just before removing them from the oven, I sprinkled the tomatoes with some grated parmesan cheese. Lastly, I sliced some avocado, and we had a fabulous breakfast. 

My little challenge of dressing each and everyday is going well. What hasn't been going well is remembering to take pictures :/ But, I decided to participate in Me Made May 2020 as an added incentive. We're only 3 days into May, but...so far so good, or at least, better :) 

On Saturday, April 23rd, I wore an 8-gored skirt that I drafted and made quite some time ago. You can see the original post with directions on how to draft an 8-gore skirt HERE. Since I made the skirt, I cut the points off the hem. The top is one that you've seen with the pants from the Simplicity pattern. This is Simplicity 9017. I like the top, but the neckline really needs interfacing in order for the neckline to sit as it does on the pattern. The instructions do not call for interfacing, so if you decide to give the pattern a go, use a little interfacing in the neckline.   


Last Sunday, April 26th, I wore a little skirt that was made from my leftover fabric after cutting a pair of pants. The border print on this fabric was on both ends of the selvedge, so all I had to do was cut the remnant in half, add an elastic casing, and voila! I had a skirt. It was rather cool last Sunday, so I wore a pair of tights. They look black, but they were navy blue. I paired the skirt with the Molly Tee from Pattern Union. The quilted vest was found in a resale shop.      


I missed getting pictures taken from Monday-Wednesday, but I got back on the wagon by Thursday. The pants were made from the same fabric as the above skirt. Just a basic pair of elastic waist pants. The flowy top is a pattern hack. I used the Helen's Closet Elliot Sweater and Tee pattern. The front was lengthened, a yoke added to the back, along with an inverted center back pleat. I also added a scoop hemline to the back. The top just floats so nicely around the body. So nice for those days when you want to look nice, but be really comfortable.     


Last Wednesday, I was so pleasantly surprised by the loveliest email. A sweet woman by the name of Chris emailed and said,

"your knowledge and designs have given me a great deal of fun and sewing pleasure, and I would like to give something back. It would give me a great deal of pleasure to gift you the Presto Popover Top pattern from Naughty Bobbins Patterns."

How could I refuse??? The next morning the pattern was in my inbox. I promptly downloaded it, taped it together, and preceded to get a garment made. I SO love this pattern. It's super easy to make, goes together in a jiffy, and looks great on the body. Once I get something made, I just have to wear it. The skirt that I'm wearing is from an out of print McCall's pattern. I saw it posted on Instagram, thought it was so cute, and found a pattern on Etsy. This is the second skirt I've made from the pattern. It's McCall's 6081. There are patterns available on Etsy and Ebay if you think that you might like to have one for yourself :)
  

Saturdays feel like days that should be a little(a lot more!)more casual. I have no idea why :/ Anyway, I threw on my favorite black leggings, the Avery Leggings from Helen's Closet, and a Tonic Tee from SBCC. If you sign up for the newsletter, the pattern is FREE!!! The pattern is new and improved with expanded sizes as well as a cute little puffy sleeve. 


I just couldn't resist...I loved the Presto Popover Top so much that I decided to make a dress. Truth be told, I actually cut the dress before I cut the top. Shame on me as I did not read the instructions before cutting. As it turns out, I needed 2 fronts. So, I wasn't able to match the pattern down center front. Oh well. I still like the dress so very much. Super comfortable. I also lengthened the sleeves as I get cold so easily. A nice piece for a Sunday, although I'm going no where :( On both the top and the dress, I used the more modest notch for the front opening. There are 2 possibilities with the other being a little lower. I think that on my next make I'll give the lower  neckline a try as it will show off a necklace a little better.  
  

I spoke with a friend recently. She is having a very difficult time, trying to work full time from home, and then deal with 3 young boys. Two of the boys are in school, and the other is a toddler. I really don't know how she is managing to do it!!! While I appreciate the effort that is being made by healthcare providers, the fire department, police officers, paramedics, and all of those who are trying to help keep fresh food in our grocery stores; all of those who are struggling with trying to work, home school their children, and keep some sanity in their homes, they too are heroes. More than heroes, Superheroes!  A friend of mine is taking at least an hour a day to be online with her granddaughter. They talk, color, and play games. She even picked out patterns and fabric and allowed her granddaughter to help her design some new outfits for the child. It gives her daughter a break that she can look forward to everyday. I'm sure it's quite a gift. The word superhero has taken on a whole new meaning for me. But, I think most moms have always been Superheroes :) 

Have a wonderful week!
BTW, if you would like to follow my #idressformechallenge on Instagram, you can find me HERE.
Rhonda



Share this PostPin ThisShare on TumblrShare on Google PlusEmail This

Wednesday, July 20, 2016

The Wednesday Showcase

Before I head out to my garden, I thought I would do a Wednesday Showcase post. I always enjoy doing the posts, but I think I'm also procrastinating a bit, as I really need to get back to my garden and finish the project I started yesterday. I've been a sweaty and dirty mess for days and I'm longing for a break. That will come tomorrow and Friday as it's supposed especially hot, so a little break is in order.

First up is Sue of Sue's Sew By Me. She lives in Australia and she began sewing as a teenager, when like so many of us who sew, she longed for the latest styles and sadly didn't have the funds to purchase them. While her children were growing up, sewing took a back seat, but now she is back with a vengeance!!!

She created this dress to wear to a wedding. Such a wonderful use of a border print, and so very elegant.


Sue enjoys wearing artful pieces and making the best use of the fabric.  Another great use of a border print with this rectangular top.


Love this Marcy Tilton top in the gauzy fabric. I may just have to break down and buy the pattern!


I absolutely love this dress. Sue liked the nod to the Mondrian look of the fabric print. I think I would be tempted to wear this dress everyday.


Sue enjoys using a number of the Tessuti patterns, so if you have had your eye on a few, be sure to check out her blog to see them made up. You can also find Sue on Instagram HERE.


Next up is Kyle from Vacuuming The Lawn. Many of you may know her from Pattern Review. She loves to sew, and she loves taking on a challenge.

Doesn't this look like one fun gal!!!


Look at how gorgeous this fabric is! 


What looks like a simple box jacket, is really a work of art.


Perfection!


And now you see that this is no typical striped fabric. 


After I saw the pictures below, I thought to myself that I may very well never knit again! She made this sweater from a blanket!!!


And finally, I just had to show you this amazing backpack. Check out the cute zipper pull.  Be sure to pop over to her blog and read all about it. You can also find Kyle on Instagram HERE.


Well, I've postponed the inevitable long enough. Time to say goodbye for the day and get back out in my garden. Pictures and a video tour will be coming soon. After all the work I've done, I need to show it to someone :)

Have a wonderful day!
Rhonda 


Share this PostPin ThisShare on TumblrShare on Google PlusEmail This

Monday, February 2, 2015

Get Your Motors Running! And You Get To Vote!!!!

We're deviating a little from our usual Monday Morning Inspiration post, but I think this will be especially inspirational!!!
Last September, Janet Pray of Islander Patterns gifted me a bolt of this wonderful fabric. It's a shirt weight barkcloth. I loved it at first sight! My original intention was to make a ball gown and use the panels to create a full skirt. I had 11 panels, so plenty to create a full skirt and enough left over for the bodice.
But, the more I thought about it, the more I wanted to share it. Then an idea popped into my head, so I called Janet and ran my idea past her and she loved it. 
I knew that Janet was coming out with a new Craftsy Class and that it would showcase her new pattern, the Motor City Express Jacket. Since I had 11 panels of the fabric, I thought that I would share 10 and of course keep 1 for myself. So I chose 10 bloggers to participate. Each blogger received 1 panel, approximately 20" wide, by 60" long. They could do anything they liked, but it needed to be made into a garment. They were free to mix the panel with another piece of fabric, or use it all alone. Out of the 10 chosen. 9 completed the project and what an amazing(really amazing!!!) job they did! Please click on their links to read about their inspiration and design process.


Shams of  http://communingwithfabric.blogspot.com/2015/02/challenge-accepted.html

Cennetta of  http://themahoganystylist.blogspot.com/2015/01/black-and-white-contest-and-wardrobe.html


Lisa of  http://www.poldapop.com/2015/01/get-your-motors-running-va-vvrrooooom.html


 photo IMG_6072_zps5zdqktn6.jpg


So, this was a challenge and YOU get to determine the winner!!! I'm so glad it's not me as I just can't choose a favorite. The winner will receive Janet's new Craftsy Class along with the Motor City Express Jacket pattern. It's a great pattern with lots of zippers!!!! 
So now we need your help to choose a winner. Please go to each contestant's blog, read about her process and then come back here and vote for your favorite. Voting will end at midnight on Monday February 9, 2015 and the winner will be announced on Tuesday February 10, 2015. How will you ever be able to pick a favorite??????

**As you can see, the voting issue has been fixed and the voting is well under way. If you would like to vote for your favorite contestant, just click on the HEART in the upper right hand corner of the thumbnail and your vote will be registered. 


Share this PostPin ThisShare on TumblrShare on Google PlusEmail This

Friday, October 17, 2014

Fabulous Free Pattern Friday

Good Morning and Happy Friday!!!
As I shared a few days ago, I am enjoying a few days of relaxation. But before I left, I put this top together for today's post. I wore the top on Wednesday to a concert and luncheon and everyone went crazy over it. I was especially pleased with how it turned out. It's just a t-shirt pattern with a rectangular extension. SUPER easy!!! Sadly, I did not get any pictures of me in the top, but I think you will be able to get an idea of how the top is made.
The T-Shirt Shawl
Above you see that only one side has a sleeve. Below you see the rectangle extension on the other side. Hmmm, I should have pressed the hem before I took the picture, opps!!!
To hold the top in place on the body, I stitched a vertical line about 3" long at the waistline on the extension side.
 The extension is open from the shoulder to the hem.
To do top, use a basic top pattern that you like and that fits well. Cut out the armhole and side seam on one side and the entire neckline. On the opposite side at the shoulder, draw a straight line out from the neckline. The length should be your measurement from your neckline to your wrist. Square the line down to the hem. And that's it! As I said, it's super easy and it looks super great!!!
This is also a great idea for border prints. I used the border print across the body and then to continue the pattern, I used it on the sleeve as well.
Be sure to let me know if you give this a try. I think you are going to love it if you do!!!


Share this PostPin ThisShare on TumblrShare on Google PlusEmail This

Saturday, June 29, 2013

Fabulous Free Pattern Friday

Once again, I have not completely lost my marbles!! I know what day it is, but I just have to post this skirt. If  a garment could have feelings, this one would most definitely feel like the unwanted child. I actually did something with this fabric last summer for a FFPF post. I liked the design, but not in this fabric, so it was put aside. A few weeks ago, I took the project out because I really like the fabric and I had a new idea. I finished the skirt and it has been sitting, waiting for me to post it for at least the last three weeks. So rather than leave it sitting for another week, I'm posting it today.
A few years ago I gave a presentation on working with border prints. I absolutely love border prints because there are so many things that can be done with them. Maybe I should repeat that presentation here on the blog. 
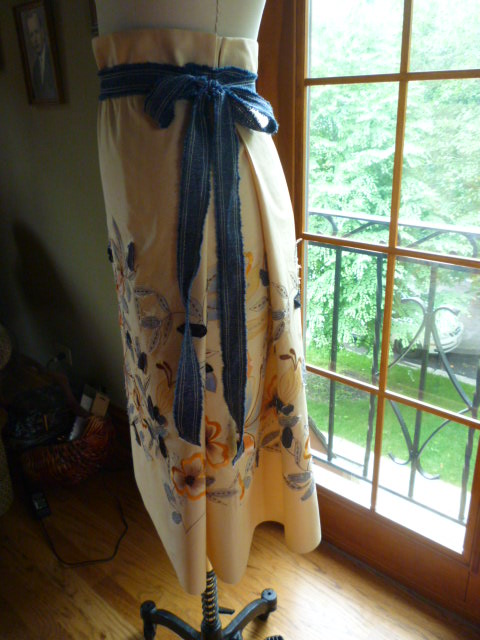
As you can see, the fabric is a border print. The skirt only has 1 seam and that is in the box pleat that is on the left side of the skirt. Below you can see the box pleat. 
On the right side is a dart which gives a smooth finish to that side.
To hold the skirt in place around the waist, I simply tore 2 strips of denim, stitched them and then stitched them in place. Their placement also helps to hold the box pleat in place.
 In the picture below you have a better view of the inside of the box pleat.
The skirt laying flat. Now you can see how the one side has been pinched in as a dart and gives shape while the other side is straight.
To develop this skirt, you will need your hip measurement and the length that you would like your skirt to be.   Add 22" to your hip measurement for the box pleat. As for the length measurement, add 3" for the waist of the skirt. So, as an example, if you hips are 40" wide, add 22" and this will be 62" that you will need for the width of your skirt. Add another 1/2" for the seam allowance. For the length, if you would like a 26" finished length, add 3". Now, I was super lazy and did not hem my skirt. The selvedge edge was so nice that I just left it as it was. But if you would like to hem your skirt, be sure to add to your length measurement for the hem allowance.
Once you have the piece cut, sew the 1 seam. Fold in the box pleats. Now try on the skirt and pinch in the right side do that it will form a long dart. Once you have sewn in the dart, fold down the 3" that were added for the waist and press. Unfold the the 3" fold and then match the edge of your fabric to the pressed fold line. Press and then fold over and stitch in place. This will give you a 1 1/2" finished edge at the top of your skirt. You can see my finished waist in the picture below.
Cut 2 ties out of whatever fabric or trim that you wish. Make sure that they are long enough to wrap around you waist and tie in a bow. Sew the ties to either side of the fold of the box pleat. As you can see, I did a little top stitching to my denim. I thought it would add a nice touch.
The skirt is finished.
This is a great way to use a border print, especially one that you would rather not do a lot of cutting into the design. 
I'm curious to see if anyone will recognize the denim and fabric combination in something else that I have posted this past month. There will be a small little prize if anyone can guess, just a little notion that I love to use. So guess away!!!! 
Enjoy your Saturday everyone!
Rhonda


Share this PostPin ThisShare on TumblrShare on Google PlusEmail This