For the Master Sewing and Design Certification Program, you must demonstrate that you know how to make a bound buttonhole. Rather than walk you through making a typical bound buttonhole, I decided to make it a little more fun and show you how to make a triangular shaped bound buttonhole. They are fun to make, and surprisingly easy. Once you master making the buttonhole, there are lots of design possibilities.
I did a video tutorial for you on how to make a triangle shaped bound buttonhole. I hope that it explains the process and that you have great success in making your own. If you would like for me to demonstrate a typical bound buttonhole, I'll be happy to do so. Just let me know in the comment section. They really aren't as scary as we've been lead to believe.
Enjoy the video!
For those of you who may be wondering about the Master Sewing and Design Certification Program, you can read about it HERE.
Master Sewing and Design Certification Program
Showing posts with label bound buttonholes. Show all posts
Tuesday, February 23, 2016
Tuesday, September 22, 2015
Buttonhole Inpsiration
In THIS post, I took you step by step through the process of making a bound buttonhole. We talked about making bound buttonholes for larger buttons, like the one below,
and I showed you how to make a triangular shaped buttonhole.
In THIS post, I gave you a little inspiration. Another triangular shaped buttonhole with bow buttons. Fun!
In that same post, I showed you this triangular shaped buttonhole with the bias accent. So special. You can find the original post for this buttonhole HERE.
Now, whenever someone is inspired by something I've posted, I love to share their work. About a week ago, I received a message from Karien who lives in The Netherlands. She had made a lovely round bound buttonhole. Take a look.
She mirrored the shaped of her button. Take note of the fine stitching around the buttonhole. So nice. I also need to comment on the lace overlay. Now this was an ambitious project.
In the above picture, the button has been put through the buttonhole and lays nicely to the side which makes for a great accent. I so love this detail.Thanks so much for sharing your work Karien!!! You've been an inspiration to me and I'm sure countless others.
There's a great tool that Dritz is once again making, The Bound Buttonhole Tool. You can find it HERE on the Joann Fabric website. By the way, it's on sale, so if you would like to have one, now's the time to get it. The tool will not make the shaped buttonholes, and if you would like a larger lip for a big button, you'll need to make the buttonhole without the tool. I do have this tool and I absolutely love it. It's great for making fine bound buttonholes. In fact, I have had mine since that fateful experience when I made my first disastrous bound buttonhole all those years ago :)
Monday, January 26, 2015
MondayMorning Inspiration
Good Morning!!! Can you believe that this is the last week of January...already!
A couple of weeks ago, we took a look at welt pockets and gained a lot of inspiration. Well, bound buttonholes are nothing more than tiny welt pockets. The problem with bound buttonholes though is that they are small, fidgety and just down right scary to put into a garment that you've worked so hard on. Well, be sure to scroll on down as I have listed some wonderful tutorials and even a tool that makes the process so much easier. But first, let's take a look at a few interesting and pretty buttonholes.
This buttonhole is nothing more than a long welt pocket with openings for the 3 buttons. This could make a lovely accent on a garment.
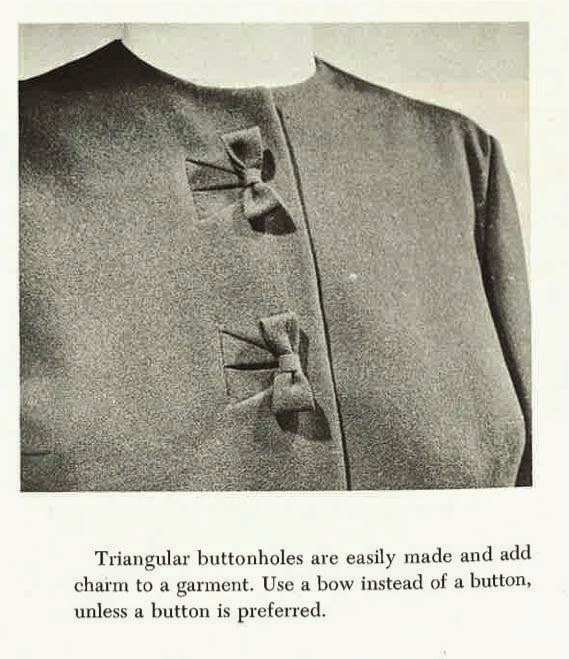
I love triangular shaped bound buttonholes. This is obviously from a vintage book. What a sweet look with the addition of the bows for buttons.Everything about this jacket is beautiful! The shape, the matching of the plaid, the bias cut of the plaid on the front, the raised neckline and then....not only did they add bound buttonholes, but they are on an slant.
Look closely at this jacket. This is basically the same idea as the first buttonhole above, but in a practical application. The bound buttonhole is long to incorporate the 2 buttons.
If you've taken a look at Vogue Patterns, you've seen this lovely coat from Ralph Rucci.
Here's a couple of close ups of the buttonholes.
Love the addition of the thread loops.
Here's another example of slanted bound buttonholes. Beautifully done I might add.
Details are what make a garment interesting. This is just a basic bound buttonhole, but look closely. Of course you see that the buttonhole is in a contrasting fabric, but notice the thread color that was used to sew the button to the garment. It doesn't match the button or the garment, but the buttonhole.This is an OMG button hole. The little touch of piping is sensational.
I thought that this was a very interesting fabric combination, felted wool and the gingham.
Real interest is added with the toggle style button, a little wider buttonhole and the the use of 3 different colors.
Now, if you don't look closely, you'll miss the mitered stripes in the buttonhole. Mezzo Couture did a lovely tutorial on this buttonhole that you can it find HERE.
The method that was used to create the above buttonhole was also used for this very interesting shaped buttonhole by Diana of Diana's Sewing Lessons. You can find the tutorial HERE.
How about this interesting shape from Louise Cutting. You can find the tutorial HERE.
Now for a treat!!When I was 16 years old, I bought this tool,
This is the Dritz Bound Buttonhole Tool. I have guarded mine with my life. Now, I can make buttonholes without it, but I do love this tool. For many years, the tool was not available. Dritz never allowed their patents to expire, smart on their part, and they are now once again producing the tool. Again, smart on their part. If you do not have this tool, it's one that I HIGHLY recommend getting.
I found this link on Amazon. The tool is $4.19, but then of course there is shipping. I also found this link on the Joann Fabrics website. It's a dollar more than the amazon price, but the shipping might be cheaper, so check it out.
Making beautiful bound buttonholes is just like making beautiful welt pockets, it takes practice. But please don't shy away from making the buttonholes as they can really set your garment apart.
Have a lovely week!
Rhonda
Thursday, October 4, 2012
Bound Buttonholes
I'm just about finished with the jacket I started on Tuesday night.
A little topstitching, the hem and I'll be finished. At least that's one thing out of my to do drawer!!
What I thought I would share with you today is how I did the bound buttonhole that I put in my jacket. There are a number of ways to do bound buttonholes. I really like this method for coats, sometimes jackets, but primarily coats as the fabric can be rather heavy.
I made a rather large buttonhole as I want it to be more than just a buttonhole, I would like for it to be an accent. There is only one buttonhole in the jacket.
I used a rather large vintage button as well.
The method I am going to share today works great if you would like to do a buttonhole that has a decorative shape. For this reason I would use this method in a jacket.
To make the buttonhole, you will need a piece of lightweight matching fabric to back your buttonhole, although this is not always necessary. I used the fashion fabric to back the buttonhole that I put in my jacket. If you are using this method on a jacket, I would recommend using a lightweight fabric to back the buttonhole, and it should match your fashion fabric. For the example I used a contrasting fabric so you could see what I did.
Clip the buttonhole open. It is important to be precise. Cut down the middle to just about 1/2" from the ends and then cut to the corners being careful not to cut through the corners. Here is the tricky part, you really need to cut right to the corner so that when you turn the fabric it turns and does not leave a pucker at the corner.
Turn the fabric and press.
Now you will have a lined rectangular shape. You can see a bit of the contrasting fabric I used as I wasn't as precise about my ironing as I should have been. Sorry about that!
Now cut 2 pieces of fabric for the lips of the buttonholes that are approximately 2 1/2" square.
Place 1 square on top of the other and sew a basting stitch down the center.
Fold the 2 sides back and press.
Line up the center line of your buttonhole lips with the center of your rectangle.
Pull one side back and pin the lining fabric to the lip fabric.
Fold back the other side and pin that side in place as well.
Now turn the buttonhole over and check to see if the stitching line is still in the middle. If not, adjust.
Stitch down the long side of the buttonhole. You will be stitching through all layers.
Turn and stitch the other side.
Check to make sure that there was no shifting while you were stitching down the long sides of your buttonhole. It's much easier to adjust at this point rather than later.
Now fold back the ends and stitch down the small triangles that are at either end.
The buttonhole is finished. As I said above, I didn't press my facing fabric as well as I should have so you can see a bit of it along the edge. If this matched the fashion fabric, you would not be able to see this.
The back of the buttonhole. Pull out the center basting thread and your buttonhole will open.
I have found this method to be fairly mistake proof when it comes to bound buttonholes. I hope you give it a try as I think that if you've never tried this method, you will really enjoy it.
Good luck, and if you have any questions, please feel free to shoot off an email and I will do my best to help.
Next week I will show you a lovely way to finish off the back of your bound buttonhole.
Labels:
bound buttonholes,
buttonholes,
sewing tutorials
Subscribe to:
Posts (Atom)


.jpg)

