It's a MOOSE!!!! I just couldn't resist taking a picture with the town moose of Winter Park, Colorado. I would never want to be so close to the real thing. Once, while I was visiting here, I took a wonderful snowshoe hike and saw an entire herd of moose. They were down in a valley and probably 50 yards away, so no need to worry. It was such a highlight to see them in their natural habitat.
Today's pattern is a vest. This piece actually started out as a scarf, then I was inspired by
Prttynpnk's Jungle January posts and the thought came to me to make this into a vest and use rectangles to make the back. The front panel is one long rectangle, obviously since it was going to be a scarf!
The back is a series of 3 rectangles. the upper rectangle is pleated in the center in order to fit the waist. There is a rectangle for the waistline, and then another rectangle below the waist that is once again pleated in the center to fit the waist. The vest is really quite easy to make, but it is a little more complicated than some of the other items that we have done.
To begin, you will need a long rectangular piece that is wide enough to fit over your bust. For the length, measure around your neck and down the front, just as if you were measuring for a scarf. This panel should be lined, so you will need to cut 2.
Now for the back.
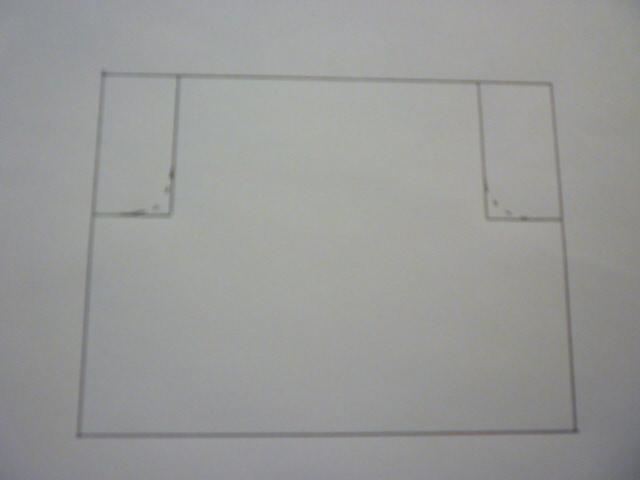
Measure from your shoulder to your waist for the length of the top back portion.
With the front panel draped around your neck, measure under your arm from the edge of the panel across your back to the opposite side. This will give you the width measurement of the top back portion.
Draw a rectangle using these measurements.
To determine the armhole area, measure down from the top of your shoulder to your armpit area. Add about 1" to this measurement. You do not want the armhole to be tight under the arm. Measure down from the top of your rectangle this measurement and then draw a line over to the edge of the rectangle. Your piece will look like the drawing above.
Round off the angle as you see above.
Your top back piece will look like the drawing above.
In the above picture, you can see that the straight edge along the top is attached to the front panel. Match the center of your front panel to the center of your back piece and sew together.
In order to have some fit, pleats will need to be pinched in to the center back of the top and lower panels.
Measure from the front panel edge around your waist to the opposite edge of the front panel. This measurement will tell you how much you will need to pleat in at the center.
For the waist panel, use the measurement you just took from one edge of your front panel to the opposite edge of your front panel at your waist. Cut a band that is 2" wide(add seam allowance)by the length that you just determined. This waistband piece will be sewn to the top back piece.
At this point, the upper portion of your back piece should be sewn to the front panel at the neckline and the waistband should be sewn to the upper back piece. Try the vest on and determine where the armhole edge will be sewn to the front panel. Baste the top back piece to the front panel.
For the lower portion of the back, measure your hips from one edge of the front panel across your back hips to the opposite edge of your front panel. Add at least 1" for ease. To determine the length of this panel, measure from the bottom of your waistband to the bottom edge of your front panel. Add hem allowance.
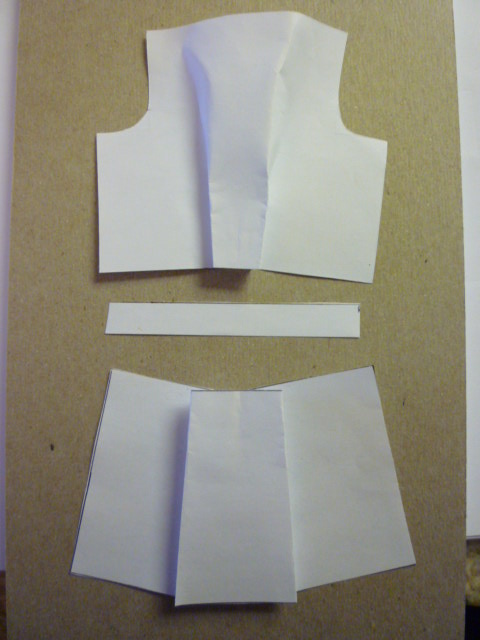
In the above picture, you can see the 3 back pieces sewn to the front panel.
The lower back piece will be a rectangular piece.
Find the center of this panel and pinch in a pleat so that the waist area of this piece will match the waistband. If your waist is considerably smaller than your hips, the pleat will fan out at the hem as you see above.
The final 3 back pieces.
Hem the lower piece and then attach all 3 pieces to the front panel.
The front panel of my vest was made from a faux fur remnant I had left over from a stole that I made. The back is made from fleece.
The front panel is lined with a piece of silk in an animal print. Don't get too close or that cat will bite you!!!!
The vest takes a little bit of trying on during the process of putting it together, but in the end, it's a fun piece to wear. I wore it for the first time today and everywhere I went, everyone commented on how much they liked the vest. I do hope you'll give it a try.
Rhonda


That's a very Grrrrr vest! I like your knitted purse--very sweet, and congrats on your Sew New assignment!
ReplyDeleteThanks so much Gwen!
DeleteYou're vest is so lovely that it took me a while to notice it's wearing a scarf and leg warmers. Much more stylish than our Canadian moose!
ReplyDeleteNot your typical moose :) this area is getting ready for their Wonter Carnival, so that's why the moose is all dressed up. Before I left this morning, they added a pair of earmuffs.
DeleteIt was a pleasure to meet you Rhonda! I wish I was a seamstress, as seeing your hand-crafted piece was inspiring. For the earmuffs, we used a large fleecy pillow cut into two sections, an embroidery hoop, and lots of staples and safety pins!
DeleteThat is so cute, Rhonda! The back shaping makes it really a "cut above". (oooh, bad pun) You are in the perfect environment for such a snuggly vest!
ReplyDeleteWe leave tomorrow :( oh well, I can't complain, we've had a lovely time:)
DeleteWhat a cute vest. I love the fabric.
ReplyDeletemarciae from SG
Thanks Marciae!
DeleteThis is one wild vest! I like your fabric selection. That lining is too much!
ReplyDeleteThanks Dixie! It was just left over fabric and remnants.
DeleteYou make everything look so simple! That is gorgeous, is looks so hard and so professional. I love the shaping at the waist, the cinching belt really works!
ReplyDeleteDo try to stay warm, you still don't have quite the warm fur of that moose.
Hi Becki, I always worry about how well I am explaining the technique. So happy to hear that I make it look simple because it really is :)
DeleteWonderful vest, Rhonda, love the back shaping. Seeing a herd of moose seems like it would be scary!
ReplyDeleteThanks Andrea. Seeing the moose was so exciting. They were far enough away that we didn't need to worry. I've been told though that if I do encounter a moose on a walk that I need to get into a ticket of trees because they are so large that they can't get inside and hurt me. I try to talk and make noise when I hike which will alert animals that I'm around. They really don't want to encounter me any more than I want to encounter them!!
DeleteWhat a great vest, looks ideal for the weather - love the cat fabric. Thanks for the tutorial
ReplyDeleteFabulous work!
ReplyDeleteOh this is so great and adaptable- I'm thinking of all sorts of ways to make this- thanks!
ReplyDeleteLove it and this looks wonderful on you! As for the moose, DH and I came face to face in our pickup with a huge moose staring us straight on on "Moose Alley", aka Rt 3 going up to Canada, His rack was wider than our F150. Unbelievable!
ReplyDeleteI was asked if this moose represented the true size and after seeing the herd, I said yes! How incredible to come upon this guy. Hopefully he just moved on and and didn't attack your truck
DeleteI graour this vest !
ReplyDeleteWonderful vest in fabulous fabrics Rhonda! And I love the zebra leg warmers on that moose.
ReplyDeleteIsn't he cute?! :)
DeleteSo interesting. I had my picture taken with that same moose many years ago, after which I made a vest. Mine was made in a faux fur. But just the same, moose, Winter Park, vest. WOW.
ReplyDeleteLove your vest.
We're we separated at birth? ;)
DeleteYour vest and the photo at The Winter Park Visitor's Center are "moost" impressive! And your talents abound! I like it when you hike and talk OUT LOUD to keep the animals at bay! Smart cookie, you are!
ReplyDeleteWow! I love this vest!! I will definitely give this one a try!
ReplyDelete