f

Saturday, July 1, 2017

Rolling A Burrito/Finishing The Easy V Express Top Neckline

One of the things that I've come to enjoy the most about the blog is chatting with all of you, sharing a bit of my life and hopefully, a few bits of inspiration. 

Back in May, I had an alternator failure on the airplane. A few years ago, I was on my way to Cincinnati with a dog in tow. The dog was the kind of rescue flight that I enjoy most as he was going to his new home. Before I left Chicago, I noticed a whirring sound in my headset. I adjusted the squelch, the sound went away, all of my other pre-flight checks were good, so off I went. After about an hour in flight, I once again heard the whirring sound, I once again adjusted the squelch, and it went away. Then suddenly, about 30 miles out of Cincinnati, a screaming noise came through the headset, and then...total silence. All of my electrical equipment was gone, and at that point, I had no idea what may go wrong next, so it was a 'get it on the ground now' situation. Luckily, there was a small country airport just a mile or so away. Since I had no means of communicating, I did a scan of the area, said a prayer, and began my approach. I'm still here, so you know it all went well :)

As it turned out, not only did I have an alternator fail, the battery had boiled over and fried the battery box. Just a mess of a situation. But, the mechanic was able to get me back up and running enough to get the plane back to Chicago. Before leaving, he drilled into me that I was basically flying a broken airplane and that I needed to take extreme caution. Once in flight, turn off the radios and don't turn anything on until I was where someone could easily come and get me. As I entered the Chicago airspace, I turned on my transponder, all was good. Then I turned on 1 radio, still good. I called Midway tower, got my squawk code and at that point, even if everything failed, I should be able to make it home. When the gear touched down at Midway, it was the biggest sense of relief I've ever felt! Thankfully, the recent alternator failure wasn't nearly as exciting. I realized what was happening before I ever left the ground. 

This past week, my mechanic and I met at the airport to install the alternator and do the annual inspection. At one point as he was working, he said, "hmmm, not good." I've learned over the years to just take whatever it is in stride, after all, I'm on the ground, and at this point, anything can be fixed. The insulation around the throttle cable was gone and the cable was quite worn. So, what does this mean? Well, the cable could break in flight which means that you no longer have control of the throttle. He told me that he has heard of cases where when the pilot pulled back on the throttle that the entire thing came out in their hand. Well, that would make for a fun situation...NOT!!! 

My new throttle cable arrived yesterday. It's so pretty. My husband laughed about how excited I was about a throttle cable. I reminded him that a throttle cable is a lifeline. He no longer thought it to be so funny.  

At long last, I finally have the video together for the burrito neckline finishing method. If you haven't already figured it out, I think you are going to love learning this new technique. In the picture below, you see the back neckline of the dress that I made using the Islander Easy V Express Top pattern. Very nicely finished.
                

Now a view from the inside.


And because the back is finished so well, the front neckline also lays beautifully against the garment.


In the video, you'll hear how I made this video. It's a little funny :/ Oh, and I want to apologize as I have been dealing with allergies the last few days, so my voice is a little weak. But all in all, I think the video will give you a good idea of how to execute the burrito method and beautifully finish the neckline of your garment.


With anything in life, knowledge is king. Be it dealing with a mechanical failure in an airplane, or knowing how to make what we do even better. 

I came across this quote and I thought it would be a nice way to end the post;

Real knowledge like everything else of value is not to be obtained easily. 
It must be worked for, studied for, thought for, and even more, 
practiced.



Share this PostPin ThisShare on TumblrShare on Google PlusEmail This

Thursday, June 29, 2017

Where's Waldo???

Have you ever played the eye teasing game of Where's Waldo? If not, the game is about this guy, Waldo. He seems to be able to loose himself in crowds at circuses, art museums, beaches, and cities all over the world. He's really quite the well traveled guy!   


The pictures look like the one below. You can literally search for hours and NOT FIND WALDO!!! So frustrating to say the least.


The reference here of course is to me and where I've been. To be honest, I have felt a little like Waldo, going about my daily life, but a little lost in the crowd. But, I'm back, and once again, very visible :)

For those of you who have been looking for the completion of the Easy V Super Express Top from Islander Patterns, I should have the next video up later today. This is the most important video as I will show you how easy the "burrito technique" is for finishing the neckline. Once I've shown you how to finish the neckline, I'll then share some fun possibilities with you.

Lots of fun things are coming up. On Monday, I will be hosting a fabulous giveaway that you won't want to miss out on. So be sure to pop back by.  

In September, I will be teaching at The Original Sewing and Quilt Expo in Schaumbug, IL. The date of the expo is September 28, 29, and 30 2017. The classes for Schaumburg have not been posted, but I'm sure they will be up soon. I'll share more about what I'll be doing in upcoming posts.


I'll also be teaching at The Original Sewing and Quilt Expo in Fredericksburg, VA October 5, 6, and 7, 2017. All of the info is up on the website and you can find it HERE.  I'll talk more about what I'll be teaching in upcoming posts. I am so very honored to have been asked to teach. And even better, I'm going to have the opportunity to talk about something that has been a passion for well, just about forever ;) 

Now for just a few fun things...

I had dinner with my niece on Tuesday night. First of all, I feel like the most blessed person in the world when it comes to her. If I have not been in touch for a while, I'll receive an email reminding me that I have not been in touch and that she would like to get together. The only bad thing about the time we share is that it flies by far too quickly :( BTW, we had dinner at this fabulous little taco restaurant in Chicago called Rojo Gusano. I'm a little apprehensive about sharing this little gem as they were already quite busy, but...I can't resist sharing something wonderful. If you live in, or near Chicago, GO! If you visit Chicago, GO! The tacos are served ala carte. If you like mushrooms, get the mushroom taco, absolutely incredible. The drinks are also fabulous and quite inventive. We both enjoyed our meal and will be returning with our husbands...maybe ;)

She just came back from a fabulous trip to Japan and South Korea. I was shocked when she pulled out a gift that she had picked up for me, a gorgeous square of fabric. 

  
She found it at a store in Kyoto called Kamiji Kakimoto. The store is known for its selection of washi paper. She said that they had a small display of fabrics that were locally made and she just couldn't resist a treat for me. The fabric is silk and so gorgeous. The picture really doesn't do it justice. I have decided to keep the piece intact and make a little clutch bag with a zipper, just something simple, but meaningful.

Over this past weekend, I was in St. Louis, Missouri for the annual opera festival. What a wonderful time I had, but then, I always do :) The most dramatic operas were The Grapes of Wrath and Madame Butterfly. Both were amazing productions.  I stopped by a Joann's fabric store to pick up some knitting needles and my eyes fell upon this magazine, Sew Style Simplicity.


Sew Style is a U.K. published magazine. You may remember the Sew Now magazine that I featured a few weeks back. This magazine is similar, but rather than 2 patterns, it comes with 3.
  

Inside the magazine, you'll find links to ton of free patterns. I've featured a few below, the little peplum top, the front buttoned skirt, the super cute pleated skirt, and even something for the mommy to be!


There are also a number of accessory patterns as well, like the satchel bag and the laptop bag. The neck pillow and zip pouch would make an easy to make, great gift for anyone going on a vacation. 


So, if you are in the United States, look for the magazine at your local fabric store. You can also find it HERE online. My small investment was well worth the entertainment that I received from the magazine.

Earlier this month, I was in Colorado. Oh my, Colorado is SO incredibly beautiful in the summer. We stopped in the quaint little historic city of Georgetown to snoop around a bit. I popped into their museum and in their store I was so excited to find these sweet crocheted yokes,


I think I only paid $15.00 for the pair. The manager of the gift shop said that they had been their for quite some time and no one knew what they were or what could be done with them. Well, lucky me! They will now find a nice home on a top or dress, and probably a pair of pajamas. 

Hope you are having a fabulous summer, or winter as the case may be. 
See you soon!
Rhonda


Share this PostPin ThisShare on TumblrShare on Google PlusEmail This

Tuesday, June 20, 2017

Checking In

My week is off to a great start, I'm being a bit facetious ;). We arrived home last night to find our hot water heating spewing water. Exciting! So I am now waiting for the guys to arrive and install a new one. I find it rather interesting whenever something happens and I'm without one of the modern conveniences that I've become so accustomed to, be it electricity, hot water, or even something like the dishwasher, and how life just suddenly seems to get rather complicated. Some talk about returning to the "good old days," well, I like these brand new days just fine and I'll be VERY happy when I can take a nice hot shower. I think everyone around will be too!!!

I opened my Facebook page this morning and found that the video below was posted 4 years ago. For any of you who are new to the blog, this was a project that so many participated in. I found out about a project at the Mary Bridge Children's Hospital in Tacoma, WA. Each child who is admitted is given a special handmade pillowcase. Such a lovely way to help calm a child. 

My goal was to collect 1000 pillowcases, and we made that goal! It was so exciting to see the pillowcases come in from all over the world. 

During the project, I heard from a few parents who had lost their children, and they told how much the pillowcase that was given to their child continues to mean to them. You would think that something that was attached to the death of their child would not bring comfort. But as I thought about it, I realized that there is something almost magical about the pillowcases, and it's because they were made with love, and I think that this is what the parent continues to feel. Not only did they love their child, but a stranger cared enough to make something that exhibited their love for a child they would never meet.   


Once I learned more about this project, I found out that hospitals all over the U.S. have similar programs. You can read more about the program HERE. And if you would like to make a pillowcase, click HERE. The video above was done early in the project. You can scroll though and see more pictures HERE.   

As soon as my new hot water heater is installed, and I can get a shower, the next post will be up for the Islander Patterns Easy V Express Top. Thanks for your patience :)


Share this PostPin ThisShare on TumblrShare on Google PlusEmail This

Sunday, June 18, 2017

Sunday Night Reflections


Share this PostPin ThisShare on TumblrShare on Google PlusEmail This

Sunday's Soup/ Twisted Green Bean Soup

My grandmother loved turnips. I did not, but I did love creamed potatoes. One day, she called us in for lunch. I sat down at the table and saw a beautiful bowl of what I thought to be creamed potatoes and proceeded to help myself to a nice big helping. Once everyone was served, I grabbed my fork, shoveled on a great big bite of what I thought was potatoes, and to my shock and dismay, it was creamed turnips. Uck!!! Well, taste buds mature, and I can't say that I love creamed turnips. but I do like the flavor they add when combined with other vegetables.


Another dish that my grandmother liked to make was a combination of turnips and green beans. I was recently thinking about her, and oddly enough I remembered the green bean and turnip combination. As I thought, I began to think that this might make a great bowl of soup. Guess what!, it does!!! With the addition of the sharp taste of the turnip, I decided to call the soup, Twisted Green Bean Soup.

Since fresh green beans have yet to make their way to the market, I used a bag of frozen beans. I knew that the true test would be my husband as he loves green beans, so either he was going to love it or hate it. Thankfully, he loved it :)

I began with a chopped white onion, and 4 stalks of chopped celery which I sauteed in a tablespoon of olive oil until tender.


I then added 2 finely diced cloves of garlic, the green beans, and 1 diced turnip.  


To thicken the soup and add a little extra protein, I added a 14.5 oz can of drained and rinsed navy beans.


I love the combined flavor of turnips and carrots, so I added 1 large sliced carrot. And if you look closely, you'll see that I also added a cup of chopped parsley. For added flavor I added 2 bay leaves. And finally, 8 cups of vegetable broth.


The mixture was then brought to a boil. The heat was then reduced to a simmer and allowed to cook for about 30 minutes.

Once the vegetables were tender, I pureed all but 1/4 of the soup. One more 14.5 oz can of drained and rinsed navy beans were added to to the soup mixture. 


The soup was allowed to simmer for another 30 minutes and then enjoyed!


Twisted Green Bean Soup
Yield: 6 large bowls

Ingredients

1 2 lb. bag frozen green beans

1 purple turnip peeled and diced

1 large carrot chopped

1 cup finely chopped parsley

2 cloves garlic chopped

1 white onion diced

4 stalks celery diced

2 bay leaves

2 14.5 oz cans navy beans drained and rinsed

8 cups vegetable broth

1 tablespoon olive oil

Salt and black pepper to taste

Directions

Heat oil in large pot. Add onion and celery and sauté until tender. Add garlic, green beans, turnip, 1 can of navy beans, parsley, carrot, bay leaves and vegetable broth. Bring to a boil and then reduce heat to simmer. Simmer for 30 minutes. Remove bay leaves and puree all but ¼ of the soup in a blender. Return to pot and add the second can of navy beans. Reheat the soup and allow to simmer for another 30 minutes to completely combine flavors. Serve and enjoy! 

The soup will freeze well for lunches.

If you give it a try, I hope you enjoy it as much as we did. 


Share this PostPin ThisShare on TumblrShare on Google PlusEmail This

Thursday, June 15, 2017

Islander Patterns Easy V Express Top Sew Along

This is the week of best laid plans going awry. Little did I know that the roofers were planning to arrive yesterday. So things were just a bit too noisy to try and get much done. But...better later than never, at least I hope :)

I just love getting new things to wear, but then, don't we all?!!! So I am so very excited about doing this sew along with the Islander Patterns Easy V Express Top. I get new things to wear, and you get to see a few things explained. The video isn't my best. I didn't sleep all that well last night, and I am just a little off my game, but I think it will shed a little light on the neckline pleat and give you some good pointers as you begin. 


For this top, I only used a yard of fabric. I measured it out just to make sure and it was exactly 37". I cut an XS size and the pattern calls for 1 1/2 yards. So if you have a yard of fabric that will fit the bill, by all means, give it a try. 


In this video, I talk about fabric choice, the pattern, and constructing the pleat at the neckline.


In our next video, we'll talk a little more about construction, especially the great neckline finish. We'll also talk about fitting, and what I did to get a nice fit on my dress.


Have fun, and if you have any questions, be sure to ask. I'll do my best to answer.

Remember, Janet is offering the pattern to anyone who comes by the blog at a 20% discount. Just use RHONDA in the promo code box. You can find the paper pattern HERE, and the downloadable pattern HERE.


Share this PostPin ThisShare on TumblrShare on Google PlusEmail This

Tuesday, June 13, 2017

It's All About The Pants Part 2

Best laid plans :/
I apologize for not getting back to the post yesterday, so sadly I am a day behind. But, we'll catch up :)

Before I begin the Islander Patterns Easy V  Express Top sew along, I wanted to do the follow up post to the pant fitting retreat. As I told you in the previous post, I made 2 pair of pants and a pair of shorts. Although the same pattern was used for each pair, there were slight changes made.

I used a wool crepe for my first pair. If you have worked with wool crepe, you know that it has a looser weave than other wools, so it can grow a bit. The side seams were taken in to get a closer fit, but all in all I was happy with the outcome.   Just a note, I have not hemmed my pants, and I also need to add the hook closure to the waistband.


Since I used a black fabric, it's a little difficult to see how the back fits, but they feel great and I am happy with how they hang. 


I LOVE having a beautiful lining in all of my clothes. Kinda like my own little secret, that just might get a slight reveal at times ;) This fabric makes the pants feel like a dream when I slide them on.


For the second pair I made, I used a herringbone from Pendleton Wool. A gorgeous piece of fabric. 


There's just a slight caving in at the back of my leg in this picture, I'm not sure if it's the pant, or how I'm standing. I have a feeling that it's how I'm standing.


This pair also appears to be just a little snug in the back crotch seam. I have not clipped the seam, so once that is done, I think it will make a big difference. 

Once I made this pair, we then made some alterations to the pattern which I did not want to do after the wool crepe pair due to the fabric characteristics. 


I used a basic bemberg lining in this pair of pants. Boring!!!


I had intended to use a fun piece of silk, but I was just a little short, so I used it as my pocket lining, just to add a fun touch. In the wool crepe pants, I used the wool crepe as my pocket lining. I really prefer using a lining fabric for the pocket lining as I feel that it makes pants and skirts alike fall a little nicer over the body.


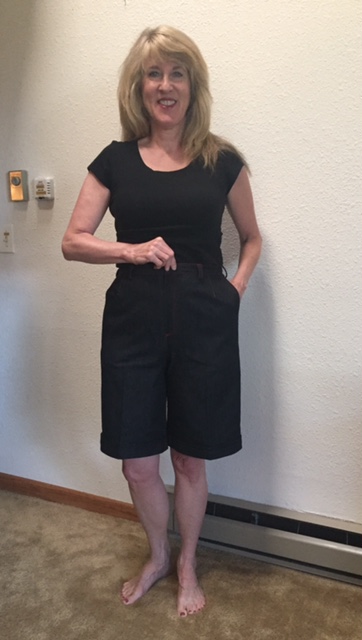
For my final pair, I made walking shorts. These were made from a denim with 3% lycra. 

I decided to have some fun with them and do lots of topstitching. 
Due to the fact that the fabric has the added lycra, I had to take the side seams in a little more from my original alterations to the pattern. By doing this, it made the pocket opening just a little smaller. So I have made a note of this and if I make another pair with lycra, I will know to alter the side seam prior to adding the pockets. 
  

I even topstitched the darts.


And I used a red zipper. Why not? :)


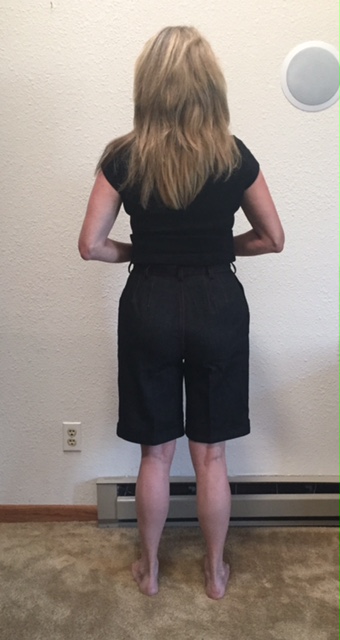
The back. There's just one more detail that I would like to add and that's back pockets. As you can see below, the center back seam is a flat felled seam. The crotch seam is also a flat felled seam. By doing this, I sacrifice a little fit in the crotch, but I love flat felled seams, so oh well :) 


Since I wanted more of a walking short, I widened the leg a little on the outside and inside leg, and then added a cuff.


The back. Although I sacrificed a little of the fit with the flat felled seams, I'm really happy with how they turned out.


If you think that you might like to take a pant fitting class, Karen is thinking of doing another class either in September, or October. If you are interested, email her at karenssewunique@gmail.com.

The master mind behind this pant fitting system is Joyce Simmons Murphy. Be sure to check out her website HERE. Her new website which will be devoted to pants should be up soon at Pants4U.com
Pants that fit is no longer just a dream :)


Share this PostPin ThisShare on TumblrShare on Google PlusEmail This