f

Tuesday, September 22, 2015

Buttonhole Inpsiration

I'll never forget the first time I attempted to make a bound buttonhole, I think I was maybe 13 years old. It was a disaster!!! Well, disaster or practice, whatever you want to call it, it was awful. But, I was determined. Bound buttonholes are now one of my favorite things to make. They can be a distinctive or fun design detail, or just give the look of a well made garment.
In THIS post, I took you step by step through the process of making a bound buttonhole. We talked about making bound buttonholes for larger buttons, like the one below,
 and I showed you how to make a triangular shaped buttonhole.
In THIS post, I gave you a little inspiration. Another triangular shaped buttonhole with bow buttons. Fun!
In that same post, I showed you this triangular shaped buttonhole with the bias accent. So special. You can find the original post for this buttonhole HERE.
Now, whenever someone is inspired by something I've posted, I love to share their work. About a week ago, I received a message from Karien who lives in The Netherlands. She had made a lovely round bound buttonhole. Take a look.
She mirrored the shaped of her button. Take note of the fine stitching around the buttonhole. So nice. I also need to comment on the lace overlay. Now this was an ambitious project.
In the above picture, the button has been put through the buttonhole and lays nicely to the side which makes for a great accent. I so love this detail.
Thanks so much for sharing your work Karien!!! You've been an inspiration to me and I'm sure countless others.

There's a great tool that Dritz is once again making, The Bound Buttonhole Tool. You can find it HERE on the Joann Fabric website. By the way, it's on sale, so if you would like to have one, now's the time to get it. The tool will not make the shaped buttonholes, and if you would like a larger lip for a big button, you'll need to make the buttonhole without the tool. I do have this tool and I absolutely love it. It's great for making fine bound buttonholes. In fact, I have had mine since that fateful experience when I made my first disastrous bound buttonhole all those years ago :)


Share this PostPin ThisShare on TumblrShare on Google PlusEmail This

Monday, September 21, 2015

Hacking Made Easy With a Free Pattern

Happy start to the week!
I'm back from my trip to Maine. What a glorious week I had. The trip not only feed my body, but my spirit. I'll post more about the trip in another post. 
I had hoped to post this last week, but internet reception was a bit spotty at best. In order to call my husband, I actually would go out on the fire escape and stand facing the cell phone tower. Sometimes it worked and sometimes it didn't. 
I was introduced to Waffle Patterns last year during Sewing Indie Month. I really like Yuki's patterns. They are easy to make, the instructions are very well laid out, and the designs are fun, hip, and on trend. One aspect of her patterns that I especially like is that they are layered. All of the sizes are printed on the pattern, but before printing, you can actually choose the size that you would like to make and then  just print out that size. Wow, no going blind trying to cut on the correct size line!!! Or, if you are one size on top and another on the bottom, choose the two sizes and print out just the two. It's a great feature. 
The Zippered Blouson is part baseball jacket and part motorcycle jacket, but with a very soft edge.
When using a Waffle Pattern, be sure to look closely at the pattern dimensions as they are quite generous in ease. For instance, the size 40 has a 36" bust, but the finished measurement is 42". That's a full 6" of ease. So depending upon how you like your clothes to feel on your body, you may want to go down a size.

For those of you who would like to try a little pattern hacking, but feel a little intimidated, Yuki has made it easy with her free add on hood pattern for the Zippered Blouson. You can find the free pattern HERE. The hood is a three piece hood. Sit's beautifully on the head and looks great when it's down and laying across the back. I have made her hood pattern and I really like it. 

Yuki posted this option of the Zippered Blouson. I absolutely love the faux fur collar.
If you think that you would like to give a little pattern hacking a try, but with a guiding hand, you can find Yuki's Zippered Blouson pattern HERE.
If you do give the pattern a try,be sure to read about the layering of her patterns and just print out the sizes that you would like. As I said, it really is a great feature. 
Have fun!


Share this PostPin ThisShare on TumblrShare on Google PlusEmail This

Sunday, September 20, 2015

Sunday Night Reflections


Remember,
A boat doesn't sink because of the water that's around it,
It sinks because of the water that gets inside.


Share this PostPin ThisShare on TumblrShare on Google PlusEmail This

Friday, September 18, 2015

A Postcard From Maine

Good Morning from Monhegan Island, Maine! I arrived last Sunday, and now I leave tomorrow. How can time go by so quickly? The trip has been enchanting, peaceful, inspiring and restorative. I've hiked, attended yoga classes, knitted, did a lot of writing, saw an art exhibit, and even got in a little reading. So this morning, I thought I would share just a few pictures. I've taken a ton. I won't bore you with too many :)
Yesterday I hiked the entire circumference of the island. The picture below is from that hike.
There are also interior trails that are absolutely enchanting.
Beauty is everywhere. I loved how someone took the time to make a little arrangement on the fungus that was growing out of the tree.
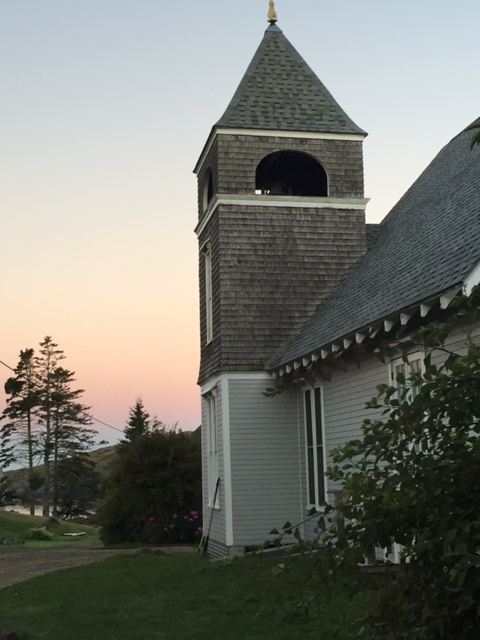
The church. 
 Morning light.
 A cat that accompanied me for a walk.
Monhegan is called the artist's island and art can be found everywhere. 
As I said,I have gotten in a little knitting. Nora Gaughan has been our instructor, and she is so inspiring. This piece is from her sampler class.
And then for a crazy picture of me. From yesterday's restorative yoga class.
Have a lovely day and I hope that you will find something to help restore your soul today.
Rhonda


Share this PostPin ThisShare on TumblrShare on Google PlusEmail This

Wednesday, September 16, 2015

Make a Dopp Bag That Will Not Only Impress Your Friends, But Even You!!!

Happy Wednesday Everyone!
I am actually on Monhegan Island, Maine this week and loving every minute of being here. We are having the most incredible weather. I'm hiking, going to yoga classes and knitting. I'll post a little more about my experience here tomorrow.
As you know, the current sew along for Sew News is the Grainline Studio Portside Travel Set. I am not exaggerating when I say that I am hooked on making the dopp bag. It is such a fun project and so gratifying. I have now made 2 and I just can't help but admire my work!!! So if nothing more, give the dopp bag a try.
I used a faux leather for the first dopp bag that I made. A great material to use as you won't worry about sitting the bag on a wet surface since you can just wipe it dry.
I decided to use leather for my second dopp bag. I had both the leather and the Amy Butler home dec print. I think I must have been a cowboy in another life as I love my boots and I love distressed leather!
The sew along begins with the pouch as it is so very easy to make and a great place to start and build confidence if you've never made a bag like this before. From the pouch, we move directly into the dopp bag.
You can find the sew along post HERE on the Sew News blog. Next week we'll jump into making the duffle bag. It too is fun to make, but there's just something special about the dopp bag. Make one and you'll see ;)  


Share this PostPin ThisShare on TumblrShare on Google PlusEmail This

Sunday, September 13, 2015

Sunday Night Reflections


Problems arise in that one has to find a balance between what people need from you 
and what you need for yourself.
                                                                                                Jessye Norman


Share this PostPin ThisShare on TumblrShare on Google PlusEmail This

Friday, September 11, 2015

Sewing Indie Month/Pattern Hacking the Spearmint Coat

As I shared with you last week, I'm the Pattern Hacker for Sewing Indie Month. It's always a lot of fun to take a pattern, maybe cut it up a bit, or manipulate it into something a little different. My first project is the Spearmint coat from Lolita Patterns. It's a lovely and ultra feminine coat that has a cascading ruffled collar. The issue is that I live in Chicago and an open collar in the dead of winter, well, it just won't do. So what to do?
Rather than all of the ruffles,
I decided that I would rather bring the collar up closer to my neck. Great idea, but how?
As you can see, I had already made the collar as the pattern dictated. To determine where I would like the collar rollover in the front, I began by matching the center back line of the collar to the center back line of the coat.  
I pinned the collar to the edge of the neckline and brought it around to the front and then pinned it where I would like for it to close. As you can see, the bottom portion of the original collar will no longer match the neckline of the coat.
In the picture below, you can see that the collar is pinned to the neckline of the coat and I also have a pin where the collar will make the turn to attach to the other side of the neckline. This will become an important notch.
This point will also need to be marked on the neckline of the coat as you see below.
I have now removed the collar from the coat and you can see the pins marking where the collar will make the turn and where it will attach to the other side of the neckline.
I want to keep the basic shape of the collar from center back to about the middle of the collar. In the picture below, I have matched the original collar up to the pattern and I am pointing to the 2 pins that mark where the collar will make the turn and where it will attach to the other side of the neckline. By the way, the collar will not be permanently attached to the other side of the neckline. I will sew a loop and a button at this point to close the collar.
From each of these points, I want to draw a straight line down that will be at least as long as the neck opening of the coat.
In the picture below, you can see how the collar no longer has the curl for the ruffles, but comes straight down the front of the coat. 
To drape the collar, begin at center back and match the center back seam of the collar to the center back seam of the coat.
Bring the collar around to the front and pin it to the neckline. At the point that was determined to be the turning point, the collar is then brought over to the other side of the neckline. Pin the extended portion of the collar to the coat.
Now, take a piece of marking wax and mark the edge of the coat neckline on to the muslin. Be sure to mark the center front point of the coat.
There is a 1 1/4" overlap at center front. 
 After I marked the edge of the collar, I removed the muslin. I then extended the line of the collar to match the 1 1/4" extension at center front of the coat, and I added my seam allowances.
Once I added my seam allowances to the new collar, I then put the collar back on the coat, matching the notches that I established.
I matched up the collar to the entire neckline to make sure that it is fitting as it should. Keep in mind that this is just half of the collar. Once the collar is completed, there will be a button on the opposite side of the neckline that will hold the collar closed. 
When the collar is left opened, it will basically look like a big shawl collar. So it can now be closed for added warmth and when it's left open, it will still look very pretty.
I've included the picture below so that you can see how the new collar compares to the original collar.
This is a fairly easy draping exercise. If you have never done any draping, but think that you might like to give the collar a try, please don't be intimated. Just be sure to do the draping in muslin so that you don't end up ruining your fashion fabric.
 The final edition of the coat with a completely finished collar will be posted on September 24th. I'm supposed to do my posts on Thursdays. I'm a day late this week. Hopefully I'll make it up with the other hacks that I intend to show.
Hope you're enjoying Sewing Indie Month. Be sure to check out all of the other posts that are being done throughout the blogosphere. Just click HERE to find the direct links.


Share this PostPin ThisShare on TumblrShare on Google PlusEmail This