f

Tuesday, March 5, 2013

I'm A Finalist!!!


Back in February I shared that I had been chosen as one of five finalists to compete for a spot on the television show, Sew It All. The competition was held this past weekend and long story short...I was chosen as one of the two finalists!!!!!
Before I go any further though, I must thank all of you who responded to my dilemma of "name this tool."
Last Thursday evening, I began writing out what I wanted to say and for the life of me, I could not remember bodkin. Nerves probably. Of course when I went to sleep that night, it was on my mind. During the middle of the night I awoke and the thought that came to me was to post a picture and ask for help. You are all so incredible. Thank you, thank you. I like to use this tool to pull my drawstrings  to the right side and then thread them through a casing. Works like magic. This little bodkin was the center of my presentation so I had to know the name. So once again, thank you so much for coming through for me. I was able to write out what I wanted to say on Friday morning and then I memorized my little script and rehearsed it over and over with a timer. We only had five minutes to present our presentation and if we were not finished, we would be cut off. I stumbled a little, but all in all it went fairly well. The two finalist were chosen by the audience so it was quite an honor to have been chosen.
So..............the next phase, being chosen as the one and only finalist who will appear on the Sew It All program. This is where I desperately will need your help once again. On Thursday, March 7, 2013 the videos of the two finalists will be posted here,  sewitalltv.com/contests/casting-call, and you will be able to vote for the finalist that you would like to see win the contest. I hope it will be me. Don't worry, I know we all have a million things on our plate, so I will be posting my plea for your vote again, once the voting has officially started.
This was such a wonderful opportunity. Thank you all for the kind words you sent when I posted that I had been chosen to go to Puyallup, Washington to compete. I took your words of encouragement with me and they did give me strength. I'm excited to see where the next bend in the road will take me. 


Share this PostPin ThisShare on TumblrShare on Google PlusEmail This

Monday, March 4, 2013

Monday Morning Inspiration

This is a magazine entitled La Moda en Espana. It's dated March 1947. The magazine has patterns throughout, but it's really a magazine. There are articles and quite a few advertisements. Since this is not a true pattern catalogue, there are fewer pictures, but look closely as there are some very interesting ideas. The magazine has seen better days. There is some water damage, so the pictures are not the best, but I hope you enjoy it nonetheless.


I enlarged the center picture as I think that the sleeve is beautiful. 
I also enlarged this sleeve. It's so pretty, but we just aren't at this place right now in fashion. Mark my word though, it will come back around. 


The dress above is difficult to see, but it is interesting. The one side actually wraps around the leg.

A little different take on the pattern catalogue. I just love seeing what other countries were doing. I'll never forget...I hosted an exchange student who had a very difficult time in school in his own country. While he was with us he did very well as I had told him that either he got his grades up or he would have to go home. As his time with us was drawing to a close, his mother called and told me that she was very worried about her son. I didn't understand why as he had made such a wonderful turn around. She said, "for you he does everything, for me he does nothing." At that point I realized that not only are teenagers the same world over, so are mothers. And for all of us who love fashion, we too are connected, we all love beautiful clothes regardless of where we live.
Have a wonderful week.
Rhonda  


Share this PostPin ThisShare on TumblrShare on Google PlusEmail This

Sunday, March 3, 2013

Sunday's Soup


I love the taste combination of sage and cabbage. In fact, I love the taste of sage so much that I grow a big pot each year, harvest it and dry it so that I have it on hand all winter long. So I decided to do a soup in honor of this obsession and it is simply
Cabbage and Sage Soup 
The ingredients;
1 medium head of cabbage chopped
1 1/2 pounds of red fingerling potatoes sliced in 1" rounds
3 stalks of celery chopped
2 large cloves of garlic
2 bunches of green onions chopped
2 large cubes of Knorr Vegetable Bouillon
1/2 cup of chopped parsley
1 tablespoon of dried sage
1 cup of heavy cream
2 tablespoons of olive oil
salt and black pepper to taste
10 cups of water (add 8 cups and then determine how much more will be needed)
shredded asiago cheese for serving
Heat oil in large pot. Add green onions, celery and garlic. Saute on a medium fire for about 5 minutes. Add cabbage, potatoes and water. Bring to a boil. Reduce heat and cook on a low flame until potatoes are tender. Add sage, parsley, salt and pepper and heavy cream. Being careful not to boil, simmer on a low flame for another 20 minutes, stirring occasionally.   
Ladle soup into serving bowls and garnish with shredded asiago cheese.
If you would like a non-vegetarian version, you can fry bacon and add to soup or you can also add ham.
Enjoy!


Share this PostPin ThisShare on TumblrShare on Google PlusEmail This

Saturday, March 2, 2013

Sleeves On Saturdays

This week's sleeve is not as over the top as last week's sleeve was. Those stripes were rather wild and crazy!!! But what a fun sleeve, don't you think?! Although this week's sleeve is a more basic sleeve, it's a wonderful one to have in your arsenal of design possibilities. The design lends itself well to color blocking. We'll revisit this sleeve in the future for other design possibilities. To develop this sleeve I used my basic fitted t-shirt pattern. This sleeve does not need to be made from a knit fabric, but the top is so easy to wear, so a knit makes it all the easier.
The Stylized Dolman Sleeve
Begin with your front and back bodice and match them at the shoulders.
 Draw a guide line out from the shoulder line. This is for the sleeve.
 Match the center of the sleeve to the guide line.
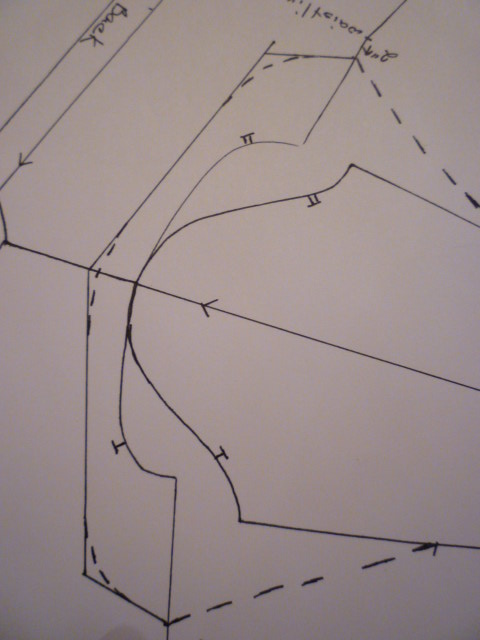
Measure over 1 3/4" to 2" from the shoulder edge on the shoulder line. Draw a line straight down from this point. Measure up 2" from the waist. Draw an angled line from the side seam up to meet the line that was drawn down from the shoulder.
 From the angled line on the bodice, draw a slightly curved line to the elbow area of the sleeve.
Since a curved line in easier to sew than a sharp angle, I curved my lines as you see below. The curved line at the shoulder is a must though as we do not want a sharp point on the shoulder line.
Before we separate the pattern pieces, be sure to add notches to the new seam lines so that you will be able to match your pattern pieces once they are cut apart. You can see the notches on the new seam lines in the picture below.
 The final pattern pieces with grainlines. Be sure to add seam allowances to your pattern pieces!!!
As I said, this is a very easy style to wear, extremely comfortable. If you give it a try, I think you'll love it too!
This will make 27 sleeves to date for this series. I'm having a blast and I hope you are enjoying the series as well. If you would like to see all the sleeves that we have done, you can find them on my Pinterest board here,  http://pinterest.com/sewbussted/sleeves-on-saturdays/. We're past the half way mark!


Share this PostPin ThisShare on TumblrShare on Google PlusEmail This

Friday, March 1, 2013

Fabulous Free Pattern Friday

I was a mess last night trying to remember the name of the tool that I posted just a bit ago. It's a bodkin!! I posted the picture on Facebook and the ladies pounced on it right away and my mind has been put to rest. I'm so grateful! Now that my dilemma has been solved, we can move on to the day at hand. 
Two years ago I was ready to throw in the towel and give up on my blog. I always find it interesting to see how fate will step in just when we need it. A few things happened that encouraged me to continue on, one was a message from Kitty. She had read an early Fabulous Free Pattern Friday post, before I named it FFPF, and made the garment that I had posted. She was so pleased with the outcome. Her message encouraged me to continue on. She also became a friend. We've yet to meet, we don't email on a regular basis, and we've never talked on the phone, but I know she is there and she me. Friendship can take on many forms, but when you know that someone is in your corner cheering you on, regardless of whether or not time has been spent together, they are a friend of the truest kind.
Kitty posted a tutorial on her blog, http://weirwoodstation.blogspot.com/, a few months ago and I loved it. It's a simple bag, it is nothing more than rectangles. How much better does it get? I asked her if she would like to do a guest post on my blog and she happily agreed to do so. The bag is extremely versatile. It can be a lunch bag as it has a plastic lining. It also makes a wonderful makeup bag for traveling. I have it with me now and I love it. You may remember that I was chosen as one of five finalists for the Sew It All contest that will take place this Sunday in Puyallup, WA. Kitty sent the bag to me as a gift and it could not have arrived at a better time. Lucky me!!!  I have not made the bag, but since I have the finished product in my hands, I can say that this is a bag that I'm sure you will get lots of use out of. I am already!! I plan to make a number of these as they will make wonderful gifts.
Enjoy Kitty's post!     

Kitty's Lunch/Makeup Bag

Supplies needed:
2/3 yard of fabric for outside, pocket and handles
1/3 yard of fabric for lining
1/2 yard of iron on vinyl
1/2 yard of craft weight interfacing
2 strips of batting 42" by 1 1/4 inches
Thread
16" or longer zipper

Instructions:
Cut 2 pieces of outside fabric, lining, vinyl, and interfacing 12" by 16". Following manufacturer's
instructions, iron interfacing to wrong side of main fabric and the vinyl to the right side of the lining fabric.
(be sure to read the instructions on doing this if you've never used this product. It could really mess up
an iron.) If you are making this as a purse it's really not necessary to add the vinyl lining.
Make two handles. Cut 2 strips of fabric, 2 1/2 inches by width of the fabric. Cut 2 pieces of light weight
batting 1 1/4 inches by 42 inches. Lay the batting on the wrong side of the handle fabric 1/2 inch from the
raw edge. Press this edge toward the batting, then fold the other side down and turn under 1/4 inch. This
will make the handle 1 1/4 inch wide. Top stitch down the middle. Pin the handle to one side of the
purse, as shown below. Pin 4 inches down. This will be your stopping point. Now stitching from the
bottom up, stitch to this point, pivot, stitch across, then stitch back down to the base.
At this point, top stitch the handles above the bag to match the bottom.
Do the same thing to the other side, but insert the pocket between the handles. Stitch across the bottom
of the pocket before stitching the handles.
Adding a pocket. I added a pocket to one side (shown in photo above). With right sides together, stitch
the top and bottom of the pocket. No need to stitch the sides, they'll go under the straps.
The fabric for the pocket and lining is cut 7 inches by 5 inches. The second photo above shows how to place the interfacing. Press and turn.

Add the pocket under the straps about 1/2" below where the straps are to be stitched on top.

I used a 22" zipper because 1. I had it on hand, and 2. I like a longer zipper for this application. When
inserting it the pull-tab doesn't interfere with the stitching.
Place the lining with the vinyl facing up, then place your zipper along the 16" top edge. Place your
outside fabric face down and line it up with the lining and zipper. Stitch along the zipper, being sure to keep the seam allowance even and not stitching through the zipper teeth. Fold the fabrics back and do
the same with the other side of the zipper. It should now look like this.
At this point, I decided to add a little "handle" to the end of the zipper like you see on men's travel bags.
For this purse, I used an ultra-suede belt that I had gotten at a thrift shop.

This is the loop stitched in place on another bag. I also stitched several times over the zipper at this point
to reinforce it before cutting off the excess. On the other end of the zipper, zip the tab down to the center
of the bag and then holding the edges together, stitch across the ends to secure them, as above. I used the same technique for the belt on this purse.
Next, with right sides together, stitch the bottom seam. I trimmed this to 1/2 inch and then covered it with
a scrap of bias fabric. You could also serge it, but it needs some type of finish.

Fold the sides so that the bottom seam is even with the zipper and stitch across. Do this on both ends being sure that the zipper is not completely zipped. You'll need to be able to turn it right side out after the next step.
Fold each of the four corners as shown. The measurement is 2 1/4" from the tip to the ruler and 4 1/2
inches from edge to edge. Use your cutting board to square it up correctly. I used a ball point pen to
mark the vinyl at this point. This is your stitching line.

Cut off corners as shown.
Turn the bag to the right side.
The final bag, ready to be filled with whatever you wish!
The fabric that Kitty used for this bag is a Kaffe Fasset fabric, really pretty. Make sure you check out Kitty's blog, http://weirwoodstation.blogspot.com/, as she has a number of wonderful tutorials. One of my favorites is an eye glass case which she posted not long after she started her blog. You can find the tutorial here, http://weirwoodstation.blogspot.com/2011/10/eyeglass-case-pattern-part-one.html and here, http://weirwoodstation.blogspot.com/2011/10/eyeglass-case-pattern-part-two.html. This is a two part post.
Thank you so much Kitty for your wonderful post. I loved having you!!



Share this PostPin ThisShare on TumblrShare on Google PlusEmail This