f
Showing posts with label winter hats. Show all posts

Thursday, November 16, 2017

Thrifty Thursday/Super Cute Slouchy Hat

I have done a LOT of dumb things in my life ;) When I was in the 8th grade, I remember one particular day when it was so cold that I thought my ears would literally fall off of my head. Truth be told, had that happened, it would have been my own fault as I was just too vain to wear a hat on my head while walking to school. That day was a game changer though. As I walked, and my ears grew colder and colder, I vowed that I would never be this cold again, and yes, I would wear a hat. 

At the time, hats were just not the thing to wear, but after my experience, fashion or not, I was going to be warm. And so it has been ever since. I LOVE hats!!! If you were to look into my drawer, you would probably think I have more than 1 head since I have as many as I do. I have changed a lot since those days when I thought hats were horribly hideous. Having a hat for whatever the occasion may be is now just absolute fun! And soft hats fold down to nothing, so having a bunch is really not an issue. 

I recently saw a post from On The Cutting Room Floor for a free slouchy hat pattern and thought it was especially cute. A great little hat to wear, and when off, easily folded and stored in a coat pocket. It's intended for knit fabric, be it fleece, wool, or just a knit that you have left over from a t-shirt project. 


There are only 6 pages to print out, so quick and easy.


The pattern looks a little like church steeples to me ;)


I had a sweater that I had felted. I love the color and thought it would make into a fun hat. 


The sweater had side seams, so I couldn't cut the hat in one continuous piece, 


So I just cut it down the center and then added seam allowances to each side. 


I used the hem of the sweater for the bottom band. The instructions say to fold up the bottom 1 1/2". In the above picture, you can see that I placed the pattern right on the edge of the sweater, making it actually an 1 1/2" longer since I would not be turning up the bottom.If you aren't using a sweater with a finished edge, I would add at least 1" to the bottom of the pattern. You can always cut it off if you feel the hat is a little too long. But, it is supposed to be a slouchy hat, so a little more slouch is not such a bad thing :)  


I decided to have a little fun with the hat and add a tassel. All I did was take a piece of my sweater knit and cut it into fringe, leaving about 1 " at the top uncut. I then rolled the fringe around to make a tassel and stitched it securely together at the top. Once it was stitched together so that it would not open up, I then stitched it to the top of the hat.  

This is a very fast project, and something that would make a great, quick gift for just about everyone on your gift list. I made one for my husband, but shortened it so that there was no slouch. He loved it!

You can find the free pattern HERE

I plan on making a few more. A trip to the resale shop is on my agenda. Hopefully I'll find some fun sweaters that I can use. Our church usually has a request for hats, and or gloves at this time of year, so I thought I would use the pattern to make up a bunch. 

Enjoy!
Rhonda    



Share this PostPin ThisShare on TumblrShare on Google PlusEmail This

Sunday, January 31, 2016

The Beret/A Video

Last November, I made this beret pattern available and so many of you have asked for the pattern. Berets are easy to make and fun to wear.
I found this picture and thought I would include it to give you an idea of the comparison of how I wear my beret and how this model is wearing her hat. Her's has not been pulled down quite as far as I have mine. In the video, you'll see why I pull mine down a little more. Both look to be the same size.  
In the video, I also show you a beret that I made out of fur, the real thing. It was left over from a coat that I repurposed. 

Like I said in the video, if you have any other questions, be sure to ask. I'll do my best to answer. 
If you would like the pattern, just email me at sewbussted@yahoo.com and I'll send it your way.
You can find the post I did on fur HERE. There will be more :)


Share this PostPin ThisShare on TumblrShare on Google PlusEmail This

Friday, October 30, 2015

Fabulous Free Pattern Friday/A Winter Hat

The last few days have been really chilly here in Chicago. While I was out for my morning walk yesterday, I kept overhearing people talk about how cold it was. I had to laugh a little, not at them, but our perception of cold. On this side of winter, we all think that 40 is cold. Once we've actually been through the winter months, and we finally get a day that is in the 40's, everyone thinks it's warm!

With the cooler temperatures, I've needed a hat, and as it goes, I can't find my hat, so time to make a new one. 
When I scrolled through the blog to find the hat that I made, I couldn't believe that it was actually 4 years ago. Wow, where does the time go?  
This hat is nothing more than a rectangle. It's a little quirky I guess, but I really like it.You can find the original post and instructions HERE. See the feather in my hair? 

Well, I'm still wearing feathers from time to time and if you look closely at the picture below, you'll see a little blue in my hair. I look at it this way, life is just too short not to have a little fun!
So, this is the exact same hat I made originally. Just a rectangle. In the original post, I instructed you to measure around your head and to not add ease. The hat should have a snug fit. I suggest measuring around your head and then sewing the center back seam and trying on the hat before you progress. I ended up cutting mine down a couple of inches to give a truly snug fit. Some of you may want a looser fitting hat, so just be sure to try it on before you sew the top of the hat together. 
I decided to make one that is a little less quirky, just a rectangle with a circle on the crown.  This is truly a very easy project, perfect for the beginning sewist.
For a medium size head, cut a rectangle that is 
20 1/2" long x 8 1/2" wide 
The measurements include a 1/4" seam allowance for the crown and a 2" turned up hem along the bottom of the hat.
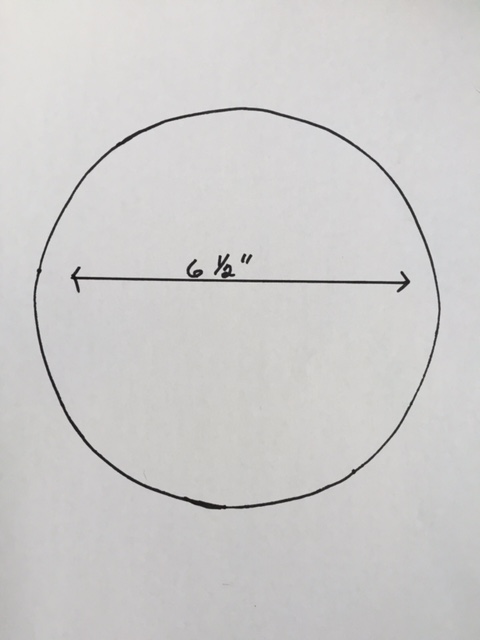
For the crown, cut a circle that is 6 1/2" in diameter. This measurement also includes a 1/4" seam allowance.
The best way to make your crown pattern is to fold a piece of paper into 4ths. From the corner, measure out 3 1/4" as you see below. Cut along the dotted line and you'll have your circle pattern! 
To make the hat, simply sew the center back seam of the rectangle. Then sew the circle to the one of the open ends. finish the hat by turning up the lower edge and stitching it in place. The hat takes no more than 30 minutes to make.
One aspect of the first hat that I really like is that it folds flat. The hat with the round crown will fold flat, but it isn't as nice and neat as the simple rectangle hat.
Whichever hat you choose to make will keep your head nice and warm, so a winner either way.
With Christmas not so far away, the hats make great stocking stuffers! 


Share this PostPin ThisShare on TumblrShare on Google PlusEmail This

Friday, January 16, 2015

Thrifty Thursday

Well, I am a day behind. In my defense, I told you last week that I was sick. I'm still struggling a bit with whatever it is I have. The worst part is an ugly fever blister that is just about to drive me nuts. The mittens that I made for this Thrifty Thursday post came in handy as a great cover up!!
The hat is called the Whirling Hat and I thought it was rather ingenious and cute. Although, I am not the cutest model!!
I found the pattern HERE. The original hat was made form an old wool sweater. I stopped in the resale shop and found a wool sweater that had conveniently for me, been lightly felted. I have a feeling that someone accidentally threw the sweater in the wash and of course it came out too small. Their bad fortune, my good fortune :) Thankfully they had the wherewithal to give it to the resale shop.
The hat can be made from fleece or any stretch knit fabric. She even gives instructions for lining the hat if you would like.
The pattern looks a little like a flickering flame. The shape of the pattern makes the hat automatically fit the shape of the head.
You will cut 6 pieces for the hat. I used the lower edge of the sweater for my cut pieces. This worked out great as I had a nice ribbed edge all the way around the bottom of the hat. 
To sew the hat together, sew 2 pieces together. Repeat with the other 4 pieces of the hat. And then sew the 3 sets together to create the hat.
I rather like the unfinished edge on the outside of the hat, but you could also sew the hat so that the seams are on the inside.
I decided to give my hat a little 1920's vibe with the matching flower. This was made by cutting 6 circles, folding them into quarters and then stitching them together. There are many tutorials on the internet for these flowers. Here's one that you might like to use.
Please forgive my incognito photos. Hopefully, the fever blister will soon be a thing of the past and I will be back to my normal self. In the meantime, I just may see about making another hat as I REALLY like this pattern.
One last thing. If you try the hat on and it's just a little large, you can easily take it up by just stitching in along the opening end of the hat and blending the stitches back in towards the crown of the hat.


Share this PostPin ThisShare on TumblrShare on Google PlusEmail This