f

Tuesday, August 30, 2011

Remember Me?


Last January I sponsored a give away of my first pattern, the above jacket. The pattern was a prototype, no instructions were included, only pictures. My goal was to have feedback from those who received the pattern on how the jacket fit and any changes that those who made it thought I should make to the pattern. At this point, I have only had two who have completed the pattern. Today I am showcasing Nancy's jacket. She did a spectacular job. The above and the next three pictures are the pictures that were received with the pattern. 


And this in Nancy's version!!! Isn't it beautiful?

I especially love her choice for the closure on the vest. Simple, yet lovely, and so perfect with her choice of fabric.


She lined the vest with the silk that she used for the outside of the jacket.
An interior view of the strap that holds the front vest in place.

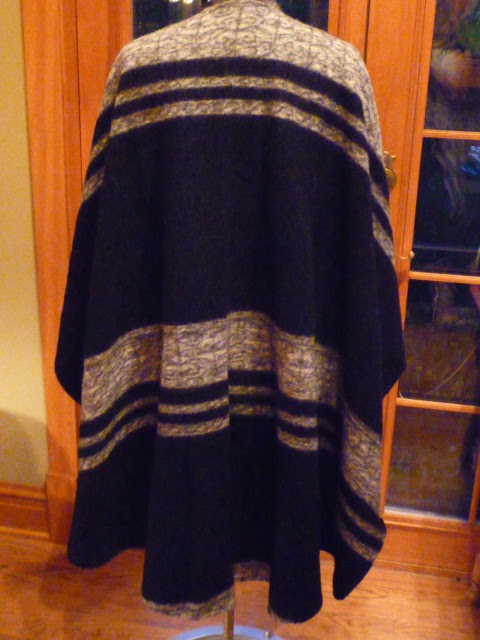
And the back. So pretty.
The good news was that the only trouble she had with the pattern was that she is smaller than she thought (what a problem to have!). The solution to her problem was an easy alteration of just taking in the side seams. Bravo Nancy on such a beautiful jacket and a HUGE thank you for helping me by making the jacket.
Another follower, Brenda has also made the jacket. She and I will see each other next week and I will have a chance to see her finished jacket in person. Her fabric choices were very different from Nancy's. I'll post pictures after I see her.
So when will my patterns be ready? The answer is that I was delayed as I really wanted to get some feedback before I went any further. Now I have at least a little. I have been working on the design of the patterns and developing a logo. I'm happy to say that the logo is almost finished. Although you aren't seeing anything at the moment, progress is being made. So stay tuned!! I'm still moving forward, just a little slower than I had hoped.
I know for myself, when things don't go as I had hoped, it is so easy to say "oh well, it didn't work." Don't ever give up on a dream. I've learned that when I hit an obstacle to just find another way around it.
Have a great day everyone!
Rhonda


Share this PostPin ThisShare on TumblrShare on Google PlusEmail This

Friday, August 26, 2011

Fabulous Free Pattern Friday/Wrap Yourself in a Ruan/Shawl

I love to wear capes, shawls, I'm not actually sure what to call them. As you can see, I have a number of them in my wardrobe. They are super simple to make, and make great gifts as well. I throw them on when I have quick errands to run, especially when I'll be in and out of the car. They are great when the weather is cold enough for something, but not a heavy coat, and they even work over a lighter coat when it is cold out.
The first one is reversible. On one side I did a cream wool and on the other side is a deep heathered green.

The second is a felted wool. This took absolutely no time. What took the most time was deciding where I wanted the stripes to fall. After I cut it, I turned the raw edge back and did a small zigzag stitch along the edge. The stitches melt into the fabric. I would try to show you, but you really can't see them.


The third piece is a double faced wool knit. To finish the edges I first of all rounded them and then cut a piece of boucle knit to bind the edges.


This pattern is really just a rectangle. Very simple. I am going to give you the measurements that I used as the piece is fairly one size fits all. If you are shorter, you will want to shorten this a bit. I am 5'6" tall. The piece falls just about at the back of my knee, a good length for me. So if you are taller, you may want to add a little to my measurement. First you will need 2 1/8 yards of fabric (a little more if you are taller or if you have a stripe that you want to fall a certain way). The fabric needs to be at least 54" wide. In the drawing below I show 27" wide. Remember, the fabric is folded in half.
On the folded edge, measure up 36" and measure in 3". The dotted line I have drawn in will be the front opening.You will want to cut on this line. For the black stripe and the reversible cream pieces, I wanted the side edges to not look so square, so I measured up 6" on both ends and did a slight curve that starts about midpoint of the ends and curves up to the selvage edge. If your fabric is exactly 54" wide and you don't like the selvage edge, just cut it off. A half inch won't make that much of a difference. At this point, cut out your fabric and finish the edges however you like. It's just that simple. In fact, you can draw this on your fabric with a chalk pencil. No need to make an actual pattern. If you would like a rounded edge like I did on the double faced wool, just draw it in. For that piece I rounded all four corners.

Enjoy your new shawl/cape/ruan, or whatever you want to call it :)
Rhonda


Share this PostPin ThisShare on TumblrShare on Google PlusEmail This

Thursday, August 25, 2011

What To Wear To The Emerald City

Another item on my work table. (I finished the felted flowers this morning. I'll post on Saturday.)
A few years ago, I made this dress to wear to a party called , An Evening in the Emerald City. I had the fabric left over from some bridesmaids dresses I made quite a while ago. The bride did not want the fabric back, so I held on to it. When I saw what the party was being called, what could be better to wear to the Emerald City than an emerald dress?

I can be a bit, some would say a lot, crazy at times. For the bustier, I decided to cut strips of the iridescent organza and weave them.
At each intersection I sewed a small crystal bead. The beads are lovely. They are emerald with a hint of navy blue.

The skirt is long with a fishtail back. The outer layer is the iridescent organza and the under layer is satin. When I originally made the skirt, I only lined it. I felt it needed something more. So I decided to add a partial petticoat and I wanted one layer of the ruffles to peak out from the bottom of the dress. The partial petticoat was attached to the lining.

To make the petticoat, I folded the skirt in half and did a rub off of just the lower section of the skirt.
I cut strips of the organza, actually, I ripped them rather than cut them as I wanted a frayed edge. The first ruffle I added goes around the entire bottom edge of the skirt. The second layer goes from one side seam to the other and the third and fourth layer of ruffles graduate in from the second. I did this because I only wanted the back to stand out. 

I wore the dress to the evening reception of the wedding that we attended back in February. My husband and I were having a bit of fun in the castle.

I've worn the outfit a number of times. I especially like that I have separates as the bustier works with other skirts as well as pants.
I've decided that I would like to spruce up the bustier a bit and add a small ruffle to the top and bottom edge as well as a solid line of the crystals along the piped edge. I think it will be a nice edition. 

 
Remember this? It works beautifully with this dress. I'm going to attend a special night at the opera, so other than the addition of the ruffle and the beads to the bustier, I'm ready to go!
A quick tutorial on how to add a fishtail hem.
If you have enough fabric, a fishtail always looks so much nicer than a slit in the back of a floor length skirt.

Begin with a straight skirt pattern.

The fishtail should start about mid thigh. My drawing is a little deceiving. I usually determine the amount that I can add by the width of my fabric. If you have enough fabric, the sweep can be rather large, but basically what were looking for is enough to be able to walk without adding a slit.
From about mid thigh, draw a sweeping line out to as wide as your fabric will allow. You can add a triangle at the hem if your fabric is not quite as wide as you would like for it to be.
Connect the hemline to the line you have drawn out from the center back line. Your line does not have to dip up as mine does in the drawing. Mine is intended for the hem to be the same all around. If you would like a trane, start at the midpoint of the hem of the skirt pattern and draw a line that will dip down to as long as you would like for your trane to be. Your fishtail line will be much longer. Just keep in mind that you will probably have to add a triangle to the centerback seam as your fabric will probably not be wide enough.    

Your finished pattern will look like this.
This is a lovely finish on a shorter skirt as well, especially for dancing.
If you have any questions, email me and I will do my best to answer them.


Share this PostPin ThisShare on TumblrShare on Google PlusEmail This

Tuesday, August 23, 2011

Felted By Mistake

A friend of mine asked me recently if I ever make sewing related mistakes. Well, after last Friday you all know that I can't seem to do simple math at times. Amazing, I can get myself anywhere in an airplane, but divide 4 into 24....oh well. At least my mistake was pointed out and I hope no one relied on my math.
Over the next few days, I am going to post some of the things that are on my worktable at the moment.
Back in the 70's my grandmother made me the most wonderful outfit. She crocheted a skirt and a matching poncho. The poncho was in a fish net pattern with long fringe all along the bottom. I loved it. I think I've always been a bit of a hippy at heart. The bad thing about the outfit was that I was only allowed to wear it to church. What fun was that? I wanted to wear it to school. So needless to say, it didn't get worn out because it just wasn't worn that much. Utimately, styles changed and the outfit went into my cedar chest. At some point I moved it to a trunk that I kept in the basement. In the truck I also kept a quilt that my great-grandmother made and a number of other items that I loved too much to part with. When we moved, I left the trunk in the basement, the building still belonged to us and I had better storage there. At one point we had a new floor poured in the basement which meant that everything had to come out. After everything was put back I couldn't find my trunk. I was so upset, I just knew someone had taken the trunk, it was an antique. The trunk meant nothing to me, the contents were what I cared about. Now, I know, I can feel my mother on my shoulder saying, "if you cared so much about it, why didn't you take better care of it?" Believe me, I beat myself up plenty about it. Finally, I just tried to accept that the things were gone, just gone.
At least ten years passed by. One of our tennents had moved and my husband and I were in the basement. He opened a door to one of the storage lockers and asked, "Rhonda, is this your trunk?" Could it be? I walked over slowly, almost too afraid to look. I felt like I was looking at a ghost, it was my trunk! Now the big question, after all this time, could I possibly hope that my things were still there? I slowly lifted the lid and there before me, just as I had left them, were all my things, my great-grandmothers quilt, my crocheted outfit, an afghan that my grandmother had made, a pillow that I had embroidered. I gathered everything up and cradled them in my arms like long lost friends.
I decided to wash the crocheted outfit, do a little work on it and wear it. After all it was back in style. When I pulled it out of the washing machine, my heart sank, it was wool!!! Thankfully, I have a front loading machine, so it didn't aggitate the outfit as much as it could have, but the fringe was a matted mess. I was so upset, here I lost it, got it back and then managed to ruin it. I decided to just hang it to dry and come back to it a few days later. When I did go back, I took the skirt off the hanger, it fell to the floor. When I picked it up, I thought, if I really felt this I could make it into a purse and I can take the matted fringe off the poncho and turn it into a skirt. So I did.   

(Sorry about the horrible picture, I'm home alone and it was the best I could do.)
I opened the poncho where she had sewed  a seam and made that the opeing to my now skirt.


 This is what had been the original skirt. The bottom of the bag was the waistline.
 I bought cloisonne beads and made handles.
 Here's what I am doing now. I think the purse looks a little like a flower pot, so I thought I would do a "flower arrangment" on the bag. I went to the Salvation Army and bought a bunch of wool sweaters and felted them.
 I am now in the process of cutting out shapes to make the flowers and leaves.
I think it will be rather fun.
So there's always hope. If you make a mistake, just leave it and come back to it later. After all, you can almost turn anything into a purse.


Share this PostPin ThisShare on TumblrShare on Google PlusEmail This

Monday, August 22, 2011

Monday Morning Inspiration

Hopefully we have all survived the weekend!
Today's blog post comes from my heart.
Quite a few years ago I had a tumor in my jaw. It was found purely by accident. A friend of mine was in her last year of dental school and needed to start taking patients. I was game. Dental had just been added to my insurance program (I don't think anyone says this anymore), so why not? Long story short, she found the tumor. I had a number of procedures done to prepare me for the surgery and to save my teeth (good thing). The surgery was horrible, so much more painful than I could ever have imagined. They had to take a good portion of my jawbone as the tumor was larger than they had expected. Two very good things though, after the biopsy was completed, no cancer. The second was that in the history of the dental school, they had never had this situation to deal with, so they told me that my case would be used at this school for all graduating oral surgeons. Rather impressive.
Fast forward a number years. I had begun to have horrible headaches and the joints in my jaws ached all the time. I was sent to see the head of the dental school. When she walked in the room, her eyes twinkled and she said, "so you're the one." She had my case as a graduating oral surgeon! It was very exciting to her to have the opportunity to deal with the aftermath of the surgery. And by the way, she did a phenomenal job, unless I told you, you would never even know that I had any surgery on my face. A little different story if you see my x-rays, I look like the bride of Frankenstein! The preparation for rebuilding my face was a long process. It took a little over a year to prepare and as much time on the backside to heal. During the preparation period, I found out about a class that was being offered called The Artist's Way. It sounded interesting, a class on creativity. Long story short, this has been one of the best experiences of my life. I attended as many classes as I could and did my best to keep up with the weekly assignments. Although it was a wonderful experience, I knew that I didn't get as much out of the class as I could have, so a few years later I decided to work through the book all on my own. This experience has been life changing.
There are a couple of exercises that are a must, you must write, by hand, three pages every morning and each week you must do something that the author calls an artist date. This "date" must be done alone. Now what's interesting is how easy it is to let things get in the way of these two tasks. Once I made the commitment though, it was amazing how much I looked forward to these dates. I've done all sorts of things, some as simple as taking a walk in the park, or treating myself to a long luxurious bath. The writing is quite interesting. The writing is to be done in the morning before the events of the day have started and the writing is whatever happens to be on your mind at that time. You can learn more about this here. I have heard many complain that they just couldn't write three pages. Yes you can. What's interesting to me is that on the mornings when I think I have absolutely nothing on my mind, those are the very days that I learn the most powerful things. It's always amazing where I start, and where I end.
This journey is about righting the past through writing. We have all heard the expression, into every life a little rain must fall. This little saying makes it sound like the rain is just a lovely afternoon shower when the truth of the matter is that the rain is more of a thunder storm that comes in the night,  lightening flashing and everything is so dark that we think we'll never see the light of day. But day eventually does comes and we're left to lick wounds that may heal but leave terrible scars.
Earlier this year I learned the truth about something that I could never figure out. I learned that a person whom I at one time idolized, had lied terribly about me. Once I knew the truth, everything made sense, but it didn't make the situation any easier to deal with. This person should be the person who protects me any any cost, but they lied in order to save themselves. I have a number of paintings that this person created. For so many years, I held on to them convincing myself that someone who could create something so beautiful had to have good in them. There is no good. In May I took all of these paintings down. It was much harder than I could have imagined. These were things that have been a part of my life for so many years and in taking them down, I knew that they never would be again, but I also knew that they could no longer be a part of my life. Hanging on my walls they were like a constant reminder of a person who had caused so much pain in my life. Then came the question, what should I do with them? One friend offered that I should burn them, another suggested that I sell them and do something nice for myself. None of this felt right. It was through my morning pages that I found what felt right for me, donate them to a charity that I love. Tomorrow that is exactly what I will be doing.

A friend of mine signs all of her emails with "I am worthy of my dreams." Yes, she is saying that she is worthy of her dreams, but what I love so much is that she is reminding anyone who reads this that we are worthy of our dreams as well. We are all worthy of our dreams. I once heard that the richest place on earth is the graveyard. Buried there you will find music that was never composed, books that were never written, paintings that were never painted. These precious people bought into the lie that those black storms brought with them, you aren't good enough, you aren't worthy.
Because of the Artist's Way, I began to draw and to paint and to believe that I truly can. I have been invited to show some of my artwork in an exhibit later this year. Exciting. Something that only a few years ago I would never have dreamed possible. And here I am writing to you. Writing is a passion of mine. I love when I'm told, "I can hear your heart."
I hope that by me opening my heart today, that someone will be encouraged. Maybe like me there is something you need to let go of, or maybe there is a dream that you have that for whatever reason you've thought, "I can't." Trust me, you can.


Share this PostPin ThisShare on TumblrShare on Google PlusEmail This

Friday, August 19, 2011

Fabulous Free Pattern Friday....The Circular Skirt


We buy so many patterns that we really don't need to buy, especially if we only knew how easy it is to draft them ourselves. Enter the circular skirt.There are only two measurements needed to draft a circular skirt, your waist measurement and the length of your skirt. There are four basic types of circular skirts, a full circular skirt,  3/4 circular skirt, a half circular skirt and a quarter circular skirt. Of course the full circular skirt is going to be quite full and the other skirts have less and less volume. The equation for the skirts are as follows;
full circular skirt:
waist measurement minus 1 inch divided by 6.
3/4 circular skirt
waist measurement minus 1 inch divided by 5.
1/2 circular skirt
waist measurement minus 1 inch divided by 3.
1/4 circular skirt
waist measurement mutiplied by 2/3.
The 1 inch is not subtracted from the waistline for a 1/4 circular skirt as this skirt is a hip-fitting skirt and the inch is needed for ease over the hips. You can ease the wistline into the waistband or darts can be added to the skirt for a sleeker look.
Today we will be drafting the full circular skirt.
As an example, if your waist measurement is 25", subtract 1 inch and divide by 6. The result will be 4 inches (25 minus 1 is 24. Divide 24 by 6 and the result will be 4").
Determine the length that you would like your skirt to be, we'll use 25".
 On your paper draw a line that is at least 30" long and another line squared that is also at least 30" long. See above.
With our equation, we determined that our 25" waist measurement minus 1" divided by 6 is 4", from the intersection of the two lines you will want to measure down 4". This will give you the curved line that you see in the above picture.

From the dotted line that we drew in for the waistline, we will meaure down 25" or the desired length of our skirt. This will be the second dashed line that you see above.

Remember to add seam allowance then cut out your pattern. It should look like the above pattern piece. You will cut 4 of these for your skirt or if your fabric is wide enough, the center front (and center back) can go on the fold. In that case you will only need to cut 2 pieces.

If you have a piece of fabric with a border print, you can also use it with your circular skirt pattern.

You should layout the pattern on the fabric with the border running as it is in the above picture. You can see from the picture of the skirt that I made up above that when the skirt is sewn, the border will fall against the stomach and then fall along the sides of the skirt. This is really quite attractive.
Once you have sewn the skirt, be sure to allow it to hang for at least 24 hours. This will allow the bias to stretch a much as it will before you hem the skirt. Be sure to have someone help you mark the hem before you hem the skirt or your hem will not be even. Look at the hemline in the picture below. I have not hemmed this skirt yet and you can see how uneven the hem is.


And now for a little announcement. The fabric for the two skirts that you see in the above pictures will be for sell in my new Etsy store (finally!!). You can find my store at http://www.sewbussted.etsy.com/. I will not be posting the fabric until tomorrow(Saturday August 20, 2011). The fabric comes ready to cut into two pieces for a circular skirt. I have one piece of the black tie dye and two pieces of the, as I call it, Sex In The City hot pink fabric. I will include instructions on how to determine your waist measurement. So check in later tomorrow afternoon if you are interested in the fabric. In the above picture I used a second piece of the hot pink fabric to make the hat I am wearing.
So good luck with your circular skirt endeavors. They are really so easy to do and there is absolutely no reason to ever buy a pattern for a circular skirt.
Enjoy.
Rhonda


Share this PostPin ThisShare on TumblrShare on Google PlusEmail This