f

Monday, November 25, 2019

Sunday's Soup/Roasted Tomato and Red Pepper Soup

Happy Monday Everyone!!!
I had intended to get this post up yesterday, but my day simply got away from me. But, rather than wait until next Sunday to post the recipe, I thought I would go a head and share it now. Of course, all of us in the U.S. know that this Thursday is Thanksgiving. If you are looking for a lovely soup to incorporate into your meal, you are a little tired of pumpkin soups, and would like something easy to make, as well as delicious, this is the soup to make!

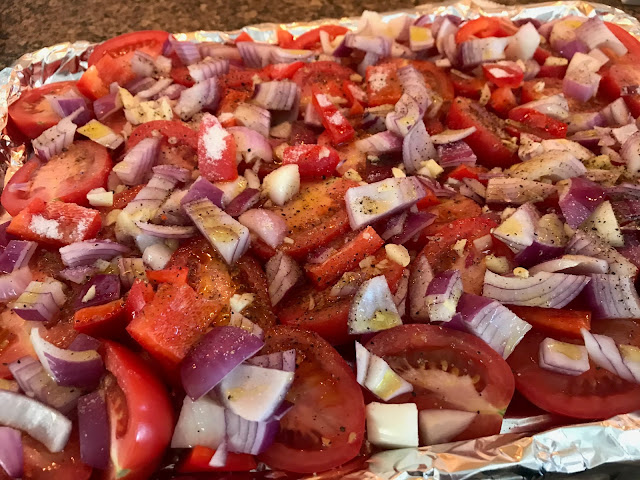
Begin with Roma tomatoes, cut in half and spread out on a large baking pan.


Cut up 2 purple onions, 4 cloves of garlic, and 1 red bell pepper. Spread over the cut tomatoes. 


Sprinkle sea salt, fresh black pepper, 1 tablespoon of sugar, and 1/2 cup of olive oil over the vegetables.


Bake in a preheated 350 degree oven for 1 1/2 hours, or until tomatoes have browned around cut edges. 


Allow vegetables to cool. Place everything in a blender or food processor, and blend until smooth. 
Transfer blended soup to a pot. Add 1-2 cups of vegetables broth. Bring mixture to a boil, and then simmer for a few minutes. Serve with a topping of basil oil. You and your guests will be in heaven! And, since there is no cream, the soup will make your vegan friends and family happy as well! 


Roasted Tomato and Red Pepper Soup
downloadable recipe

Soup Ingredients;

4 lbs. Roma Tomatoes sliced in half
1 red pepper chopped
2 red onions chopped
4 cloves garlic chopped
1 tablespoon sugar
sea salt
fresh black pepper
1/2 cup olive oil
1-2 cups vegetable broth

Basil Oil Ingredients;

1 cup fresh basil
1/2 cup olive oil
salt to taste

For Soup;
Preheat oven to 350 degrees
Slice tomatoes in half and place on a large baking sheet in a single layer. Sprinkle chopped red pepper, onions, and garlic over tomatoes. Sprinkle sugar, salt, black pepper and olive oil over vegetables. Place in oven and bake until tomatoes are golden brown on cut sides, approximately 1- 1 1/2 hours.

Remove from oven and allow to cool. Put vegetables along with all juices in food processor or blender and process until smooth. You will most likely need to do this in 2 batches. 
Place pureed mixture in soup pot. Add 1- 2 cups of vegetable broth to make soup desired consistency. Bring to a boil, reduce heat and simmer until ready to serve.

For Basil Oil;
Place basil and oil in a small processor, or blender and puree until smooth. Add salt to taste. 

Both the soup and the basil oil can be made ahead a day ahead. The soup can also be frozen until ready to serve. 

A note;
Please do not leave out the sugar. The sugar helps to take any bitterness out of the tomatoes.    

For just a little fashion inspiration this morning;
I saw this picture of the gown that Taylor Swift wore to the American Music Awards. LOVE IT!!! For myself, I will make the underskirt longer. While I love the boots, I think I would wear a pair of lovely evening shoes. 


Have a wonderful week!
Rhonda


Share this PostPin ThisShare on TumblrShare on Google PlusEmail This

Friday, November 15, 2019

Books That Will Make You Think

This past week, I received such a lovely email from one of my former exchange students. He is now a married man with 2 children. Hard to believe. He told me that in their home, they have a special wall devoted to family pictures, and among the pictures is a picture of my husband and me. Their daughter is 3, and their son will be 2 in February(they are busy!!!). He told me that he and his wife have told the children who we are, and their daughter will go to the wall, point to our picture and say, "Carl and Rhonda." When I read this, my heart melted.

A while back, I had to run a few errands with a friend of mine. I had told him about a book that I had recently read, and thought he might enjoy. He said, "bring it along, and read it to me while we drive." So, I did. Here was a grown man who listened as intently as a child while we drove and I read. He still talks about how much he enjoyed that day. 
This same friend purchased a book for his daughter for Christmas. Once she had read the book, he brought it to me as he felt it was one that I too would enjoy. The story takes place in Oklahoma during the worst of the dust bowl. It's a fictional story, but it gives the reader a true look at how devastated the people were by what happened. The story is lovely, sad, joyous, and heartbreaking. The author, Karen Hesse writes for children, older children. The book is intended for children 9 and above. I was so taken by the book, and Ms. Hesse's style of writing that I wanted to read more of her work. So today, I am sharing two of her books. 


The first book, Out of the Dust is the one that takes place in  Oklahoma. The second is The Music of Dolphins. I've highlighted both titles so you can easily find them at Amazon. But, my recommendation would be to check them out at the library, read them, and then decide if they are something that you would like to share with your children or grandchildren. 


Both books will take no longer than 3 hours to read. Once I began reading, I did not want to put them down. I hope you'll find the video review helpful in making a decision about whether you would like to read the books. I have enjoyed her storytelling so much so that I am planning to read two others, Witness, a story about the Ku Klux Klan's attempt to recruit members in a small town in Vermont in 1924. The other is A Light in the Storm. It's written as the diary of a child during the civil war, and discusses the true meaning of sacrifice for others. Both prove to be quite powerful.

I cease to be amazed by how a small, seemingly insignificant action can mean so much to another. When my former exchange student left for home at the end of his year with us, I thought I would most likely never see him again. He has now come to a place where he sees his time spent with us as a turning point in his life. "Had it not been for you...," he has said. 

Every moment is precious.

To be human is to live for tomorrow. Why does tomorrow matter? What is important is now. 
From The Music of Dolphins   


Share this PostPin ThisShare on TumblrShare on Google PlusEmail This

Wednesday, November 13, 2019

Gifts/Scarves and or Shawls with a Tutorial

It's that time of year again! 


I don't know where I found the piece above, but I love it! I have never started to make handmade gifts a couple of days before Christmas, but I have bitten off more than I could possibly accomplish :/

I recently received a message from Fabrics-store.com about a linen they carry that's perfect for scarves/shawls. So, I thought I would give it a try. I really do like the fabric. They recommended getting 2 yards for an over-sized shawl/scarf. I would recommend getting 2 1/2 yards. The pieces that I made up are fine, but a little extra yardage would be nice.

I purchased 2 colors, the black and the poinsettia. You can find these and other colors HERE. Remember, you will get 2 scarves out of 2 1/2 yards of fabric.


I was so pleased with the fabric. The scarves below have been washed and pressed. There was very little shrinkage. The only problem is that I want to keep at least 1 for myself...maybe 2.
 

The tutorial was only available through an email, so I have attached it below in the event you decide to give it a try. 
Oversized Linen Shawl - Your Comfort!
  • A neutral and light accessory that can fit in the purse should it not be needed. But, is right at the fingertips to be wrapped around for warmth or to hide from the strong sunshine rays.
  • Something that is low maintenance and can be washed at home in the washing machine - I like my free time spent not running errands to the dry cleaners
  • An exquisite looking item - comparable to brand names that are selling their shawls as I type this for $168 (and theirs don’t even have tassels!)
IL041_Fog_Shawl_Finished

2 yards and about an hour of sewing will make 2 Shawls
( so think of who you can gift one to - the shawls turns out pretty amazing)
Here are the steps to gift yourself and a lucky friend - sun protection, warmth, and convenience - aka - a linen shawl
  1. Pick your color scheme - 2 yards  of the color you like - I went with Fog (picking your color we need to save for last so I can show you the steps to make the shawl :)
  2. Receive the box - we ship your order either same day or the following morning
  3. Find the middle of the width (I folded the cloth in half - selvage to selvage) and pull a thread down the middle of the entire length

    Pull_Thread-Down-Middle
  4. Cut down the middle where you pulled the thread and cut off the selvage

    Cut_Down_Middle_and-Selvage
  5. We need to hem the length of the cloth - fold under 0.25 inches 2 times and stitch

    Fold_Twice_and_Stitch
  6. Unravel the raw edges to make the tassels ( you can also leave it as just fringed without the tassels)

    Fringe_Raw_Edges
  7. Take 10-15 loose threads and bunch them up like a ponytail. Use the nearest thread to loop around the “ponytail” and tie a knot. Do 2 knots on each ponytail/tassel.

    Double_Knot_Tassels
  8. Tassel both sides of the shawl

    Finished_Tassels
  9. Throw in the wash - gentle cycle - cold water. Dry on a delicate cycle with low heat ( iron should you like - the left one is not ironed and right one was pressed)

    Not_Ironed_and_Ironed
  10. Your shawl is ready to be worn and face the summertime with you

    Finished_Shawl

Not only is this an opportunity to take care of your skin and stay comfortable regardless of the weather, but this is your opportunity to have a finished HANDMADE item that would have cost you upwards of $160.
A couple pointers:
- if you are going for sun protection during the day - don’t pick dark colors. They will absorb the heat leaving you hot while wearing the shawl.
- If you aren’t in a tassel kind of mood, you can fringe, but make sure to run a securing stitch so the thread doesn’t keep unraveling.
And now the fun part - click below to find the color you want your shawl to be...
P.S. 2 yards are just the right length for 2 shawls size 27"x70".
This is a very quick project that will keep you looking and feeling fabulous throughout the hotter season.
Plus, this will leave you with a beautiful and useful item that was handmade by you and would have cost you over $160 at a store (these also make great gifts if you decide you want to share).
Don’t forget your 7% discount code ilovelinen at checkout.

You Risk Nothing - if, for some reason, you find the fabric is still sitting in a box a month down the line - simply return it to us with the receipt and we will refund the fabric cost.

I just had to share this! You may remember that I made a poppins bag with fabric that I had printed from a painting that I did last year. I had a little left over, just enough for a king-size pillowcase. 


One day last spring, I came home to find that my poor Gracie had chewed a huge hole in my duvet cover. We had a rain storm while I was out. Why she decided to chew the duvet cover, I have no idea. At least she didn't tear apart the down comforter inside!!! I loved the cover, and decided to see if I could find another. I did! Most of the fabric from the old cover was good, so I saved it thinking that I would find something to do with it. When I realized that I had just enough of my cone flower fabric left for 2 pillowcase tops, I remembered the duvet cover. I now have pillowcases in my very own fabric, and coordinating pillowcases too! Mr. Berkley thinks they're pretty great as well :)     

  
Remember, pillowcases make great gifts too! The children in your life would love a special pillowcase made out of a character fabric. You can also make lovely linen pillowcases and edge them with antique crochet lace. 

Happy Gift Making Season!
Just don't stress yourself out!!!
Rhonda


Share this PostPin ThisShare on TumblrShare on Google PlusEmail This

Tuesday, November 12, 2019

Once You Obtain Tailoring Skills, It's Hard to Let Them Go!

Good Morning from the iceberg we are calling Chicago!!! Wow, is it ever cold!!! At least the sun is shining, so hopefully some of the iced over sidewalks won't be as treacherous as they are at the moment. 

I just have to brag a bit...Mr. Berkley graduated from level 3 to level 4 in his training. I am so very proud of him. Level 4 will be a little difficult as in this level he will have to demonstrate the ability to just walk past another dog without paying attention to them. Berkley is such a friendly guy, and always wants to say hello to other dogs. So, we have our work cut out for us. My goal was to have him complete level 3 by Thanksgiving. My next goal is to have him complete level 4 by Christmas. The challenge is on!!! :)

I apologize for being so delinquent from the blog. Just a lot on my plate. But, I am happy to say that my husband has healed from his broken leg, and is back to his normal activities. I've also been doing quite a bit of flying. I needed to do some currency work, so that has taken a good bit of my time. On my last flight, as I came in to land, even if I say so myself, it was a beautiful landing, a true greaser. The flight instructor said, "Do you do that just to impress me? Believe me, I'm already impressed!" Made my day :) 

Now, back to a little tailoring.
What I have learned about advancing your skills as a sewist, once you learn how, it's difficult to go back. 

I am putting together the Box Blazer pattern from Pattern Union. It's an unstructured, unlined jacket, but with tailored details.    


Here's the lovely Sarah in her creation.


The jacket was designed to be quick and easy to make, but...

As you can see, I have underlined the pieces with cotton batiste. I love cotton batiste for underlining wool. If you decide to use cotton batiste, be sure it is cotton batiste and not quilting cotton. Cotton batiste is a very fine fabric that works beautifully as an underlining.


Here's my jacket in the early stag of construction. I will be using horsehair interfacing for the collar and lapels, and I will also use the horsehair interfacing in the hem of the jacket and the hem of the sleeves. Using horsehair in the hems makes all the difference in the world as it makes the hems hang so beautifully. I wanted you to see the jacket at his stage as once the horsehair interfacing goes in, you'll really see the difference. 


The jacket was designed to be unlined, but...I need a lining :) I found this beautiful piece of silk charmeuse. How pretty will this be?!!   


The next step will be to do the bound buttonholes, and then the collar and facing will go in. Can't wait to get it finished!

Lots more tailoring will be following!
Have a wonderful day!
Rhonda


Share this PostPin ThisShare on TumblrShare on Google PlusEmail This

Sunday, November 3, 2019