f

Wednesday, September 30, 2015

My Bags Are Packed!

The final post for the Sew News Grainline Studio Portside Travel Set sew along is up on the Sew News blog and you can find it HERE

I had such a good time putting the bags together. And even better, I now have 2 sets to choose from. So depending on my mood....or my traveling outfit ;), I'm all set.  Believe it or not, I actually have a pair of boots that match the first set I made!!! Now that's coordination :)

My finished sew along set below. I am super pleased with how the bags turned out. Love the distressed leather and how well the Amy Butler fabric coordinates with it.
In the post, I did my best to walk you step by step through the process of creating the adjustable strap.
It's just a bit tricky, just give it a try and I think you'll figure it out.

Christmas is just around the corner, and since the bags are great for men and women alike, and since they go together so quickly and easily, you just might want to consider doing a few as gifts. But then, you might be like me and just decide to keep them all for yourself!!!

If by chance you would like to make the bags up at a later date, here are the links to the sew along posts,
Week 1 HERE
Week 2 HERE
Week 3 HERE
Week 4 HERE

Thanks so much for following along.
Rhonda


Share this PostPin ThisShare on TumblrShare on Google PlusEmail This

Tuesday, September 29, 2015

A Must Read

A little over a month ago, I read a book excerpt in Vogue magazine that intrigued me like no other article has ever done. The book is entitled, In The Skin Of A Jihadist. After reading the excerpt, I went to Amazon and read the reviews, they all concurred that it is a riveting story. So I decided to check it out of my library rather than purchase it. No copies were available, and I was 5th in line for the next available book. I thought to myself, "oh great, it'll be Christmas before I see a copy." Since I was in the middle of reading a couple of other books, I decided that I could wait, and if it didn't turn up, I could always purchase a copy. To my surprise, the book was available in less than 3 weeks. Now I know why. It is the most riveting, compelling story that I have read in sometime, possibly ever. The book arrived just before I left for Maine, so I decided to take it with me and read it while I was away. Before I packed the book, my husband was able to read maybe the first 10 pages. I was instructed to  "please don't forget that book as I can't wait to read it." 
The story is the true account of a French journalist who wanted to know why so many young people, male and female alike, are leaving France, going to Syria and joining ISIS. 
There is nothing gruesome in the book, at least nothing more than we've heard on the news. At one point, as the investigation began to fall apart, I was screaming in my mind, "ABORT, ABORT, ABORT!!!!" I knew that the journalist lived, after all, she wrote the book, but I was so afraid of what might be about to happen to her. 
After I finished the book, all I wanted was to be able to talk to someone about what I had read. But no one I know had read the book, and if I talked to anyone, I would spoil the story, so I had to keep my mouth shut. Once I was back home, my husband grabbed the book and finished it in less than 24 hours. I was so happy to finally be able to talk about what I had read. I made the comment that I thought that everyone should read this book. My husband is usually not as passionate as I am, but he quietly shook his head and said, "yes, I agree." 
You can find the book HERE on Amazon. Read the reviews and make your own decision about whether to read it or not. You can also see a video interview that was done with the author HERE
After reading this book, I thought about how prior to September 11th, I knew about Iraq, Iran, Syria, but it was there, not here. And then in the blink of an eye, 2 planes were flown into the World Trade Towers, another into the Pentagon and the last, thanks to some very brave people, was flown into the ground. From that moment on, our lives changed and it's no longer just there, but here. After I read the book, I remembered something I was told a long time ago, "if those who are against you take the time to know who you are, you too must take the time to know who they are."  


Share this PostPin ThisShare on TumblrShare on Google PlusEmail This

Monday, September 28, 2015

Monday Morning Inspiration/Andrew GN

"We need happy clothing."
Andrew GN

There's one thing I always look forward to on Wednesday morning. As you know, I love to laugh, and I know that every Wednesday morning there is going to be a little email that will lead me to a post that's always a lot of fun and that's Wearable Wednesday from Pretty Grievances. Her imaginative wit is incomparable. If you love to laugh, or just be shocked, be sure to check out her Wearable Wednesday posts if you haven't done so already.
The Wearable Wednesday posts typically showcase some of the worst ideas in fashion. But last week, that wasn't the case. I had not heard of Andrew GN and from what I saw, I wanted to know more. So off I went to search for the collection. Everything I saw was beautiful, from embroideries to a wonderful mix of patterns and fabrics. This collection is from his Resort 2016 line. Sadly, I wasn't able to find a video of the fashion show, but I did find a video of  his Spring/Summer 2015 collection. It's fresh and to quote Andrew, it's "happy clothing."
So take a look. I am absolutely infatuated with his coats.


The front panels on the coat below would make for a fun piecing project.

This baseball jacket below with the lace accents is fresh, feminine, and I want one!
And now for a little evening gown amazement.


You can find more of the line HERE on Style.com.
And take a look at the video below. It's only a little over 4 minutes long, so it won't take a lot of time, and you can fast forward through the initial makeup section. Some great skirts and lovely embroideries.


Now, go throw on something happy and make it a great week!
Rhonda


Share this PostPin ThisShare on TumblrShare on Google PlusEmail This

Sunday, September 27, 2015

Sunday Night Reflections


What if you gave someone a gift, and they neglected to thank you for it - would you be likely to give them another? Life is the same way. In order to attract more of the blessings that life has to offer, you must truly appreciate what you already have.

Ralph Marston


Share this PostPin ThisShare on TumblrShare on Google PlusEmail This

Eating For Your Future/Afghan Cauliflower with Tomato Sauce

There is an amazing Afghan restaurant near Chicago called Kabul House. One aspect of their menu that I especially enjoy is that they have a number of vegetarian dishes. One that is a favorite is a baked cauliflower dish. I love it so much that I decided to come home and try and find a similar recipe. My search lead me to a recipe that I love even more than the dish at Kabul House. It's called Gulpea, or Cauliflower with Tomato Sauce. This is one amazing recipe! If you like cauliflower, even just a little, I think you'll really enjoy this dish. The sauce is out of this world. The recipe was found on the Saveur website. If you enjoy Middle-Eastern food, or just food in general, by all means, stop by the website and see all the interesting recipes that they have to offer.      

Ingredients

5 cloves garlic, peeled
4 medium vine-ripe tomatoes, cored
12 cup canola oil
2 small yellow onions, cut into ¼” dice
1 tbsp. ground turmeric
1 tbsp. kosher salt
14 tsp. ground coriander
1 tsp. freshly ground black pepper
2 small heads cauliflower, cut into large florets
1 large jalapeño, stemmed and sliced ¼" thick

Instructions

Purée garlic and tomatoes in a blender; set aside. Heat oil in an 8-qt. Dutch oven over medium-high. Cook onions until slightly caramelized, 10–12 minutes. Stir in turmeric, salt, coriander, and pepper; cook 30 seconds. Add reserved tomato mixture; cook, stirring occasionally, until thickened, 10–12 minutes. Transfer half the sauce to a bowl. Fit cauliflower, stem side down into pot; pour reserved sauce and ½ cup water over top. Top with jalapeño; boil. Reduce heat to medium-low; cook, covered, without stirring, until cauliflower is tender, 45 minutes to 1 hour.
The dish takes a little bit of time to make, but it is well worth the effort. Above you can see my cauliflower just prior to putting the lid on and allowing it to cook for the 45 minutes.

I felt that I wanted something a little heartier than just rice to go with my cauliflower dish, so I made a side dish using Italian Farro. Farro has a hearty, nutty taste and it's a great source of protein.

Italian Farro with Vegetables

8 oz, farro
1 tablespoon olive oil
1 medium onion finely chopped
1 large carrot finely chopped
1 stalk of celery finely chopped
1 clove garlic chopped
2 tablespoons tomato paste
1 cup finely chopped kale
2 to 4 cups of water or vegetable broth
salt and pepper to taste

Begin by cooking farro according to package directions.
Heat oil in saucepan, add onion, carrot, and celery. Cook until tender. Add chopped garlic and saute for approximately another minute. Add tomato paste, cooked farro and kale, stir well to combine. Add salt and pepper to taste. Add water or broth. Begin with 2 cups and add more if needed. Bring to a boil, reduce heat and cook and water has been absorbed.

I actually made both the cauliflower and farro last Sunday. The farro became my go to snack throughout the week. It was so good and so satisfying.
If you decide to give it a try, I hope you enjoy both dishes as much as I did.


Share this PostPin ThisShare on TumblrShare on Google PlusEmail This

Friday, September 25, 2015

Sewing Indie Month/Pattern Hacking the Spearmint Coat

Sewing Indie Month is almost over!!! Where has September gone??? Although September will end, I've decided to keep the pattern hacking posts coming, at least for a while as there are a number of things that I would like to do and I think it's always fun to see how a pattern can be stretched to so many other possibilities.
Now on to the big project for this month. You'll remember that this is how my Spearmint Coat from Lolita Patterns began. Again, so sorry for the wrinkles. You would think that I don't own an iron!
My issue with the collar and neckline is that it's just too low and too open for wearing during the many cold weather months that we have here in Chicago. 
In order to keep the coat and save the day, I used the existing collar pattern, but re-draped the lower portion of the collar. In case you missed it, you can see that post HERE.
I had hoped to have the collar completely finished this week, but I have yet to find buttons. I'm headed out today on a button finding safari, so maybe I'll be in luck. 
I decided to go ahead and baste the collar together so that you could see what the collar will actually look like. It's a little difficult to get a true impression with muslin. I'm very pleased with the collar. In order to keep the collar closed, I will be adding loops where you see the pins and the buttons will run along the edge of the collar and then down the center front of the coat. There are 4 pins in the collar, but I think I will only have 3 loops and corresponding buttons.
 The back of the collar lays beautifully over the back.
 What the collar will look like when left open.
I decided to go all out wild with the lining and use this vintage piece. Hey, we need a little pop of color here in the winter! The days can get awfully gray.
 A peek inside the pockets.
I decided to make one small change to the collar pattern before I cut it out. As you can see, the edge of the collar flattens out a bit, so I decided to add a curve to that edge. A minor change, but one I felt would enhance the way the collar lays across the back and shoulder.
Be sure to head over to the Sew Independent website and check out the posts from Mary of Idle Fancy who is heading up the Everyday Casual category and Laura of Lilacs and Lace who is heading up the Dressed to the Nines category. 
Have a wonderful day!
Rhonda


Share this PostPin ThisShare on TumblrShare on Google PlusEmail This

Thursday, September 24, 2015

The Grainline Travel Set Duffle Bag

Until I started working on the Grainline Studio Portside Travel Set for Sew News, I had no idea how much fun it could be. As I said last week, I am now addicted to making the little dopp bags. They are fast, easy to make, and they are so cute once finished. Guess what my husband is getting for Christmas. Shhh, don't tell him ;) I've watched how he looks at the 2 that I have made so far and I can tell that he would really like to have one, but doesn't want to ask. So it will be a nice surprise unless he reads this post!!!
In the inspiration post I did a few weeks back, I showed you how the sky is really the limit when it comes to making your own duffle bag. It can be sleek and sophisticated, or as unique as the one I showed you that was made out an old coffee sack. 
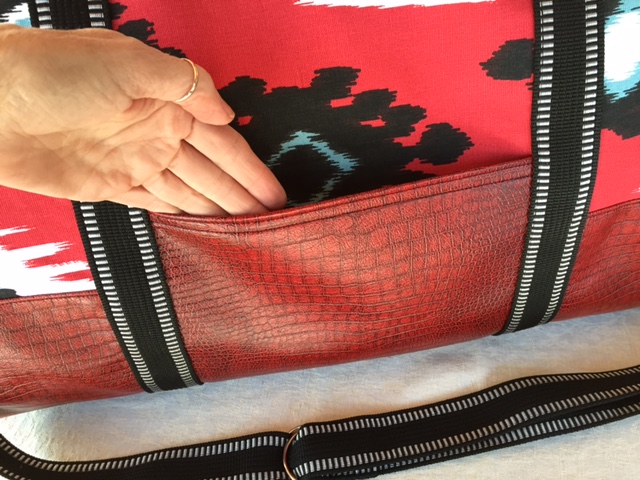
I purchased the fabric below at a little shop here in Chicago called The Needle Shop. It's a small shop, but they have some wonderful pieces. The embossed faux leather was a piece that I purchased at a home dec store in Houston, Texas. If you are ever in Houston, be sure to check out some of the home dec fabric stores as they are amazing. Home dec fabric stores can be a great fabric resource for bags, coats, jackets and even skirts.
The Portside duffle bag is well designed and I especially like the fact that you are instructed to stitch over the webbing and create handles. If really gives the hand a break when carrying the bag.
The bag also features a great side pocket, perfect for storing things that you need quickly, like a boarding pass. And you'll see that creating the pocket is an absolutely no fail process. I really like no fail processes :)
In this week's sew along post, we are putting the duffle bag together. As you can see, it's basically a layering process, so it goes together very systematically, i.e., no fail!  
If you choose a fabric with a pattern, it's really quite easy to keep the pattern aligned as you insert the zipper.
You can find this week's sew along post HERE on the Sew News blog. And if you have not picked up your pattern, you can find it HERE.
Happy Sewing!
Rhonda


Share this PostPin ThisShare on TumblrShare on Google PlusEmail This

Tuesday, September 22, 2015

Buttonhole Inpsiration

I'll never forget the first time I attempted to make a bound buttonhole, I think I was maybe 13 years old. It was a disaster!!! Well, disaster or practice, whatever you want to call it, it was awful. But, I was determined. Bound buttonholes are now one of my favorite things to make. They can be a distinctive or fun design detail, or just give the look of a well made garment.
In THIS post, I took you step by step through the process of making a bound buttonhole. We talked about making bound buttonholes for larger buttons, like the one below,
 and I showed you how to make a triangular shaped buttonhole.
In THIS post, I gave you a little inspiration. Another triangular shaped buttonhole with bow buttons. Fun!
In that same post, I showed you this triangular shaped buttonhole with the bias accent. So special. You can find the original post for this buttonhole HERE.
Now, whenever someone is inspired by something I've posted, I love to share their work. About a week ago, I received a message from Karien who lives in The Netherlands. She had made a lovely round bound buttonhole. Take a look.
She mirrored the shaped of her button. Take note of the fine stitching around the buttonhole. So nice. I also need to comment on the lace overlay. Now this was an ambitious project.
In the above picture, the button has been put through the buttonhole and lays nicely to the side which makes for a great accent. I so love this detail.
Thanks so much for sharing your work Karien!!! You've been an inspiration to me and I'm sure countless others.

There's a great tool that Dritz is once again making, The Bound Buttonhole Tool. You can find it HERE on the Joann Fabric website. By the way, it's on sale, so if you would like to have one, now's the time to get it. The tool will not make the shaped buttonholes, and if you would like a larger lip for a big button, you'll need to make the buttonhole without the tool. I do have this tool and I absolutely love it. It's great for making fine bound buttonholes. In fact, I have had mine since that fateful experience when I made my first disastrous bound buttonhole all those years ago :)


Share this PostPin ThisShare on TumblrShare on Google PlusEmail This

Monday, September 21, 2015

Hacking Made Easy With a Free Pattern

Happy start to the week!
I'm back from my trip to Maine. What a glorious week I had. The trip not only feed my body, but my spirit. I'll post more about the trip in another post. 
I had hoped to post this last week, but internet reception was a bit spotty at best. In order to call my husband, I actually would go out on the fire escape and stand facing the cell phone tower. Sometimes it worked and sometimes it didn't. 
I was introduced to Waffle Patterns last year during Sewing Indie Month. I really like Yuki's patterns. They are easy to make, the instructions are very well laid out, and the designs are fun, hip, and on trend. One aspect of her patterns that I especially like is that they are layered. All of the sizes are printed on the pattern, but before printing, you can actually choose the size that you would like to make and then  just print out that size. Wow, no going blind trying to cut on the correct size line!!! Or, if you are one size on top and another on the bottom, choose the two sizes and print out just the two. It's a great feature. 
The Zippered Blouson is part baseball jacket and part motorcycle jacket, but with a very soft edge.
When using a Waffle Pattern, be sure to look closely at the pattern dimensions as they are quite generous in ease. For instance, the size 40 has a 36" bust, but the finished measurement is 42". That's a full 6" of ease. So depending upon how you like your clothes to feel on your body, you may want to go down a size.

For those of you who would like to try a little pattern hacking, but feel a little intimidated, Yuki has made it easy with her free add on hood pattern for the Zippered Blouson. You can find the free pattern HERE. The hood is a three piece hood. Sit's beautifully on the head and looks great when it's down and laying across the back. I have made her hood pattern and I really like it. 

Yuki posted this option of the Zippered Blouson. I absolutely love the faux fur collar.
If you think that you would like to give a little pattern hacking a try, but with a guiding hand, you can find Yuki's Zippered Blouson pattern HERE.
If you do give the pattern a try,be sure to read about the layering of her patterns and just print out the sizes that you would like. As I said, it really is a great feature. 
Have fun!


Share this PostPin ThisShare on TumblrShare on Google PlusEmail This

Sunday, September 20, 2015

Sunday Night Reflections


Remember,
A boat doesn't sink because of the water that's around it,
It sinks because of the water that gets inside.


Share this PostPin ThisShare on TumblrShare on Google PlusEmail This

Friday, September 18, 2015

A Postcard From Maine

Good Morning from Monhegan Island, Maine! I arrived last Sunday, and now I leave tomorrow. How can time go by so quickly? The trip has been enchanting, peaceful, inspiring and restorative. I've hiked, attended yoga classes, knitted, did a lot of writing, saw an art exhibit, and even got in a little reading. So this morning, I thought I would share just a few pictures. I've taken a ton. I won't bore you with too many :)
Yesterday I hiked the entire circumference of the island. The picture below is from that hike.
There are also interior trails that are absolutely enchanting.
Beauty is everywhere. I loved how someone took the time to make a little arrangement on the fungus that was growing out of the tree.
The church. 
 Morning light.
 A cat that accompanied me for a walk.
Monhegan is called the artist's island and art can be found everywhere. 
As I said,I have gotten in a little knitting. Nora Gaughan has been our instructor, and she is so inspiring. This piece is from her sampler class.
And then for a crazy picture of me. From yesterday's restorative yoga class.
Have a lovely day and I hope that you will find something to help restore your soul today.
Rhonda


Share this PostPin ThisShare on TumblrShare on Google PlusEmail This