I hope your Saturday is off to a great start. I'm on my 3rd cup of tea and listening to some great music. We have a wonderful radio station here in Chicago called WXRT. On Saturday mornings, they have a featured program called The Saturday Morning Flashback. Every Saturday morning, they flashback to a year gone by. Today is 1968. The music is fabulous. I was a little girl at the time, but I loved listening to my radio. I also loved everything about the fashion of that period. I wasn't allowed to wear much of what I liked...but I dreamed of a time when I could :-).
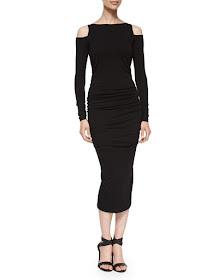
I received a message from a lovely lady who lives in England asking if I could help her with a cold shoulder sleeve. I thought it was a typo, maybe she meant a bold shoulder??? Nope, she meant cold shoulder. Since I had no idea what a cold shoulder sleeve would be, she sent along a picture. Once I saw the picture...ohhhh.
This is a very easy sleeve to do. In order to get the fit that is in the picture above, the garment must be made in a knit fabric. Begin with a t-shirt pattern, or a knit dress pattern.
Here's my sleeve.
If you'll notice in the inspiration picture, the shoulder is cut away a little. In order to give a little hint of a cut away shoulder, but still be able to wear a normal bra with the top, I came in 1" from the shoulder edge and blended the line back to the notch.
And I did the exact same thing to the front of the pattern. I did not cut the seam allowance off the armhole of the pattern. Once I drew in my new style line, the pattern was cut on the new line.There will be no need to add seam allowance. Now for the sleeve.
Square a line across the top portion of the sleeve from the front notch to the back notch.
The front and back notches on the sleeve should be approximately at the point where the armpit hits the chest. I think the top line of the sleeve should be a bit higher, so I came up 1/2" from the notch line.
You could come up a little higher if you wish. In the picture below, my ruler is sitting 1" above the notch line. I felt that this was a little too high, but you are the designer, so you get to decide what you like best :-) Remember, you can always cut away the excess, but adding it back can be a chore, or maybe impossible.
Once you have determined where the top of your sleeve should be, find the middle of the sleeve and place a mark at midpoint. From that point, measure down from the midpoint 1/8". Draw a slightly curved line back to the edge of the sleeve.
Add 1/4" seam allowance to the new style line.
Now cut away the top of the sleeve.
There are a number of ways that the top of the sleeve could be finished. I opted to cut a 1" wide strip and sew it to the top of my sleeve prior to setting the sleeve into the top.
This gave a small casing just in case I wanted to add a touch of elastic. It wasn't necessary, but it's nice to have the option.The neckline was finished in the same manner.
I have not finished the shoulder edge, but I will be adding a strip to the edge of the shoulder as well.
My almost finished top.
The sleeves on most t-shirt patterns have ease from the armpit to the wrist. Keep this in mind with your sleeve as you may want to taper the sleeve to achieve a more fitted look.
As I said, the sleeve is quite easy to draft. It's rather fun to wear too. Think about maybe wearing it under a jacket. The of element surprise when you take your jacket off would be such fun!!!


Rhonda darling,
ReplyDeleteThank you so much for this posting. As usual, your instructions are so easy to follow..................Don't I just wish some expensive sewing books made such sense on the first time of reading!!
I really hope other followers of your blog enjoy this, as "cold shoulder" is in and Spring/Summer is just around the corner.
Would love to see you modelling some of your recent makes. Your cold shoulder top looks beautiful, and I know the colour will look amazing on you.
Happy weekend Rhonda.
I love this sleeve! It would really glam up a simple knit dress. Thank you for the tutorial!
ReplyDeleteLooks like something fun to try. Thanks for the tutorial.
ReplyDeleteAnother great tutorial and another one to keep. Thank you so much
ReplyDeleteLove this! Thank you so much!
ReplyDeleteLove this! Thanks, Rhonda, and thanks to Marysia for suggesting it.
ReplyDeleteGreat post, Rhonda! Thank you!!
ReplyDeleteThat sleeve would look great on you :)
DeleteWow, love this kudos!
ReplyDeleteEstupendi Rhonda, muchas gracias!!😘
ReplyDeleteDe nada! 😊
Delete